Everything You Need to Know About Installing Wafer Lights with a Rough-In Plate
Lighting installation has come a long way, especially with the rise of ultra-thin recessed lighting options like wafer lights. These sleek, low-profile fixtures are changing the game for homeowners, electricians, and DIYers looking for elegant ceiling lighting without the bulky housing of traditional can lights. But as simple as wafer lights are to install, there’s one component that often causes confusion—the rough-in plate.
If you're planning to install wafer lights and wondering what a rough-in plate is, when to use it, or how it helps your installation, you're in the right place. In this article, we’ll break down everything you need to know about the wafer light rough in plate and why it's a must-have for many lighting projects.
What Is a Wafer Light Rough-In Plate?
A wafer light rough-in plate, sometimes referred to as a mounting plate or template, is a flat metal or aluminum bracket designed to mark and reserve the spot for your wafer light fixture during the rough-in stage of construction. It essentially serves as a placeholder before the drywall is installed.
Unlike traditional recessed light cans that require housing boxes and bulky installations, wafer lights are slim enough to fit in tight ceiling spaces—even under joists. But just because they’re slim doesn’t mean you can skip planning ahead. The rough-in plate gives you a reliable, standardized way to prep your ceiling openings for an accurate, aligned installation.
Why Use a Rough-In Plate for Wafer Lights?
Many people ask, “Do I really need a rough-in plate for wafer lights?” The short answer: it depends—but in most new constructions or major renovations, yes.
Here’s why a wafer light rough-in plate is so useful:
 Precise Placement

It ensures consistent spacing and alignment between fixtures. This is especially helpful when installing multiple lights in a series along a hallway or kitchen ceiling.

 Simplified Drywall Work

The plate gives drywall installers a clear indicator of where each fixture should go, preventing misalignments or the need for last-minute adjustments.

 Code Compliance & Safety

In some regions, building codes require fixture placement to be planned and documented before the ceiling is enclosed. Using a rough-in plate supports these inspections.

 Easier Retrofits

Even for remodels or retrofits, rough-in plates can be used as guides to help measure and cut clean holes in existing drywall.
When Should You Install the Rough-In Plate?
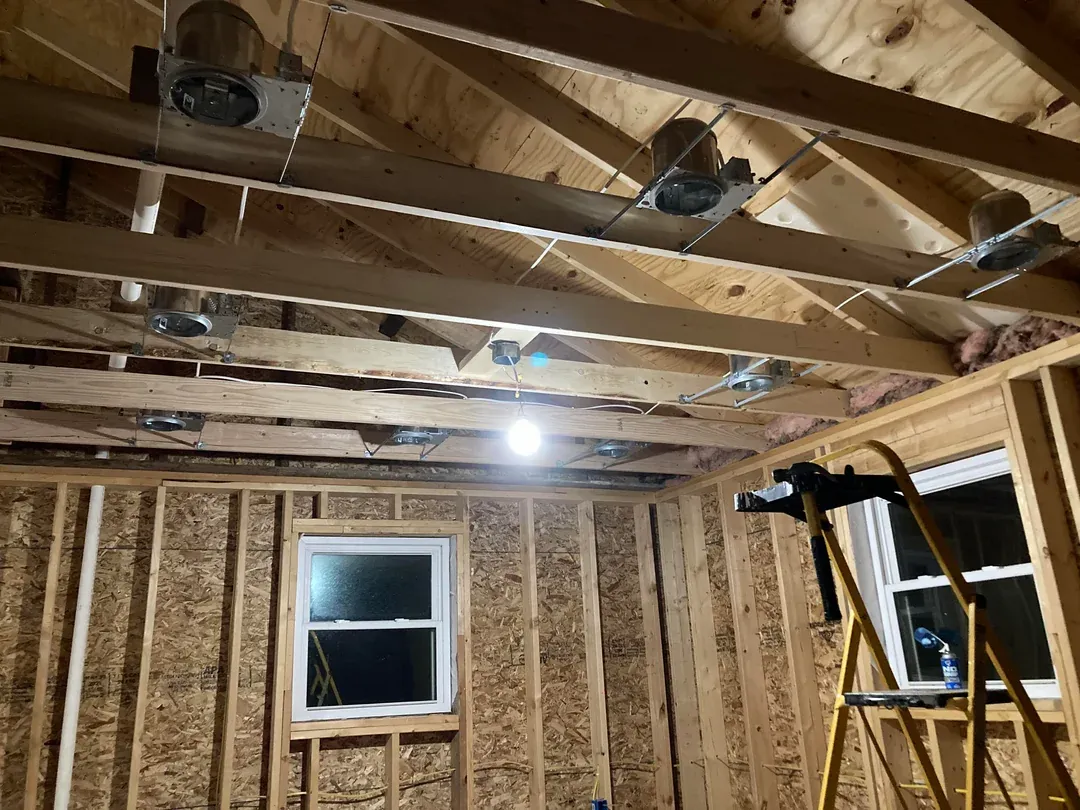
Rough-in plates are typically installed during the “rough-in” phase of construction—after framing but before insulation and drywall. This is the time when all your mechanicals (electrical wiring, HVAC ducts, and plumbing) are being laid out. That makes it the ideal moment to place and secure your wafer light rough-in plates.
To install one:
Measure and mark the spacing between lights based on your lighting layout.

Secure the rough-in plate between ceiling joists using screws or adjustable brackets.

Pull your electrical wiring to the center of the plate’s cutout area.
Once drywall is installed, you or your electrician can easily cut out the circle using the plate’s visible outline and connect the light.
Key Features to Look for in a Wafer Light Rough-In Plate
Not all rough-in plates are made the same. Depending on your wafer light brand and the size of your fixtures (common diameters include 4", 6", and sometimes 3" or 8"), you'll want to pick a plate that’s compatible.
Here are some important features to look for:
 Correct Hole Size
Match the rough-in plate's cutout to your wafer light’s trim size.

 Material Durability
Aluminum plates resist corrosion and hold their shape better than flimsy templates.

Adjustable Mounting
Some plates come with sliding arms or adjustable ends to fit various joist distances.

Laser-Etched Guides
Helps installers align multiple plates uniformly, keeping everything symmetrical.
Pro Tip: Use the Same Brand
If you’re buying wafer lights from a specific brand, check if they offer their own rough-in plates. Matching accessories usually ensures compatibility and reduces installation errors.
Who Typically Uses Rough-In Plates?

 Homeowners doing full gut renovations

 Electricians working on new construction

 DIYers wanting cleaner, more professional installs

 Contractors coordinating between framers, drywallers, and electricians
If you're just replacing a single light in an already finished ceiling, you probably won’t need one. But if you're working on a larger lighting layout or starting from scratch, rough-in plates are a lifesaver.
Step-by-Step: How I Installed My Wafer Lights Using Rough-In Plates
I recently renovated my home office, and adding recessed lighting was high on my list. I opted for 4-inch wafer lights—sleek, minimal, and dimmable. Here’s how I used rough-in plates to make the install easier:
I laid out my lighting plan using graph paper and ceiling measurements.

I purchased matching rough-in plates for my wafer lights online.

After framing, I mounted the plates with self-tapping screws between the ceiling joists.

I pulled Romex wiring to each plate location and left extra slack for later.

Once drywall was up, cutting out the holes was as easy as tracing around the plate.

After finishing, snapping the wafer lights into place took less than five minutes per light.
The final result? A clean, symmetrical grid of lights with zero measuring headaches post-drywall.
Where to Buy Wafer Light Rough-In Plates
Many lighting retailers and home improvement stores carry these plates. But if you're looking for high-quality, reliable options, check out trusted online suppliers that specialize in lighting accessories. One reliable place to find rough-in plates for different wafer light sizes is Comiled’s rough-in plate collection.
You can often buy them in multi-packs to save money if you’re doing a whole room or multiple installations.
Final Thoughts
Installing wafer lights is one of the simplest ways to modernize your home's lighting, but that doesn’t mean you should overlook the prep work. A wafer light rough in plate is one of those tools that may seem small but makes a massive difference in how professional and pain-free your installation turns out.
Whether you’re an experienced electrician or a confident DIYer, using a rough-in plate helps ensure your lighting is aligned, code-compliant, and easy to install. It’s a small step that pays off in big ways.