Creating To-Do List Web Application | Vue.js 2 & Materialize CSS - Part #2
Repository
What Will I Learn?
- You will learn about List Rendering Concepts.
- You will learn about Replacing an Array.
- You will learn about Mutation Methods.
- You will learn about
v-forfunction. - You will learn how to create To-Do application with using components.
- You will learn how to use
:keywithv-forfunction. - You will learn about
splicemutation method. - You will learn about
pushmutation method. - You will learn about
@submit.preventfeature. - You will learn about script must be a function rule.
- You will learn how to use
v-ifwithv-for. - You will learn how to create transparent text in placeholder.
Timeline
00:00 Intro.
00:46 Information About To-Do List.
01:00 Information About "Why we use Materialize and Vue.js v2?".
01:21 Brief Information About Replacing an Array Feature.
01:41 Brief Information About Mutation Methods (Sub-feature of List Rendering).
02:07 Brief Information About push Mutation Method
02:22 Brief Information About splice Mutation Method
03:26 Brief Information About v-for, :key and v-for with a component.
05:13 Information About Script Resources.
05:23 Defining To-Do List Main ID
05:58 Information About @submit.prevent.
06:32 Brief Information About Two Way Data Binding.
06:54 Information about v-model.
07:43 Creating first button (Add Something To Do button)
08:16 Creating Components and Information About v-for and :key.
11:38 Creating a Field for To-Dos
12:53 Creating Actions-ToDo-List div class for buttons.
13:28 Defining Done and Remove buttons properties and tasks with using @click and v-if function.
14:51 Brief Information about index parameter.
15:25 Defining Little CSS Codes.
16:10 Creating new Vue Instance elements and components.
16:43 Defining data as data must be a function.
17:14 Information about return.
18:03 Information About "Why we need to use Computed Properties when we creating To-Do List Application?"
19:33 Defining Mutation Methods
19:54 Information About push mutation method.
20:41 Information about title: this.newTodo.
21:58 Information About splice mutation method and index parameter.
23:40 Testing our Work.
24:33 Checking for Error with Inspect Element Console.
24:53 Ending.
Requirements
- Vue.js version 2.5.16 (Full Library).
- Materialize Minified CSS Package 1.0.0-beta version.
- Microsoft Visual Studio Code. (or another text editor.)
- A browser for testing.
- XAMPP Control Panel Server.
OS Requirements for Running Materialize and Vue.js v2
- Linux (64-bit)
- Windows 7 / Windows 8 / Windows 8.1 and Windows 10.
- macOS (64-bit)
Difficulty
- Intermediate
Description
A Small Overview
Firstly we talked about To-Do List, List Rendering, Replacing an Array, Mutation Methods (splice & push), Two Way Data Binding, Computed Properties, Index Parameter, v-for and more. After that we defined our To-Do List's HTML body codes. I gave detailed information about all the codes and functions we have defined. We defined v-model, v-for, v-if and v-for :key at the HTML body codes. We defined v-for :key's task for completed tasks. After many operations, In the script section we learned how to use mutation methods and "data must be a function" rule. And we also learned how to use push and splice mutation methods and we learned how to trigger the push and splice mutation methods. We finally learned how to use splice method with index parameter.
Finally, I gave technical information about all of classes, components, codes, elements, mutation methods, special features, important concepts, variables and all operations. Vue.js tutorial series will progress from intermediate to advanced. All the programs and scripts described in the video (Vue.js Version 2, Materialize CSS Minified Package Version 1-0-0, Visual Studio Code, XAMPP Server Control Panel Server) are open source and are all included in the links section of the GitHub repositories (Except XAMPP Control Panel Server). If you wish, you can access the web pages of these programs and download links for Windows from the All of Resources for this Project section.
All of Resources for this Project
- Vue.js Github Repo: https://github.com/vuejs/vue
- Vue.js Installation Page: https://vuejs.org/v2/guide/installation.html
- Vue.js Main Logo: Image
- Vue.js Documentation Guide: https://vuejs.org/v2/guide/index.html
- Visual Studio Code (VSCode) GitHub Repo: https://github.com/Microsoft/vscode
- Materialize Web Site: https://vuejs.org
- Materialize Minified CSS Library: https://cdnjs.cloudflare.com/ajax/libs/materialize/0.100.2/css/materialize.min.css
- Vue.js CDN: https://cdn.jsdelivr.net/npm/[email protected]/dist/vue.js
- Visual Studio Code Web Site: https://code.visualstudio.com/
- Visual Studio Code Download Link for Win x64: https://go.microsoft.com/fwlink/?Linkid=852157
- XAMPP Control Panel Server Web Site: https://www.apachefriends.org/en/
- XAMPP Control Panel Server (For Windows) Download Link: https://www.apachefriends.org/download.html
Knowledge Resources (Wiki)
- Vue.js Knowledge: https://vuejs.org/v2/guide/index.html
- Vue.js Brief Knowledge (Unofficial): https://wiki.base22.com/btg/vue-the-progressive-javascript-framework-116392407.html
- Vue.js List Rendering Knowledge: https://vuejs.org/v2/guide/list.html
- Vue.js Computed Properties Knowledge for Version 2: https://vuejs.org/v2/guide/computed.html
- CSS Knowledge (wiki): https://www.w3schools.com/w3css/
- Vue.js Render Functions and Virtual DOM: https://vuejs.org/v2/guide/render-function.html#The-Virtual-DOM
- Vue.js Components Knowledge: https://vuejs.org/v2/guide/components.html
- Vue.js Replacing an Array Knowledge: https://vuejs.org/v2/guide/list.html#Replacing-an-Array
- Vue.js Two way data binding Knowledge for version 1: https://012.vuejs.org/guide/
- Vue.js Two way data binding Knowledge for version 2: https://vuejs.org/v2/guide/forms.html
- Vue.js Components on
v-modelKnowledge: https://vuejs.org/v2/guide/components.html#Using-v-model-on-Components - Vue.js Form Input Bindings and
v-modelKnowledge: https://vuejs.org/v2/guide/forms.html - Vue.js
@submit.preventKnowledge: https://vuejs.org/v2/guide/events.html#Event-Modifiers - Vue.js Mutation Methods Knowledge: https://vuejs.org/v2/guide/list.html#Mutation-Methods
- Vue.js
v-ifwithv-forKnowledge:
https://vuejs.org/v2/guide/conditional.html#v-if-with-v-for - Vue.js
:keyKnowledge: https://vuejs.org/v2/guide/list.html#key
Cover Image Source
The source code and project file for this tutorial can be found here..
Summary: Important Points
Creating HTML Body Skeleton for To-Do List Application
In the first step, we defined a division ID as todoapp. This ID is very important for our project because when we write Vue.js special scripts and methods, we will need this ID.
And on the bottom line, we defined two division class for container and header. These division classes are simple commands for creating a field.
And after that we defined an header for our To-Do List. The header will appear above the To-Do List and in the center of the page.
Creating an input type with Two Way Data Binding Feature, Creating addTodo Button with using @submit.prevent and Defining v-model
Firstly we used @submit.prevent feature for addTodo operation. We used @submit.prevent instead of @click because we will add something to do in our list. The @click buttons a.k.a normal buttons generally will direct us to another page. We want to add something to our list and we want to stay on the current page, so using the @submit.prevent feature will let us stay on the page.
And after creating @submit.prevent button, we defined a division class for To-Do App input and after we created an input type as text with using two way data binding and we defined class as form control because To-Do list is a kind of form.
And after that we defined placeholder as Write something to do. This text will appear transparent and when we click on the textarea, this transparent text will disappear on the placeholder.
Lastly we defined v-model as newTodo, we defined v-model as an ID for script section, we will use this ID for push mutation method. And another reason is, HTML input types aren't very helpful to us, so we want to make custom events with two way data binding feature by using input types. We can use v-model to create custom inputs because v-model can work with components. We will create To-Do List Application with helps of components.
Finaly we created a submit button to add something to the list. We defined button class as "btn blue right" for blue button color
After that we defined button type as submit because the task of this button is to add something to the list.
Creating v-for Main Task with using :key
We used ul class because todo list is a kind of list and we defined li class for todo-list item. We created this li class for todo list items.
After that, we defined v-for todo and index in todos.
That means, todo indicates the tasks todo we will add.
After that, we used index parameter, that means, when the any data is added to the list, this parameter will reflect the view of the newly added todo's to the page.
Another reason why we define the index parameter? is, we will use the splice mutation method when adding the remove button. For this, we need to a referance for creating remove button scripts, so index and todo parameters will help us for defining splice mutation method at the script section.
Finally we defined todos. We can think of "todo, index in todos" section like "item and index in items". This is the v-for function's original form. We will add a few new todo's in our To-Do list so our new todo we will add will be in the our other todos, it will be in the To-Do List and it will be a To-Do List element.
Firstly we used v-for function with a component. As you know, when we use v-for with a component, we need to use :key in the same command line because it's the rule. And also we used :key for todo-list items and we defined a simple data task with using :key .
We have defined :key's main question as is-completed? That means is our work completed properly?. After that, we defined a kind of answer for this question as todo.completed. The key will affect "done" button directly with this dialogue. Dialogue: "If our work is completed properly, we will click the done button and To-Do List's Database will receive todo.completed as an answer.
If the todo is successfully completed, the :key will indicate that the work is done. But this operation will not appear on the page because Vue.js v2 supports Virtual DOM, Two-Way Data Binding and Computed Properties features.
We have defined v-for and :key for completed tasks on the To-Do List.
Creating Field for To-Do List Elements
In this line, we created todo-container as division class and span class as todo-title. We want to add something to do into the To-Do List and we want the datas we add to appear under the To-Do List. And Reminder: All the things to do we will add to the list are data.
We defined a container for create a field to the list elements we will add. And we also defined span class as todo-title because all the todo's we will add will be the title.
Finally we defined {{ todo.title }}, that means, all the data we will add to the list will be appended as todo.title without any additions and only the tasks we have written will appear.
Defining Done and Remove Buttons Tasks (HTML)
In this line, we defined division class as actions-todo-list. We firstly defined the actions-todo-list as division class because we want to create two buttons, and these buttons will affect all of the list status.
*Done and Remove buttons will be in action and it will be the affect all of the list.
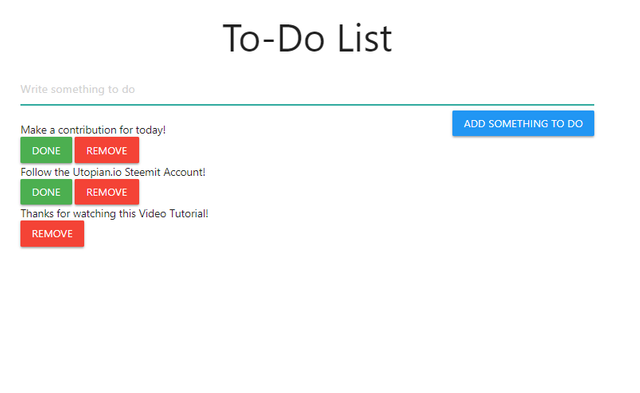
Firstly, we defined @click function as todo.completed=true, we just defined v-for :key as todo.completed for completed tasks so we defined @click function for done button with the help of the v-for :key. We also defined done buttons color as green and we defined v-if function as todo.completed. That means, "If we click on the done button, the system will assume that the to do has been completed." We talked about v-if function but it works in much the same way as the if-else, which is the basic JavaScript functions, we learned if and else in other tutorials. We will talk about v-if function in much more detail in other tutorial episodes because It's not just a function used with components.
And finally we created the remove button to delete unfinished tasks. We defined @click as deleteTodo(index) this means, It will remove unfinished task from the view. The Remove button will affect the list element directly and will remove the list element from the list when the remove button is clicked.
We will define the remove button in detail in the script section using the splice mutation method and index parameter. We also defined remove button's color as red.
That's all of the To-Do List HTML codes.
Little CSS Editing for To-Do List
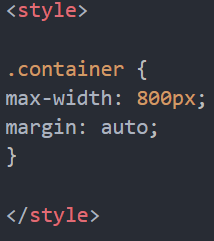
In the style tags, we defined maximum width value as 800px, I used this value to make the To-Do List appear in the center of the page.
And we also defined the margin value as auto because we want the gap between list and page to be set automatically. The gap will be calculated automatically by the browser.
Script Line: Creating new Vue Instance, Component and Data
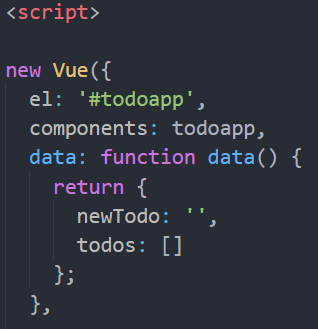
We defined new Vue Instance element with our main division id as usual. It's todoapp as you will understand. After that, we defined components as todoapp same as main divison id.
And we also defined main data as function data, because data must be a function. This is the one of the important rules of Vue.js v2 (For Creating To-Do App). We need to use this feature only when creating applications like To-Do List. We are working with components so component’s data and main script values must be a function so any data entered into the list, it can maintain and list an independent copy of the returned data object.
After that, we defined newTodo value as blank. If we write something here, when we enter the page, the placeholder will be filled but we want the textarea to be empty because we will fill the list manually.
And for the same reason, we haven't defined anything for todos, the same as newTodo, we will fill the todos field manually in the To-Do List.
Using Computed Properties for To-Do List
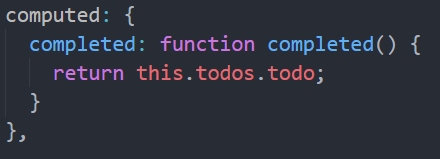
We need to use Computed Properties because, when we click on the done button for indicate that we approve the completed task, computed properties will show us the remove button that we have created after calculations in the background and It will allow us to remove the completed task from the list when we click on the remove button.
And we also defined main computed value as completed function is completed. If you remember we just follow the data must be a function rule in the data script line.
And our data returned this.todos.todo. That means, Computed Properties are returning for any completed task in todos for all of the todo. We need to use computed properties feature because it will help us for completed tasks.
Creating Mutation Methods: push
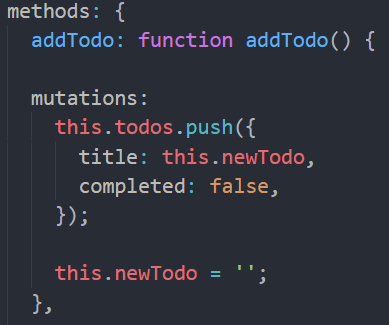
Firstly we created push mutation method for adding something to do list button, if
And we just comply the addTodo must be a function rule and after that we created push mutation, we defined it for add a new todo.
And this.todos.push this means, "any new todo that we add through the Add Something To Do button, new todo will be pushed and created by the push mutation method. With the help of push method, we will be able to add a few new todos into the To-Do List. this represents the addTodo button.
And since we have established a connection between "addTodo and newTodo, these ID's represents todos to be newly created.
After that, we defined title's task as this.newTodo, that means, "Every todo we will create, will be accepted as a new todo and these todos will be listed under the previous todos".
Every todo we will create will be assumed as a title.
And we also defined completed status as false because we have used the pushmethod to add new todos and we defined the status of new todos to be added as not completed because we will decide with the done button, whether the todo will be completed or not completed.
We have defined this.newTodo value as empty because we will add new todos to the list. If we fill this value, "when we enter the page the textarea appears as filled". We want to add todos manually to the list.
Creating Mutation Methods: splice
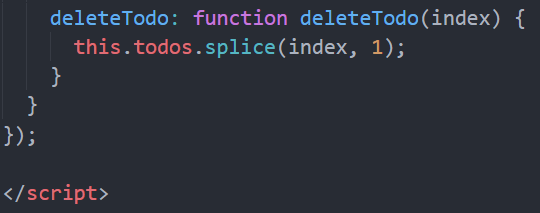
In the final step, we used splice mutation method to define the properties of the remove button. We began by following the deleteTodo must be a function rule but unlike the others, we defined the index parameter in parentheses. The reason of this, "when we remove a todo in our list, it will directly affect the index parameter and the list database."
We also defined this.todos.splice(index,1), as you know this we defined represents, "any newTodo we will add and "new todos" we will add will be together with our other todos in the list. The splice method will trigger the remove button we have defined it to delete the todos and the added todos will be removed from the index with using remove button.
Since we need to reflect the operation to the index parameter, we have defined the index parameter into parentheses and defined the value as 1 to trigger the splice mutation method.


Hi @sargoon,
This is a very good and thorough tutorial, well structured, with all the specific time noted for the learners to review. Excellent work.
You have developed a good style over the months. Only one advice in the presentation talk and that is, you can 'pause' a little bit after each concepts to give yourself and the learner a breather. This needs experience and I am sure as you do more video tutorial, you will learn this trick.
Your contribution has been evaluated according to Utopian policies and guidelines, as well as a predefined set of questions pertaining to the category.
To view those questions and the relevant answers related to your post, click here.
Need help? Write a ticket on https://support.utopian.io/.
Chat with us on Discord.
[utopian-moderator]
Hi, Rosa. Thank you very much for your so valuable comment and also thank you for moderating my contribution. I'm glad you like my tutorial. And yes, you are absolutely right, I have to stop a bit while I'm explaining important concepts, I tried very hard to prevent the video from being too long but I will follow your advice on my next contributions.
Hey @sargoon
Thanks for contributing on Utopian.
We’re already looking forward to your next contribution!
Want to chat? Join us on Discord https://discord.gg/h52nFrV.
Vote for Utopian Witness!