Reviewing GIMP software (PART 2)
SOURCE IMAGE
Introduction
Welcome to my latest post in the blog category. in the previous post i discussed, introduced, and shared my experience about GIMP (Gnu Image Manipulation Program). meanwhile my first post wrote about the Android application known as 'SkyTube'. this Open Source alternative application allows users to use YouTube comfortably without the need for a Google / YouTube account and therefore this application only offers read-only access to YouTube. the second blog post is about the android application known as 'MusicPiped'.this application allows users to stream any music available on You Tube for free. maybe you can check it on my previous blog if you want to read it. In this post, i want to discuss the basics of GIMP (Gnu Image Manipulation Program) so that we all get to know this software better. So many people believe that photos, Banner is soul food. generally, these personal photos always have a way for our emotions. this can help us feel better when we need it, can give satisfaction when we see it and so many people believe that editing photos, makes the logo design very difficult. at first i thought so too. however, the argument began to disappear when i discovered this GIMP software. actually, i used to be someone who doesn't like things like this. edit photos, make the design a boring thing in my opinion. instead, i prefer editing audio in the Audacity software. because my hobby is in the music world. not long after the time goes by, i always pay attention to my close friends editing photos using this GIMP software. every step taken i pay close attention. well ... at that time i felt that editing photos, making a design was fun and challenging my creativity. the next day i immediately installed the GIMP software on my PC. until now i still like to experiment and pour my creative ideas into this software. Therefore, i want to share my personal experience when using GIMP software for all of you, hopefully it can be useful.
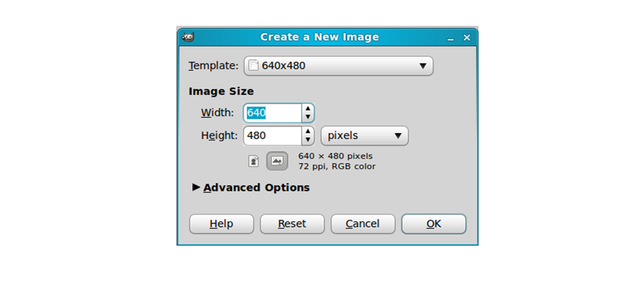
Immediately, on this occasion i want to introduce the GIMP software in outline. in the previous post i discussed what GIMP is. However, for others to be accepted by many people, there is a need for GIMP developers to adjust and make their own extraordinary players. this can be done by adding features that will increase application usage. GIMP is not left behind in this search, the developers have been able to add several features to allow the application to stand out from the crowd. if we want to know, of course we must try to really understand. the first way you can try creating a new document in GIMP. how to create a new document in GIMP. please click File> New or use the CTRL + N key on the keyboard. A dialog box will appear that you can set as needed.
Create a new document
Get to know the GIMP window
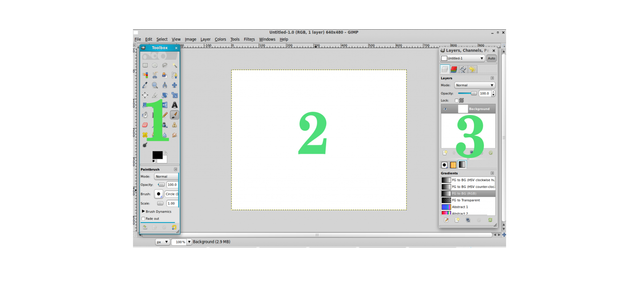
- Toolbox: One of the most important parts of the GIMP application is the toolbox. because in the toolbox there is a tool or tool that becomes the main control for users to be able to process images or photos through GIMP. without this tool, GIMP will not be as popular as now. tool boxes are generally located on the left side of the GIMP screen. in this tool box some tools have been grouped according to their functions. maybe i will discuss the next post.
- Layers: layer on GIMP is a collection or layer that functions as the placement of an object, or can also be referred to as a canvas for an object. the layer in GIMP is very helpful for editing certain objects, with our layers easier to edit objects without disturbing other objects, this is if we create more than one object. You can adjust layer composition by changing the attributes and order of layers. besides that, style specifically such as adjustment of layers, fill layers, and layer styles can be applied to give special effects to the layers.
- Image Window: a collection of important elements such as the Control Menu, Title Bar, Menu Bar, Option Bar. i will explain everything in detail in the next post. now I only discuss it in outline so it is more organized.
Main Toolbox
There are 33 Tool in the toolbox. Pretty much for everyday use. Each tool will be followed by some options that automatically appear at the bottom or the Tool option.
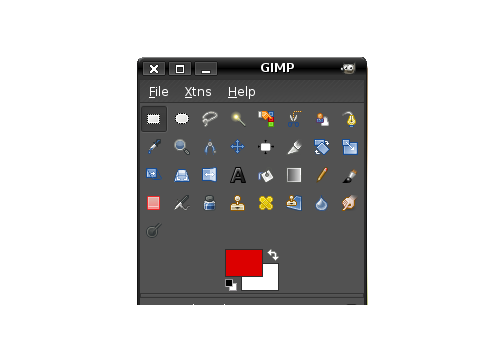
- Select the Rectangle Tool
- The Ellipse Select Tool
- Free Select Tool
- Fuzzy Select Tool
- The Select by Color Tool
- the Scissors Select Tool
- Foreground Select Tool
- Paths Tools
- Color Picker Tool
- Zoom Tool
- Measure Tool
- Move Tool
- the Alignment Tool
- Crop Tool
- Rotate Tool
- Scale Tool
- Shear Tool
- Perspective Tool
- Flip Tool
- the Text Tool
- Bucket Fill Tool
- Blend Tool
- The Pencil Tool
- Paintbrush Tool
- The Eraser Tool
- Airbrush Tool
- Ink Tool
- Clone Tool
- Healing Tool
- Perspective Clone Tool
- Blur/Sharpen Tool
- Smudge Tool
- The Dodge/Burn Tool
Get to know the Option Tool
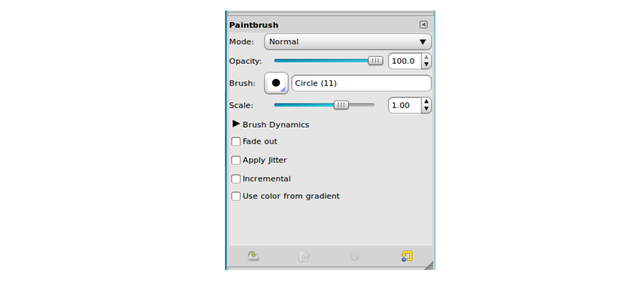
The tool option is located at the bottom of the Toolbox. the main function of the tool option is to set the attributes of a tool that is activated in the toolbox. if the tool option window does not appear, you can press the SHIFT + CTRL + T button on the keyboard.
Description of tool options, examples in the paintbrush:
1.Mode: type of brush used
2.Opacity: the level of transparency of the image object
3.Brush: brush shape and size
4.Scale: large size small brush
Initial Trial
let's just try to make a glass picture very, very simple, yellow. Just follow the steps as shown.
- Select the Paths Tool, create a square image by clicking 4 points (don't drag). To connect the last line, press Ctrl right at the first point. Tata in such a way that it is trapezoidal.
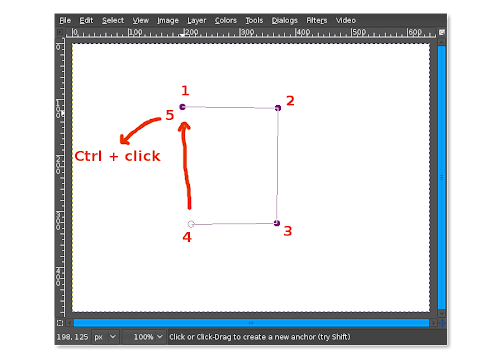
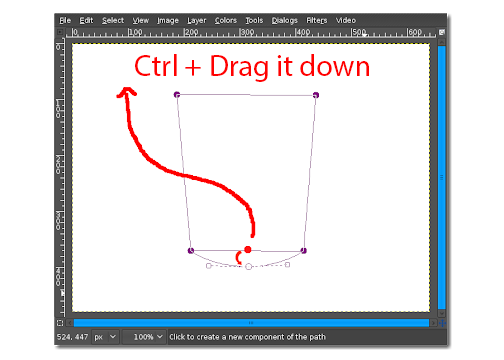
- Curve the front part by pressing Ctrl + click right in the middle of the bottom line while dragging the mouse down.
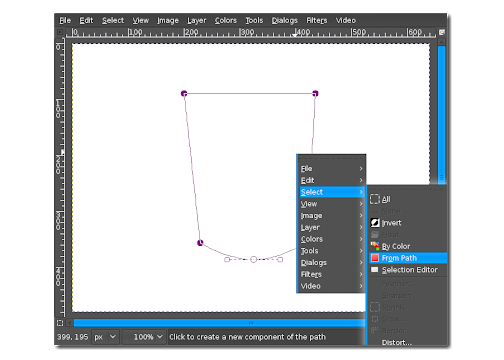
- In the object that has been created, right-click> Select> From Path.
- Select the Blend Tool, then change the color to your liking.
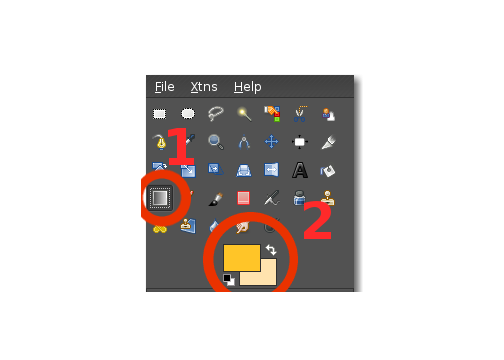
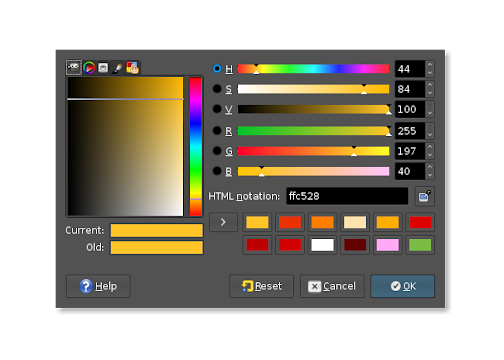
- Drag the blend line as shown below.
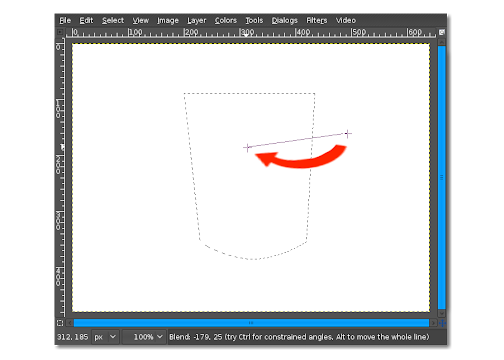
- Make another selection using the ellipse tool
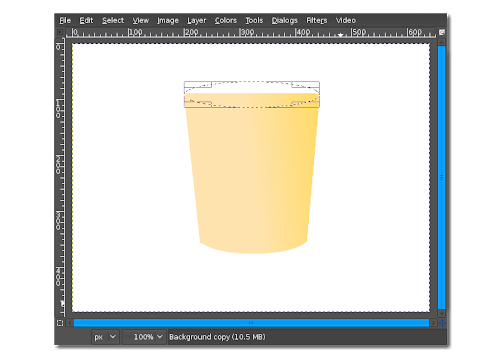
- Pull the blend line in the opposite direction from the previous blend
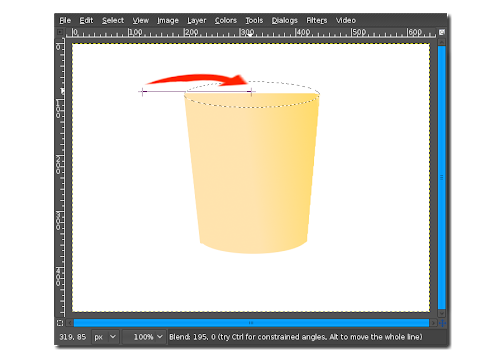
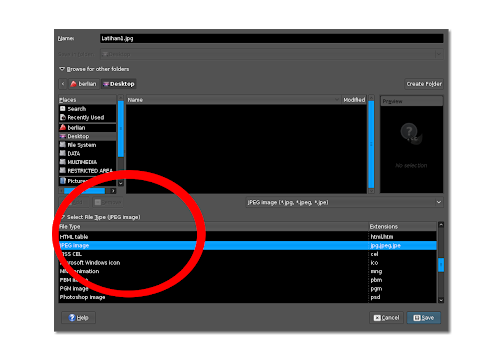
- Don't forget to save, like other software, File> Save as ..
If you want to save raw files, please select the format of GIMP xcf image (.XCF), with this format, all the layers and other layers are fixed so that you can continue later.
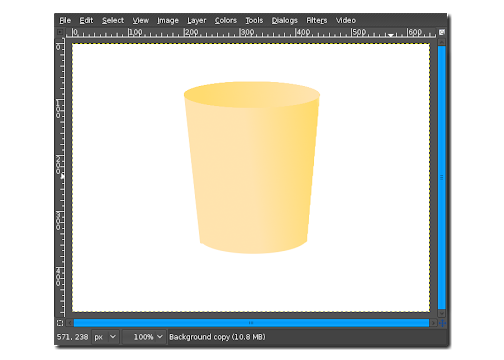
Well, that's the example of our experiment today. simple right?
So, this is my first experience when i first discovered this GIMP software. i know the basics of elements first. until i really understood, i tried to learn more detailed things. there are many important elements that we must know. one of the basic things that i have outlined above. in the next post i will discuss the stages in more detail. note for all of you who are new to the GIMP software and want to learn and create a work here, "Don't miss the basics if you want to go further, because it is impossible for you to step to the fifth floor if not through the first floor"
In this article, i can review the GIMP software according to my personal experience and the collection of reliable information from the software. i also share my opinions and suggestions about some features. the GIMP software is amazing and i am impressed. Although there are some users who don't like this application because its features are still standard, but it is very unique and comfortable to use. Maybe this application is quite comfortable for me.

Series Backlinks
Reviewing GIMP software (PART 1)
Hello, @riyandacountri!
Thank you for this contribution. This is another rather informative blog post in this series, and I think that you did a good job in providing us with valuable insights about your personal experience with the project. Keep up the good work.
On the content side, even though I like all the information provided, I have to admit that I don't see the need for the addition of so much information regarding your previous or even future contributions. Furthermore, the post contains a list of features, but tells the readers almost nothing about your personal experience of using those. Regardless, I enjoyed reading about your personal views, and I think that users looking to get started with this tool will find your post helpful and interesting.
That said, the writing of this post was not good enough, I'm afraid. There were serious issues of style and proofreading, making your post hard to read at times. Good writing is marked by comprehensibility, which is why using long sentences is often discouraged. I would advise you to consider breaking apart longer sentences in order to enhance the readability of your future texts.
I look forward to your next contribution.
Your contribution has been evaluated according to Utopian policies and guidelines, as well as a predefined set of questions pertaining to the category.
To view those questions and the relevant answers related to your post, click here.
Need help? Chat with us on Discord.
[utopian-moderator]
Thank you for your review, @lordneroo! Keep up the good work!
Hi @riyandacountri!
Your post was upvoted by @steem-ua, new Steem dApp, using UserAuthority for algorithmic post curation!
Your post is eligible for our upvote, thanks to our collaboration with @utopian-io!
Feel free to join our @steem-ua Discord server
Hey, @riyandacountri!
Thanks for contributing on Utopian.
We’re already looking forward to your next contribution!
Get higher incentives and support Utopian.io!
Simply set @utopian.pay as a 5% (or higher) payout beneficiary on your contribution post (via SteemPlus or Steeditor).
Want to chat? Join us on Discord https://discord.gg/h52nFrV.
Vote for Utopian Witness!