How to create a GUI application with tkinter and python?
I shall show you how to use Tkinter for constructing Graphical User Interface (GUI) applications.The Tkinter module is the standard Python interface to the Tk GUI toolkit.Python when combined with Tkinter provides a fast and easy way to create GUI applications. Tkinter provides a powerful object-oriented interface to the Tk GUI toolkit.
What Will I Learn?
- How to create a running GUI application
- How to use Label widget
Requirements
- Basic knowledge of programming
- Python 3.5+
- A text editor
Difficulty
- Basic
Tutorial
1. Create a window
Here, we show how simple it is to create a very basic window in just 4 lines.
import tkinter as tk
app = tk.Tk()
app.title("First GUI")
app.mainloop()
We import the tkinter module and alias it as tk and create instance app.The title is "First GUI". An event loop is a mechanism that makes our GUI work.So we start the window's event loop by calling the mainloop method on the class instance app.
Under Windows it appears in the Windows look and feel:

An event loop is a mechanism that makes our GUI work. We can think of it as an endless loop where our GUI is waiting for events to be sent to it. The event loop ends when we clicks the close(X) button or a widget that we have programmed to end our GUI. When the event loop ends, our GUI also ends.
2. Adding a label to the GUI form
A Label is a Tkinter Widget class, which is used to display text or an image. The label is a widget that the user just views but not interact with. The code is blow:
    import tkinter as tk
    app = tk.Tk()
    app.title("first GUI")
    #The keyword parameter "text" specifies the text to be shown:
    theLable = tk.Label(app, text="Hello Steemians!")
    #The pack method tells Tk to fit the size of the window.
    theLable.pack()
    app.mainloop()
Running the code:

2.1 Set the size
If you don’t specify a size, the label is made just large enough to hold its contents. You can also use the height and width options to explicitly set the size.
theLable = tk.Label(app, text="Hello Steemians!",width=30,height=10)
It produces the following result:

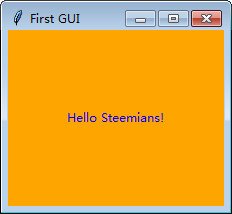
2.2 Set the color
You can specify which color to use for the label with the foreground (or fg) and background (or bg) options. The attribute fg can be used to have the text in another colour and the attribute bg can be used to change the background colour of the label.
theLable = tk.Label(app, text="Hello Steemians!",
                                            width=30,height=10,
                                            fg="blue",bg="orange")
It produces the following result:
You can use any locally defined standard color name. The colors "white", "black", "red", "green", "blue", "cyan", "yellow", and "magenta" will always be available. You can see color example code: named_colors.py.
2.3 Set the fonts
The label allow you to specify the fonts used to display text. This can be achieved by setting the attribute "font".As a tuple whose first element is the font family, followed by a size in points, optionally followed by a string containing one or more of the style modifiers bold, italic, underline, and overstrike.
Examples:
- ("Arial", "18") for a 18-point Arial regular;
- ("Times", "20", "bold italic") for a 20-point Times bold italic.
code:
theLable = tk.Label(app, text="Hello Steemians!",
                                            width=20,height=5,
                                            fg="blue",bg="orange",
                                            font=("Times", "40", "bold italic")
                                             )
result:

3. Adding Images in Labels
As we have already mentioned, labels can contain text and images.The following example contains a label with a text and an image.
import tkinter as tk
import time
app = tk.Tk()
app.title("Hello")
myImage = tk.PhotoImage(file="hello.gif")
imageLable=tk.Label(app,
                                                 compound = tk.TOP,
                                                 image=myImage,
                                                 text="Hello Steemians!",
                                                 fg="white",bg="black",
                                                 font=("Times", "30", "bold"),
                                                 )
imageLable.pack()
app.mainloop()
The PhotoImage class can read GIF and PGM / PPM images from the file. If you need to use other file formats, you can use the Python Imaging Library (PIL).
The option compound specifies how to display the image relative to the text, in the case both text and images options are present. Valid values are:
text: display text only
image: display image only
top, bottom, left, right: display image above, below, left of, or right of the text, respectively.
none: the default. display the image if present, otherwise the text.
The result looks like this:

Congratulations! you get a tool for making memes.This tool does not look very good, we will improve later.
Posted on Utopian.io - Rewarding Open Source Contributors
Your contribution cannot be approved because it does not follow the Utopian Rules.
The contribution doesn't follow the rules:
You can contact us on Discord.
[utopian-moderator]
Thank you!
Congratulations @laopihao! You received a personal award!
Click here to view your Board
Congratulations @laopihao! You received a personal award!
You can view your badges on your Steem Board and compare to others on the Steem Ranking
Vote for @Steemitboard as a witness to get one more award and increased upvotes!