CRUD Hibernate Java
What Will I Learn?
In this tutorial, I will explain the example CRUD (Create, Read, Update and Delete) in Hibernate Java. Actually what is Hibernate? If I think Hibernate it is Framework that is ORM (Object Relational Mapping) to connect to Database. "Is it just for a connection to the Database?" no. You can perform all other SQL operations. In other words, can you say that Hibernate can replace JDBC operation. To simplify your understanding, here's an example for connecting the Database.
- JDBC (Without Hibernate)
try
{
    Class.forName(driver);
    Connection conn = DriverManager.getConnection("jdbc:mysql://localhost:3306/"+name_database, user, pass);
    return conn;
}catch(ClassNotFoundException nfe)
{
    nfe.printStackTrace();
    return null;
}catch(SQLException se)
{
    se.printStackTrace();
    return null;
}
- Hibernate (Connection with Hibernate)
Session s = new Configuration().configure().buildSessionFactory().openSession();
if(s == null)
    System.out.println("Connection Failed");
else
    System.out.println("Connection Successful");
You can see that by using Hibernate you do not have to declare all of its Database fields. Ok, for the advantages and disadvantages of Hibernate that I will not explain here. On the Internet, many have discussed it. In this tutorial, I assume that readers have mastered JDBC so readers are not hard to understand the syntax explanation - the syntax is there.
Requirements
Write here a bullet list of the requirements for the user in order to follow this tutorial.
- Hibernate
- IDE Eclipse J2EE Juno
Difficulty
- Advanced
Install Hibernate
For the installation phase part, here I use the Juno J2EE Eclipse IDE. For those of you who use a different IDE I can find my own tutorial on how to install it. OK, for the installation please follow these steps:
- Open your Eclipse.
- Then, select Help menu> Install New Software.
- After that, open the following link to select the JBoss library that matches your Eclipse.
- After you select, Note the Addressnya url. And put it into the Work with textfield that is in Eclipse earlier. And type "hibernate" in the search field. Because, in JBoss you want to install only Hibernate only.
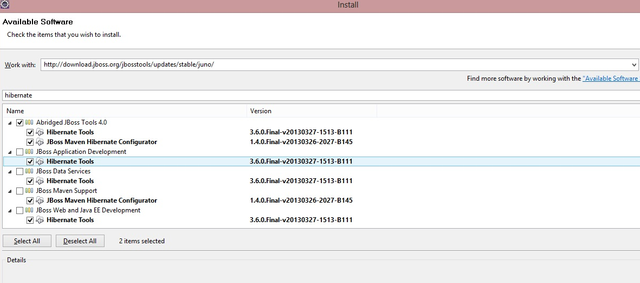
- After that select Next until the installation phase is complete.
- After the installation is complete, Restart your Eclipse.
Creating a Database
Before starting the coding, there are some things we should make first. Namely, the Database with the name "library" and the table with the name "users" and the following fields for table users.

After you create the Database with the table then, the next step is to start making Coding CRUD Hibernate in Java.
Preparing Initialization
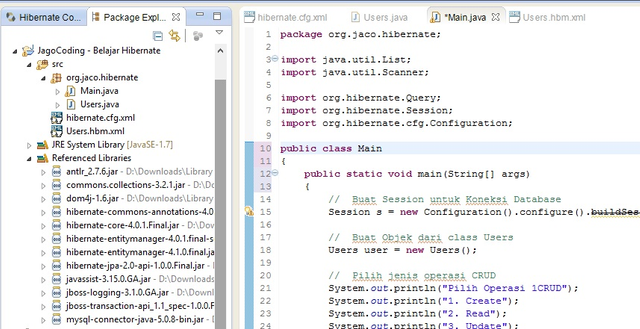
The first step, in making CRUD in Hibernate Java is to create a new project called "JagoCoding - Learning Hibernate". After creating the project, then create a new class file named "Users" and package "org.jaco.hibernate".
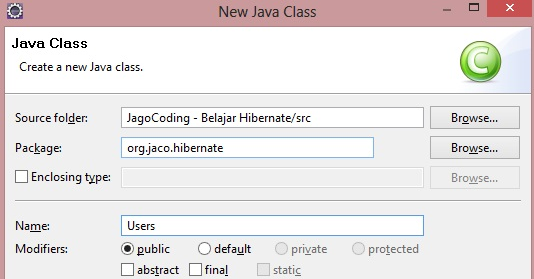
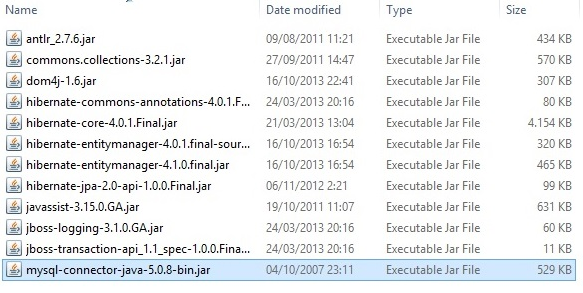
Do not forget to import the required library for Hibernate. Here are some libraries that I import.
After that, the contents of the following coding into the file class "Users"
package org.jaco.hibernate;
import javax.persistence.Column;
import javax.persistence.Entity;
import javax.persistence.GeneratedValue;
import javax.persistence.GenerationType;
import javax.persistence.Id;
import javax.persistence.Table;
@Entity
@Table(name = "users")
public class Users
{
    @Id @GeneratedValue(strategy = GenerationType.AUTO)
    @Column(name = "id")
    int id;
    @Column(name = "nama")
    String nama;
    //  Getter dan Setter
    public void setID(int id)
    {
        this.id = id;
    }
    public int getID()
    {
        return id;
    }
    public void setNama(String nama)
    {
        this.nama = nama;
    }
    public String getNama()
    {
        return nama;
    }
    @Override
    public String toString()
    {
        return "ID : "+id+" Nama : "+nama;
    }
}
Information :
The intent of @ or called Anotation is a way of connecting between xml files with java.
@Id serves to declare that the variable as the primary key field in the Database Table
@GenerationType serves to declare that the primary key field is created by Auto_Increment
@Column serves to state that this is the destination field in the column in the table.
After that, create a Hibernate Configuration File (Hibernate Configuration File). The trick is as follows:
- Select the project you just created earlier. And create the Hibernate Configuration File in the src directory.
- Right-click on the src directory and select New> Hibernate Configuration File (cfg.xml) or by pressing Ctrl + N and select Hibernate> Hibernate Configuration File (cfg.xml)
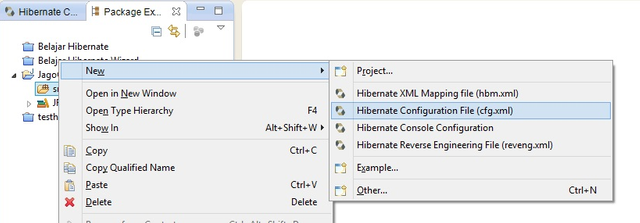
- After that let the file name remain "hibernate.cfg.xml" and Next.
- Then, adjust the Hibernate Configuration File you created according to the following image.
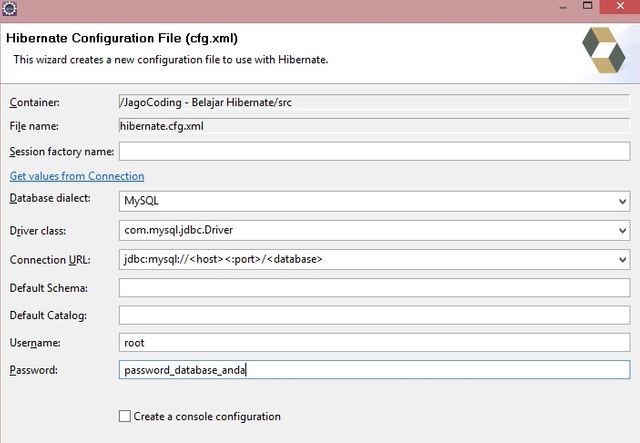
- Then, select Finish.
After that, open the hibernate.cfg.xml file you just created earlier and select the Source tab at the bottom. and then change the contents of the file to be as follows.
a href="#">hibernate-configuration PUBLIC
        "-//Hibernate/Hibernate Configuration DTD 3.0//EN"
        "http://hibernate.sourceforge.net/hibernate-configuration-3.0.dtd">
<hibernate-configuration>

        <property name="hibernate.connection.driver_class">com.mysql.jdbc.Driver
        <property name="hibernate.connection.password">password_database_anda
        <property name="hibernate.connection.url">jdbc:mysql://localhost:3306/nama_database
        <property name="hibernate.connection.username">root
        <property name="hibernate.dialect">org.hibernate.dialect.MySQLDialect
        <property name="hibernate.show_sql">true
        <property name="hibernate.format_sql">true
        <mapping class="org.jaco.hibernate.Users" />

hibernate-configuration>
Now, create 1 more xml file for Hibernate XML Mapping File (hbm.xml). The trick, almost the same as for Hibernate Configuration File however, select the Hibernate XML Mapping File (hbm.xml)
- First, right-click on the src directory and choose Hibernate XML Mapping File (hbm.xml)

- Then, select the available package ie, org.jaco.hibernate.
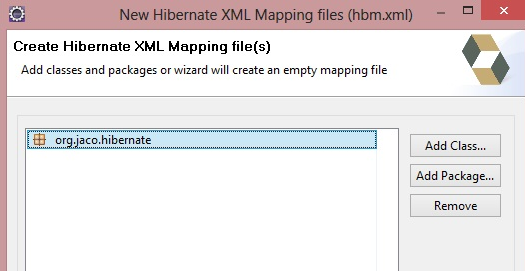
- And select the available class ie, class Users. Then, select Finish.
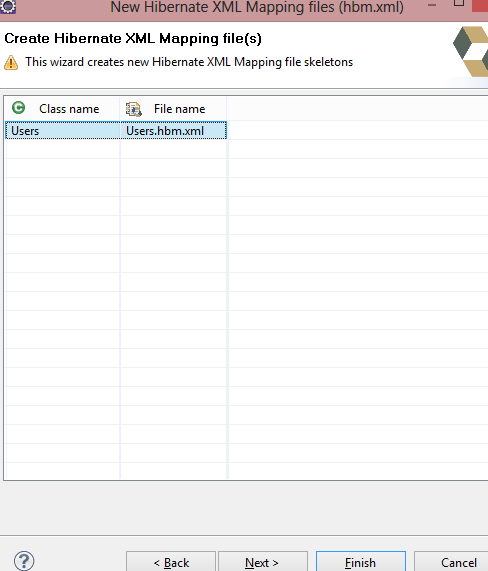
After that, create a class file that is class Main and place in the same package with class Users. After that follow the following steps gradually to start CRUD coding in Hibernate.
Create (Insert)
- For Create, enter the following coding into the Main class
package org.jaco.hibernate;
import java.util.Scanner;
import org.hibernate.Session;
import org.hibernate.cfg.Configuration;
public class Main {
    public static void main(String[] args) {
        //  Buat Session untuk Koneksi Database
        Session s = new Configuration().configure().buildSessionFactory().openSession();
        //  Buat Objek dari class Users
        Users user = new Users();
        //  Pilih jenis operasi CRUD
        System.out.println("Pilih Operasi 1CRUD");
        System.out.println("1. Create");
        System.out.println("2. Read");
        System.out.println("3. Update");
        System.out.println("4. Delete");
        System.out.print("Pilihan : ");     int pilih = new Scanner(System.in).nextInt();
        switch(pilih)
        {
            case 1  :   //  Create(Insert SQL)
                        //  set nilai untuk objek user
                        //  user.setID(null)    nggak perlu dibuat karena, Auto_Increment
                        user.setNama("Yudi");
                        try
                        {
                            //  Mulai Koneksi
                            s.beginTransaction();
                            //  Simpan Objek User ke Session
                            s.save(user);
                            //  execute Session ke MySQL
                            s.getTransaction().commit();
                        }catch(Exception e)
                        {
                            e.printStackTrace();
                        }
                            break;
            default :   System.out.println("Pilihan tidak tersedia");
        }
    }
}
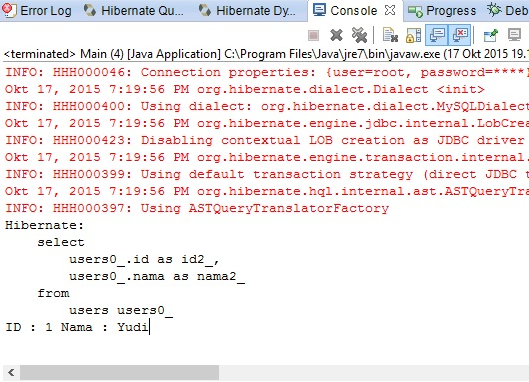
- Then, run the Main.class file. If the output like the following means, you successfully perform Database Connection and Insert Query. And try checking in the database table whether the query execution is successful or not.
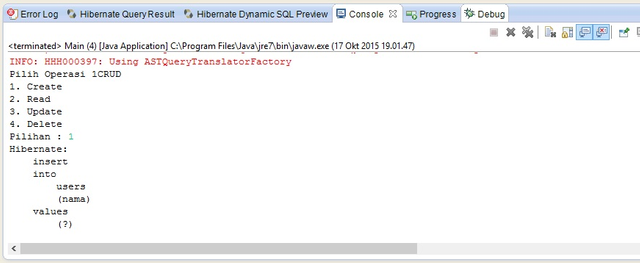
Read (Select)
- For Read, add the following coding into the Main.class file.
case 2  :   //  Read(Select SQL)
        s.beginTransaction();
        for(Users us :getAllUsers())
        {
            System.out.println(us);
        }
            break;
- And the following method.
//  Method untuk select all from table
    public static List getAllUsers()
    {
        List list = null;
        Session session = new Configuration().configure().buildSessionFactory().openSession();
        try
        {
            session.beginTransaction();
            Query query = session.createQuery("from org.jaco.hibernate.Users");
            list = query.list();
            return list;
        }catch(Exception e)
        {
            e.printStackTrace();
            return null;
        }
    }
If the output is, as above then, your coding succeeds.
Update
- For updates, add the following coding into the Main.class file.
case 3  :   //  Update(Update SQL)
        s.beginTransaction();
        //  Set Query SQL
        Query query = s.createQuery("update org.jaco.hibernate.Users set nama = :nama where id = :id");
        query.setParameter("nama", "Setiawan");
        query.setParameter("id", 1);
        int exec = query.executeUpdate();
        s.getTransaction().commit();
            break;
- Run the Main.class file, input 3 and check Output. And check also the results in the database table.
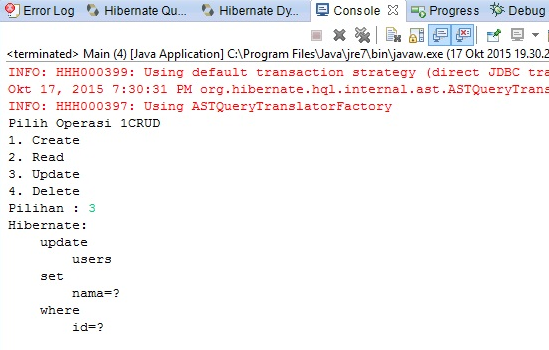
Delete (Delete SQL)
- For the last Delete, add the following coding into the Main.class file
case 4  :   //  Delete(Delete SQL)
        s.beginTransaction();
        //  Set Query SQL
        query = s.createQuery("delete from org.jaco.hibernate.Users where id = :id");
        query.setParameter("id", 1);
        exec = query.executeUpdate();
        s.getTransaction().commit();
            break;
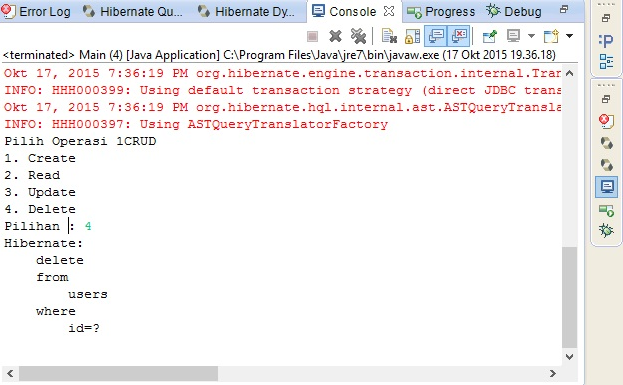
- Run the Main.class file, input 4 and look at the output. And do not forget to check in the database table whether the record was successfully deleted.
And here is the complete source code of each file - the files that exist in this tutorial.
- Users.class
package org.jaco.hibernate;
import javax.persistence.Column;
import javax.persistence.Entity;
import javax.persistence.GeneratedValue;
import javax.persistence.GenerationType;
import javax.persistence.Id;
import javax.persistence.Table;
@Entity
@Table(name = "users")
public class Users
{
    @Id @GeneratedValue(strategy = GenerationType.AUTO)
    @Column(name = "id")
    int id;
    @Column(name = "nama")
    String nama;
    //  Getter dan Setter
    public void setID(int id)
    {
        this.id = id;
    }
    public int getID()
    {
        return id;
    }
    public void setNama(String nama)
    {
        this.nama = nama;
    }
    public String getNama()
    {
        return nama;
    }
    @Override
    public String toString()
    {
        return "ID : "+id+" Nama : "+nama;
    }
}
- hibernate.cfg.xml
a href="#">hibernate-configuration PUBLIC
        "-//Hibernate/Hibernate Configuration DTD 3.0//EN"
        "http://hibernate.sourceforge.net/hibernate-configuration-3.0.dtd">
<hibernate-configuration>

        <property name="hibernate.connection.driver_class">com.mysql.jdbc.Driver
        <property name="hibernate.connection.password">nasigoreng
        <property name="hibernate.connection.url">jdbc:mysql://localhost:3306/perpustakaan
        <property name="hibernate.connection.username">root
        <property name="hibernate.dialect">org.hibernate.dialect.MySQLDialect
        <property name="hibernate.show_sql">true
        <property name="hibernate.format_sql">true
        <mapping class="org.jaco.hibernate.Users" />

hibernate-configuration>
package org.jaco.hibernate;
import java.util.List;
import java.util.Scanner;
import org.hibernate.Query;
import org.hibernate.Session;
import org.hibernate.cfg.Configuration;
public class Main
{
    public static void main(String[] args)
    {
        //  Buat Session untuk Koneksi Database
        Session s = new Configuration().configure().buildSessionFactory().openSession();
        //  Buat Objek dari class Users
        Users user = new Users();
        //  Pilih jenis operasi CRUD
        System.out.println("Pilih Operasi 1CRUD");
        System.out.println("1. Create");
        System.out.println("2. Read");
        System.out.println("3. Update");
        System.out.println("4. Delete");
        System.out.print("Pilihan : ");     int pilih = new Scanner(System.in).nextInt();
        switch(pilih)
        {
            case 1  :   //  Create(Insert SQL)
                        //  set nilai untuk objek user
                        //  user.setID(null)    nggak perlu dibuat karena, Auto_Increment
                        user.setNama("Yudi");
                        try
                        {
                            //  Mulai Koneksi
                            s.beginTransaction();
                            //  Simpan Objek User ke Session
                            s.save(user);
                            //  execute Session ke MySQL
                            s.getTransaction().commit();
                        }catch(Exception e)
                        {
                            e.printStackTrace();
                        }
                            break;
            case 2  :   //  Read(Select SQL)
                        s.beginTransaction();
                        for(Users us :getAllUsers())
                        {
                            System.out.println(us);
                        }
                            break;
            case 3  :   //  Update(Update SQL)
                        s.beginTransaction();
                        //  Set Query SQL
                        Query query = s.createQuery("update org.jaco.hibernate.Users set nama = :nama where id = :id");
                        query.setParameter("nama", "Setiawan");
                        query.setParameter("id", 1);
                        int exec = query.executeUpdate();
                        s.getTransaction().commit();
                            break;
            case 4  :   //  Delete(Delete SQL)
                        s.beginTransaction();
                        //  Set Query SQL
                        query = s.createQuery("delete from org.jaco.hibernate.Users where id = :id");
                        query.setParameter("id", 1);
                        exec = query.executeUpdate();
                        s.getTransaction().commit();
                            break;
            default :   System.out.println("Pilihan tidak tersedia");
        }
    }
    //  Method untuk select all from table
    public static List getAllUsers()
    {
        List list = null;
        Session session = new Configuration().configure().buildSessionFactory().openSession();
        try
        {
            session.beginTransaction();
            Query query = session.createQuery("from org.jaco.hibernate.Users");
            list = query.list();
            return list;
        }catch(Exception e)
        {
            e.printStackTrace();
            return null;
        }
    }
}
So much for this tutorial, Thanks.
Posted on Utopian.io - Rewarding Open Source Contributors

Your contribution cannot be approved because it does not follow the Utopian Rules, and is considered as plagiarism. Plagiarism is not allowed on Utopian, and posts that engage in plagiarism will be flagged and hidden forever.
You can contact us on Discord.
[utopian-moderator]