How to Install Antergos Arch Linux - Linux Tutorial
Hi friends, today I will share the tutorial "How to Install Antergos Arch Linux" for you guys. Before we go far discussing about tutorials, first we must know first, What is Antergos Arch Linux?
Antergos Linux?
Antergos is a distro arch linux , arch linux promises a lightweight operating system and wants everyone to build the system used as needed (full customized), because arch linux feature there is no complete package in its OS installation. users are required to install drivers, apps, xserver, kernels manually and independently.
Antergos makes it easy to install the arch linux , but users can still make adjustments to the OS used. Antergos like the GUI version of the installer for arch linux.
If you are used to using ubuntu / debian you may have to make some adjustments because the different package managers and service managers are used
- if ubuntu uses apt-get to download and install package from repository then arch linux uses pacman to download and install package from repository
- ubuntu / debian uses init as its service manager and arch linux uses systemd as its service manager.
- ubuntu uses PPA (Personal Package Archive) as a repository created by community / users while arch linux uses AUR (Arch User Repository). the advantages of this AUR we can see the script and edit it before running PPA can not see the contents of the script to be run.
Steps to install Antergos Arch Linux:
The first thing to be prepared is to make a bootable media using flash / DVD, also set its firmware mode to use BIOS / UEFI and Setting boot sequence from DVD / flash which contains Antergos Installer file.
1. Start Live CD
After the computer successfully boot from the DVD / flash then select the Start menu Antergos Live on the boot loader.
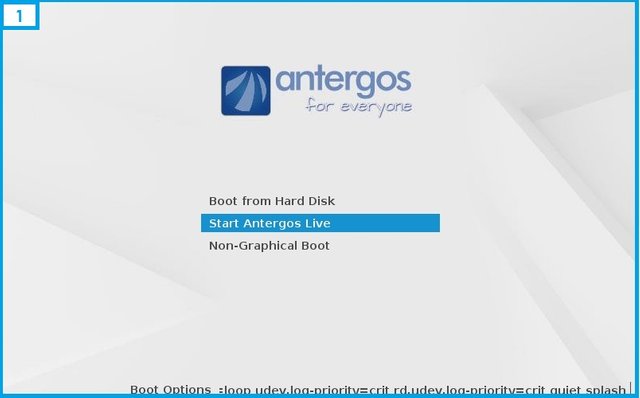
2. Network Settings
Antergos requires an internet connection to update the installer, and you need to know the antergos installation is done online (download from the internet not from bootable media) so you need to make sure the IP settings are correct and connected to the internet.
If your Wifi card is not detected please use the cable for installation.
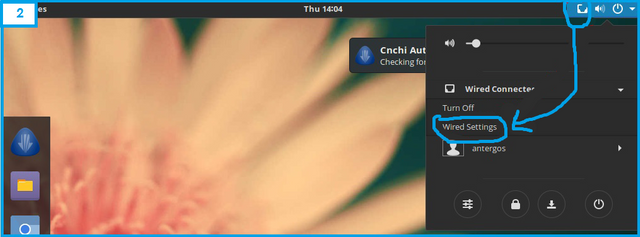
3. Run the Antergos Installer
Wait a few moments for the installer to be updated automatically and then go into menu and select install antergos to run antergos installer.
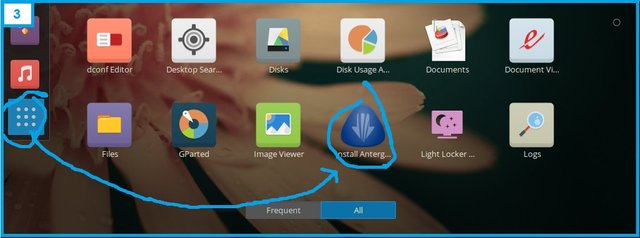
4. Select the install menu> select Language
Language selection here will determine the language used on the system (Here I choose english)
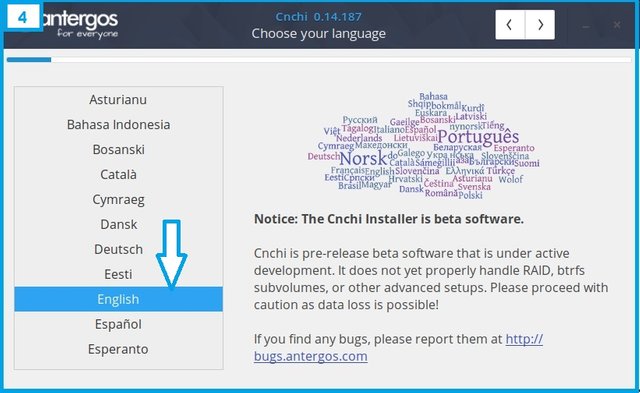
5. Check system
installer will check the condition of the computer, if eligible then the installation process can continue the terms here:
- Minimum has 8GB of storage (HDD / SSD)
- If you use a laptop then plug your laptop charger
- The computer must be connected to the internet
- Cnchi (the installer application you are using) must have the same version as the server (latest version)
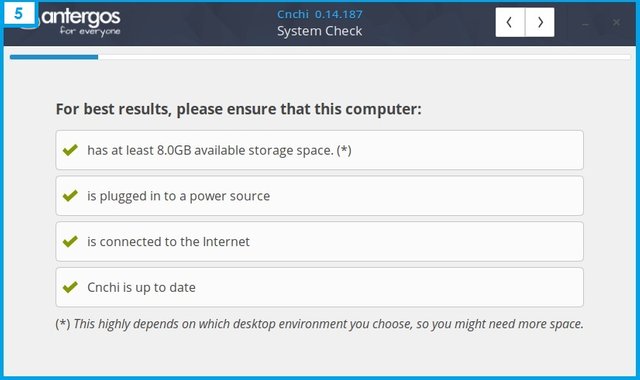
6. Choosing Locations and Locale
This option specifies the locale varible, where the locale will be used by the application as a parameter for rendering text, currency format, time and date format, writing type and other parameters.
If you want to use English for all menus then you select only English, if you want to change later we can change the manual
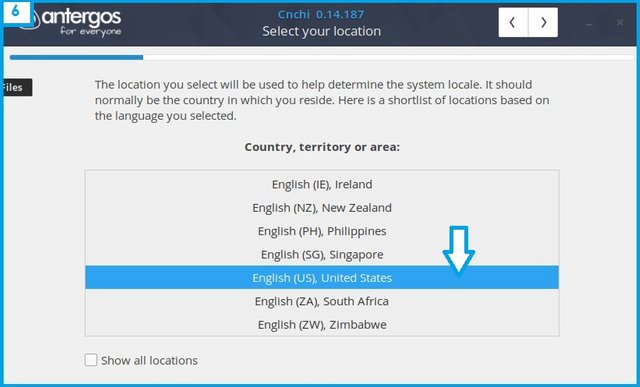
7. Choose Timezone
Choose the time zone in accordance with where you live, because if you choose the wrong clock later in your computer will not match, because the clock will sync with the Internet clock using NTP.
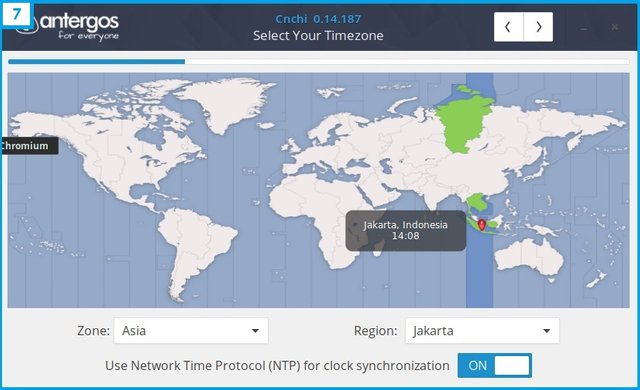
8. Choosing Keyboard Layout
choose the keyboard layout according to the type of keyboard you are using now. standard keyboards typically use the standard English US QWERTY layout.
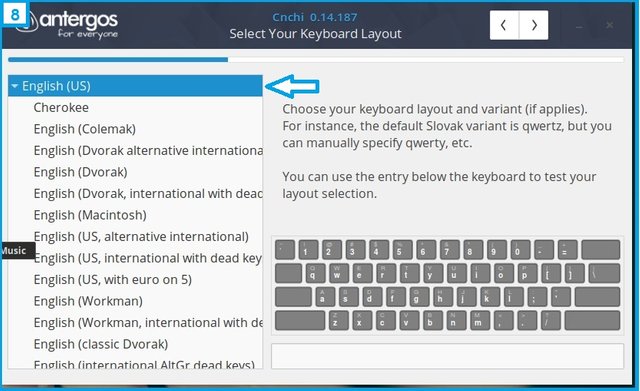
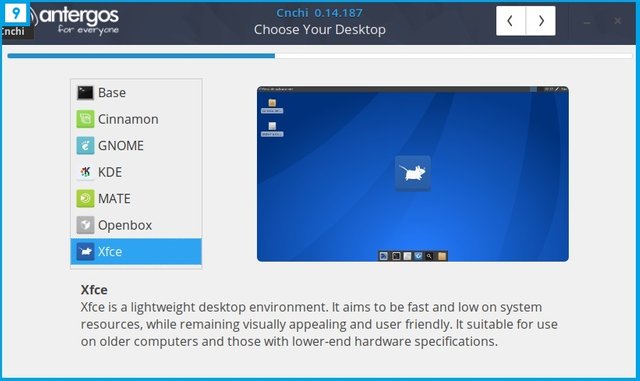
9. Selecting Desktop Environment
each desktop environment has its own look, menu layout, and way of customizing it (customize) and each Desktop environment requires different resources to run. specifically for the laptop I recommend to choose XFCE because desktop environmet is very light and can be adjusted according to our wishes (fully customized).
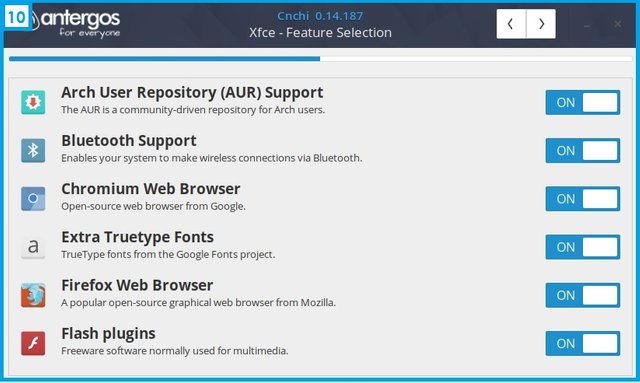
10. Feature selection
To consider is do not enable the proprietary install option VGA driver, because if it does not match it will be blank at boot (failed to enter the X windows). so mending we install the VGA driver later after the OS install process is complete
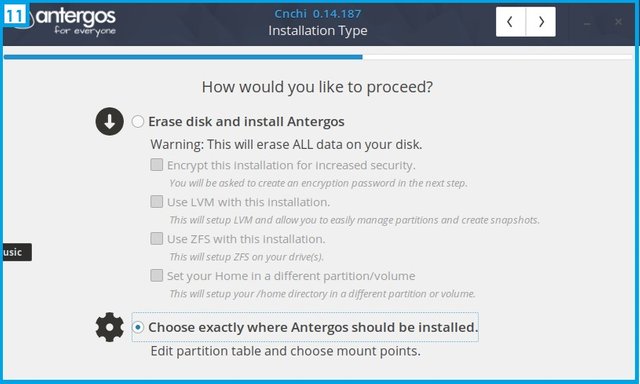
11. Installation Type
if you want to custom a separate partition (eg mount points for / and / home are in different positions) then choose the option under "Choose Exactly where antergos should be installed". if you choose the top then 1 drive will be made 1 partition.
12. Advanced Installation Mode
This menu will appear if you choose the lower option in the installation type session
- Each drive will be represented with / dev / xxx, xxx here starting from the initial drive with the name sda, second drive with third sdb drive with sdc and so on.
- Partition for each drive will be added numbers behind him for example first partition on sda1 named sda1, second partition on drive sda will be named sda2 and so on.
- You can create a partition on the drive if the drive already has partition table (MBR / GPT)
- Partition table selection should be adjusted with firmware mode, if BIOS mode use MBR and if UEFI use GPT.
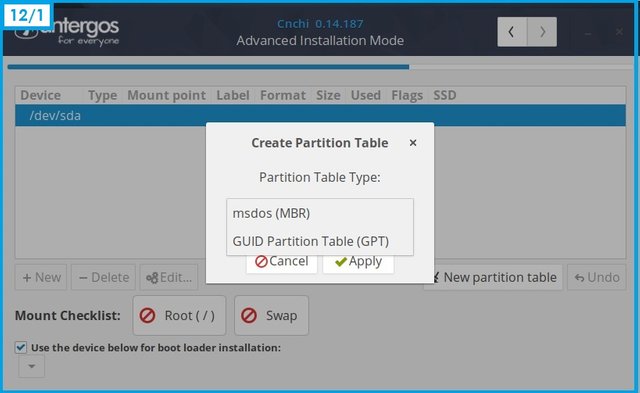
- Mount Check List: provides a description of mount points that must be made for example:
+BIOS mount point, which must be made is Root (/) and Swap
+UEFI mount points, t the mandatory ones are Root (/) and Efi partition (/ boot / efi)
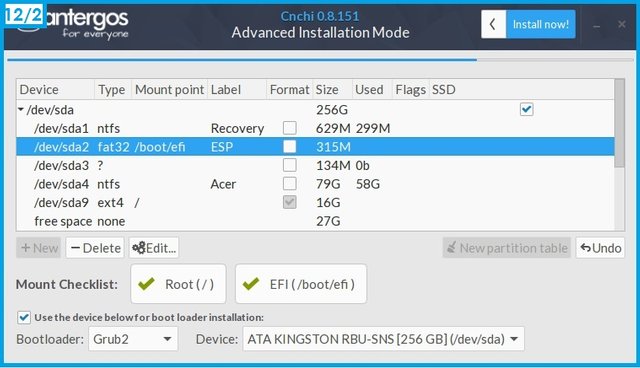
Do not forget to specify the boot loader to use and the location of the boot loader installation. put the boot loader on the drive where the system will be installed.
13. Creating Partitions
Create a partition for root (/) first if you use BIOS mode and create an EFI (/ boot / efi) partition if you are using UEFI mode.
Create partition for root (/)
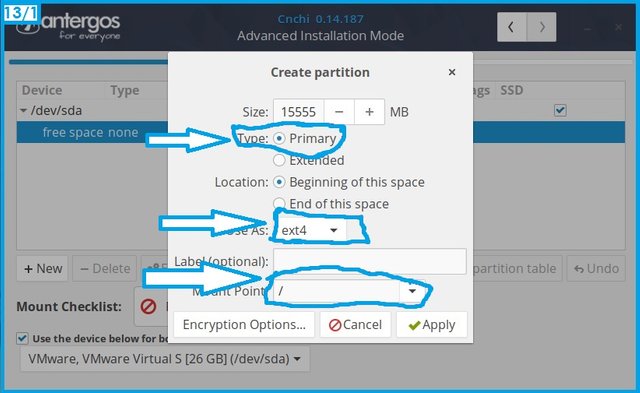
Root here is like a C drive in windows containing the OS file itself and where the application is installed, you can specify its size (my suggestion is at least 20Gb) Create EFI partition (/ boot // efi)
This partition will be loaded by linux boot loader if you use UEFI mode, if you use BIOS boot loader will be in root (/). 1GB is more than enough for EFI share
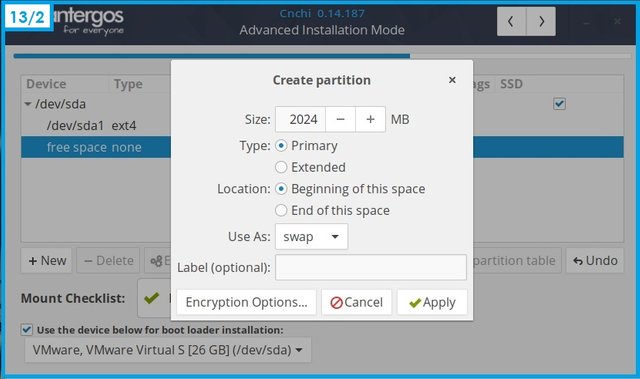
Create a swap partition
Swap acts exactly like virtual memory on windows, swap will be used if the operating system runs out of RAM, because the average computer now has more than 4GB of ram then just make it 2GB to Swap.
Creating a Partition for Home (/ home)
Home here is like my document on windows, we can use another partition to mount to / home so that our document is not mixed with operating system file.
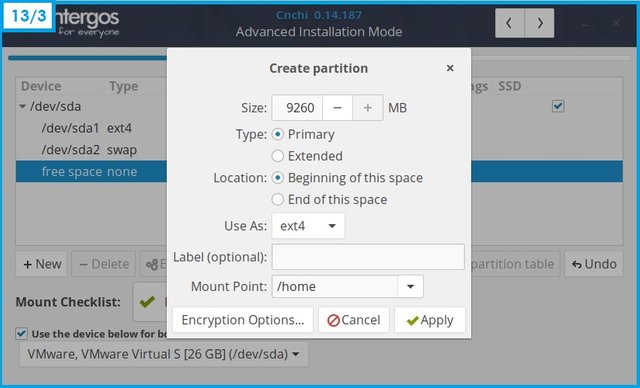
If any partition is not specified mount point then it will appear in the file manager like D E F drive on windows.
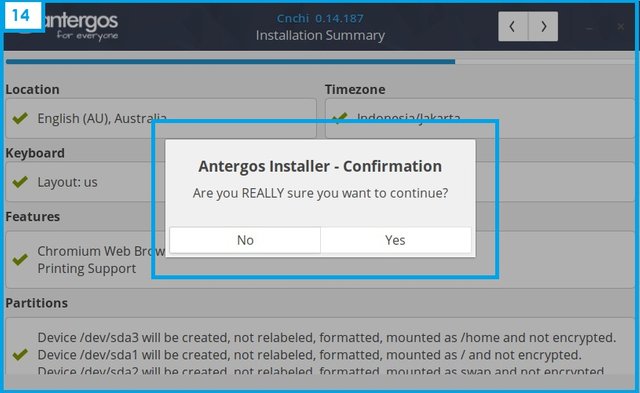
14. Install summary
if you are sure you have done the settings correctly then select yes to continue the install process.
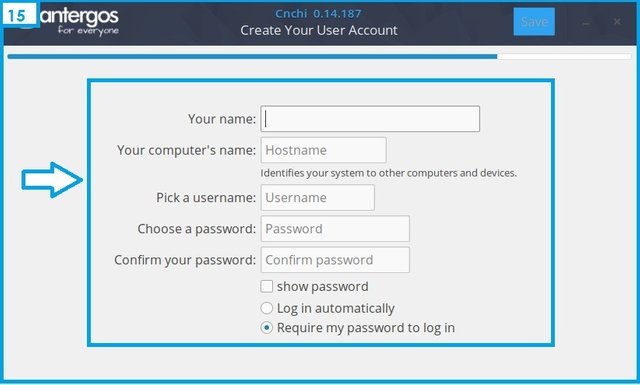
15. Create User and Computer Name
Create user and password wisely and do not forget till you can not get into new linux you install, click save to continue.
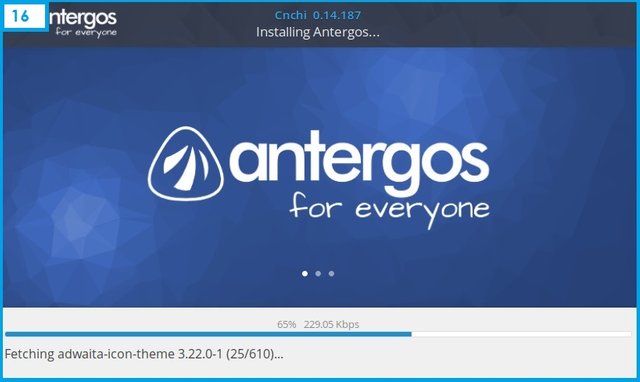
16. Download and Install
Download and install process begins please wait patiently to complete.
Done.
Hopefully the tutorial that I share above is useful for you who need it. And thanks for all of you who have visited my post.
Thank You
Posted on Utopian.io - Rewarding Open Source Contributors
Thank you for the contribution. It has been approved.
You can contact us on Discord.
[utopian-moderator]
Hey @farahnabilla I am @utopian-io. I have just upvoted you!
Achievements
Suggestions
Get Noticed!
Community-Driven Witness!
I am the first and only Steem Community-Driven Witness. Participate on Discord. Lets GROW TOGETHER!
Up-vote this comment to grow my power and help Open Source contributions like this one. Want to chat? Join me on Discord https://discord.gg/Pc8HG9x