ESP8266 tutorials--创建web服务器
What Will I Learn?
让esp8266模块连接wifi
使用esp8266模块创建一个web服务器
配置web服务器属性
自定义一个web界面
Requirements
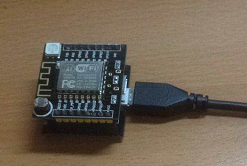
ESP8266 -12F
Arduino IDE (版本要大于1.6.7)


Difficulty
Basic
Tutorial Contents
使用esp8266模块创建一个web服务器
1.引入esp8266的wifi库文件
#include <ESP8266WiFi.h>
在esp8266wifi.h的库文件中,已经包含了其他搭建web服务器所需的库文件
在esp8266wifi.h中,引入的库文件包括如下:
#include "IPAddress.h" #include "WiFiClient.h" #include "WiFiServer.h" #include "WiFiClientSecure.h"- IPAddress :用于将ip地址格式化
- WiFiClient:可以基于此库连接现有的wifi热点
- WiFiServer:可以基于此库创建wifi的web服务器
- WiFiClientSecure:用于安全连接wifi
2.让esp8266模块连接wifi
const char* ssid = "steemit";
const char* password = "cha0s0000";
- ssid:设置要连接的wif的账号
- password:设置要连接的wif的密码
- const char* ssid = "steemit";:在这里,两个变量都要用c字符串指针形式
3.初始化web服务器的端口配置
WiFiServer server(80);
- server(80):设定该web服务器的访问端口为80
4.初始化串口,用于调试
Serial.begin(115200);
- begin(115200):设置波特率为115200
5.配置开放wifi热点
WiFi.begin(ssid, password);
- begin(ssid, password):配置esp8266模块使其连接上wifi
6.检测是否连接wifi成功
 while (WiFi.status() != WL_CONNECTED) {
    delay(500);
    Serial.print(".");
  }
- WiFi.status():若链接wifi成功则返回WL_CONNECTED
7.初始化web服务器
server.begin();
- begin():开启服务器
8.检测是否有客户端接入web服务器
  WiFiClient client = server.available();
  if (!client) {
    Serial.print(".");
  }
- server.available():检测esp8266模块查看连接上该wifi的用户是否访问该web服务器
9.定义返回的http数据
String s = "HTTP/1.1 200 OK\r\nContent-Type: text/html\r\n\r\n<!DOCTYPE HTML>\r\n<html>\r\nHello I am cha0s0000 ";
s += "</html>\n";
- HTTP/1.1 200 OK:设定返回的http请求头,200为连接成功
- Content-Type: text/html:设定返回的类型为text/html格式的数据
- :返回html格式数据
10.发送返回数据至客户端
client.print(s);
整合程序并烧写上传到ESP8266模块
1.打开Arduino IDE

2.选择对应的开发板,此步骤可以参照:**你的wifi我作主----DIY一个wifi杀手 **

3.整合程序
#include <ESP8266WiFi.h>

const char* ssid = "god";
const char* password = "zhangliuchen";

WiFiServer server(80);

void setup() {
  Serial.begin(115200);
  WiFi.begin(ssid, password);
  while (WiFi.status() != WL_CONNECTED) {
    delay(500);
    Serial.print(".");
  }
  Serial.println("");
  Serial.println("successfully connect to wifi");
  server.begin();
  Serial.println("server IP is :");
  Serial.println(WiFi.localIP());
}

void loop() {
  WiFiClient client = server.available();
  if (!client) {
    return;
  }
  Serial.println("there is a client");
  while(!client.available()){
    delay(1);
  }
  client.flush();
  String s = "HTTP/1.1 200 OK\r\nContent-Type: text/html\r\n\r\n<!DOCTYPE HTML>\r\n<html>\r\nHello I am cha0s0000 ";
  s += "</html>\n";
  client.print(s);
}
4.上传程序
注意:上传程序的时候,需要按一下esp8266-12f模块的RST键


5.测试效果:

Posted on Utopian.io - Rewarding Open Source Contributors
Thank you for the contribution. It has been approved.
You can contact us on Discord.
[utopian-moderator]
Hey @cha0s0000 I am @utopian-io. I have just upvoted you!
Achievements
Suggestions
Get Noticed!
Community-Driven Witness!
I am the first and only Steem Community-Driven Witness. Participate on Discord. Lets GROW TOGETHER!
Up-vote this comment to grow my power and help Open Source contributions like this one. Want to chat? Join me on Discord https://discord.gg/Pc8HG9x