Set up your own OpenVPN Server and connect with ssh
OpenVPN Connect is the original open source program on allows you to manage any virtual private network. PrivateTunnel is a OpenVPN protocol service only. Connection via other connection protocols, such as PPTP, L2TP/IPsec, or SSTP will not lead to a successful connection. OpenVPN is not only the most advanced security features, but also compatible with third-party software and supports many platforms.We will use the personal version of OpenVPN, Privatetunnel for free.
What Will I Learn?
- You will learn create theDigitalOcean account and open server.
- You will learn connecting to the server with SSH.
- You will learn Connect to the IP address with putty software.
- You will learn OpenVPN connection.
Requirements
- DigitalOcean server
- Ubuntu 14.04.4 64 Bit versiyonunu
- Putty configuration
- OpenVPN Connect
Difficulty
- Intermediate
Tutorial Contents
Setting up a personal VPN service is advantageous in terms of price, are you followed with a special ip and management panel ? He will save you from the question.
In this guide, we will talk about setting up a high-speed VPN server for $ 5 a month. Let's all go together.
We Install Your Personal VPN Server!
For the installation, we first need a company that will rent us a cloud server with affordable but high-speed connectivity . Shuan offers DigitalOcean the best choice for this quest . With prices starting at $ 5 per month, DigitalOcean offers you a cloud server rental from many countries.
Caution: When entering the password with Putty during installation, the passwords you have entered on the screen do not appear, you can press Enter key after entering the password.
Caution: When logging into OpenVPN after installation, your browser will give you an unsafe site warning. The reason for this is the use of the https protocol without an SSL certificate. It does not pose any problems, you can safely skip the warning.
First, we need to be a member of DigitalOcean by clicking the link above .

After filling in the required information, there are two processes that are requested from you in the page that is not available.

First of all, we will confirm your account with the first e-mail address. As long as you do not approve your account, you can not go through the other steps and create a cloud server.

By clicking on the link in the mail, we perform the validation process and pass the second step. In the second step, you are asked to enter your credit card information or pay $ 5 via Paypal.
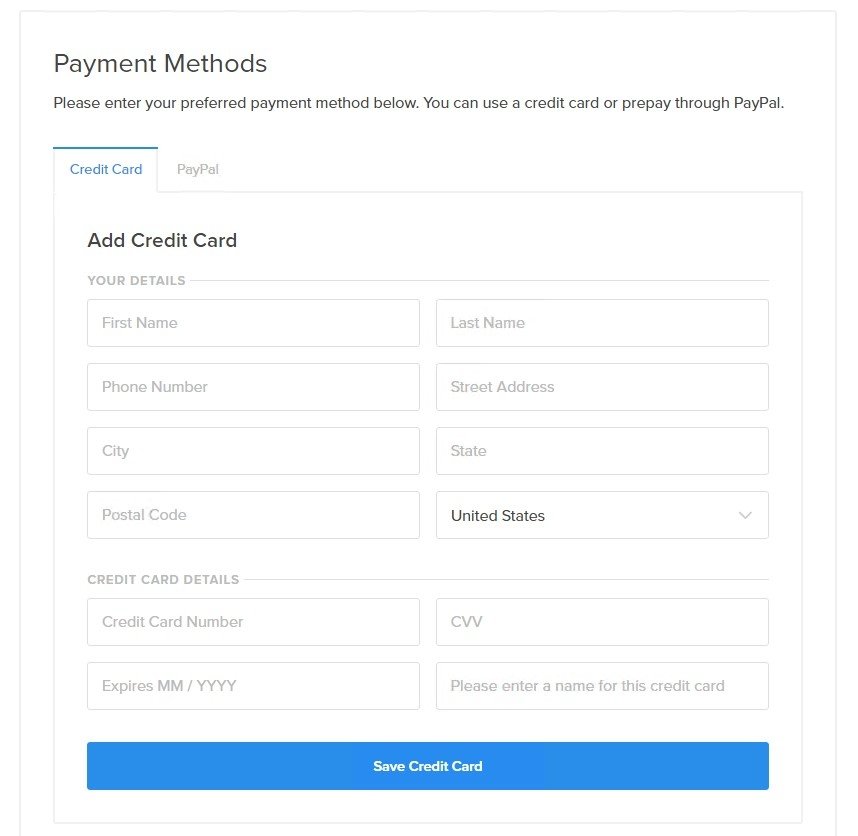
If you enter your credit card information, a small amount is withdrawn and the card information is verified. On the paypal side, your fee account is transferred. We prefer payment via PayPal . Once we've made the payment, our account is approved directly and we are now moving to the cloud server creation step.
From the Create Droplets menu we can create our cloud server. We will use the OpenVPN software for the VPN server and for this reason we choose the 64 bit version of 14.04.4 which is the latest Ubuntu version compatible with OpenVPN .
Among the offered packages, we do not need processor power, so we choose the lowest priced $ 5 package. This package offers you up to 1 TB of data transfer per month. The most important option for us is choosing the right location.

As a result of our tests , we reached the best ping times and internet speed via Amsterdam. It also determines which country your traffic will pass through when using VPN. A user who prefers Amsterdam will appear to be logging in from that country when a rope query is made.

After making your choice from this section, we start the installation process by clicking the Create button. After waiting 1 - 2 minutes, the server informs us via e-mail.
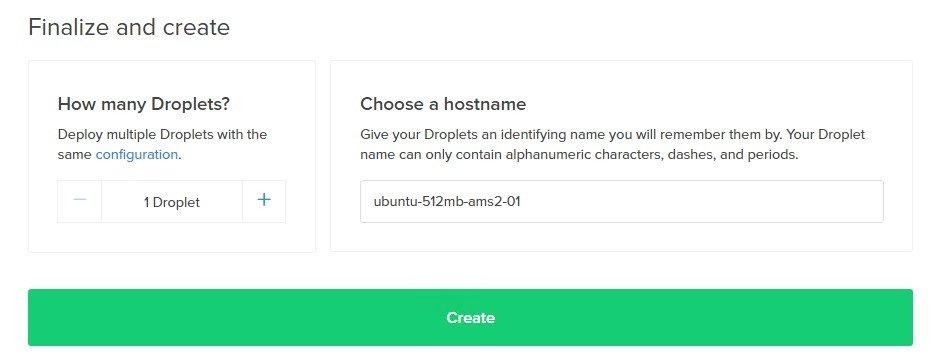
When we check the e-mail to our e-mail address, we see that the ip address / user name and password are sent to us.
Installing OpenVPN on Ubuntu
Now we will connect to the server we created with SSH. For this we use Putty software, which allows us to perform fast operations compared to the small structure.

:: https://the.earth.li/~sgtatham/putty/latest/x86/putty.exe
After opening the Putty software without needing to install, we are connecting to the company by entering the IP address that is communicated to us.
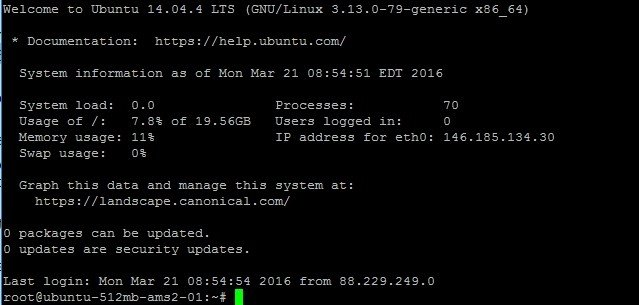
After entering the username and password on the screen, we now have the connection and we have all the authority of the server.

When you log in for the first time, you will be asked to change your password for security reasons. Once you have entered your normal password first, you can enter the new password and perform the password renewal process. Once we have changed the guardianship, we can move on to other steps.
Before installing OpenVPN, we install all updates to achieve higher performance. For this you need to enter sudo apt-get update command. Updates are starting to install automatically.

Once the updates are complete, we need to edit the network settings to avoid problems during the VPN connection . With the following command, we open the required file to make the address part and the up ip address part the same.
sudo nano / etc / network / interfaces
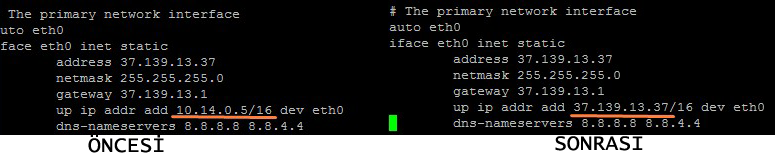
To save the changes, press the Enter key twice after typing Yes after the CTRL + X combination. After the updates and changes, we reboot with the reboot command so that the installation is healthy. Here the PuTTY connection will go. After 30 seconds, reconnect as we did above.
Now we are going to install OpenVPN. We install OpenVPN compatible with Ubuntu 14, which we prefer during installation, with the following command.
sudo wget http://swupdate.openvpn.org/as/openvpn-as-2.0.25-Ubuntu14.amd_64.deb

The file required for OpenVPN was successfully downloaded. Now we use the following command to start the installation.
dpkg -i openvpn-as-2.0.25-Ubuntu14.amd_64.deb

The installation was successfully completed. Here we have two different addresses, one for management panel and one for VPN use. After we register these addresses, we again set the security for OpenVPN.
***sudo passwd openvpn

After changing the password, we can now access our OpenVPN server with the following information.
Admin Panel: https: // your ipadress: 943 / admin
User Panel: https: // your ipadress: 943 /
User: OpenVPN / Password: The password we specified in the previous step
We are starting to use OpenVPN!
You can download OpenVPN on your iOS and Android devices by downloading OpenVPN Connect software. We show you here on the computer.
https: // iPadress: 943 / We access the user panel and login with*** username / password .***

After you log in, OpenVPN Connect software will be offered according to the operating system you are using .
We install the file we downloaded in Windows operating system and click on OpenVPN icon in the notification area and click "Connect to xxx".
16
We enter the user name and password that we entered in the browser on the pre-screen, and press the connect button. VPN connection is completed within approximately 5 - 10 seconds.

Congratulations! You will connect to your chosen location. Succesful you're connected. Have finished this tutorial completely. Thanks for reading...
Curriculum
Posted on Utopian.io - Rewarding Open Source Contributors
Your contribution cannot be approved because it is a duplicate. It is very similar to a contribution that was already accepted here.
You can contact us on Discord.
[utopian-moderator]
Hey @sedatyildiz, I just gave you a tip for your hard work on moderation. Upvote this comment to support the utopian moderators and increase your future rewards!