How to introduce new features to users of your application using Bootstrap Tour
What Will I Learn?
- You will learn about Bootstrap Tour
- You will learn how to design a simple webpage using bootstrap
- You will learn how to use Bootstrap Tour
- You will learn how to introduce new features to your users
Requirements
- You must have a working knowledge of HTML and CSS
- You need basic knowledge on how to create a website
- You need Text Editor, web browser and internet to download resources
Difficulty
- Basic
Tutorial Contents
Introduction
Bootstrap Tour is a free and open source JavaScript library built with Twitter Bootstrap. It helps websites or application owners to introduce new features tor their users with ease. Like the name implies, it was built to serve as a step-by-step guide that will take users on tour to introduce the new features a website or an application.
Bootstrap Tour is user-friendly and also compatible with most browsers, Google Chrome, Mozilla, Firefox and Safari etc. With just basic HTML, CSS and JQuery, we can setup the library in no time.
For this tutorial, we are going to develop a bootstrap webpage and integrate the Bootstrap Tour JS library to show users around the web page. It’s very simple and easy if you follow the steps below accordingly.
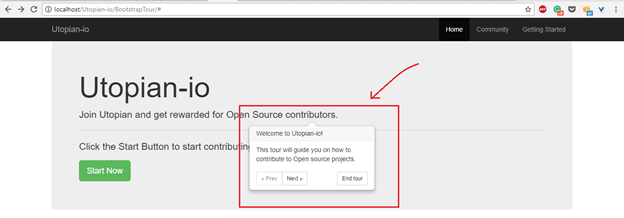
STEPS
Setting up our web page
- Launch your text editor and create a file named “index.html” and save it in your project folder.
- Declare the standard HTML5 elements from opening to closing tags. This;
<!doctype html>
<html lang="en">
  <head>
    <meta charset="utf-8">
    <meta name="viewport" content="width=device-width, initial-scale=1, shrink-to-fit=no">
    <meta name="description" content="">
    <meta name="author" content="">

    <title>Utopian-io – Quick and Easy Bootstrap Tour</title>

  </head>
<body>

</body>
</html>
- We will setup the bootstrap framework in our website. We have two options, one is to download the resources from bootstrap website https://getbootstrap.com/ and include directly like I did or include the CDN links into our website. For Bootstrap Tour to work we need to use Bootstrap Version 3.3.7 and below. The CDN links are;
The CSS:
<link href="https://maxcdn.bootstrapcdn.com/bootstrap/3.3.7/css/bootstrap.min.css" rel="stylesheet" integrity="sha384-BVYiiSIFeK1dGmJRAkycuHAHRg32OmUcww7on3RYdg4Va+PmSTsz/K68vbdEjh4u" crossorigin="anonymous">
The JS:
<script src="https://maxcdn.bootstrapcdn.com/bootstrap/3.3.7/js/bootstrap.min.js" integrity="sha384-Tc5IQib027qvyjSMfHjOMaLkfuWVxZxUPnCJA7l2mCWNIpG9mGCD8wGNIcPD7Txa" crossorigin="anonymous"></script>
The JQuery
<script src="https://cdnjs.cloudflare.com/ajax/libs/jquery/1.10.2/jquery.min.js"></script>
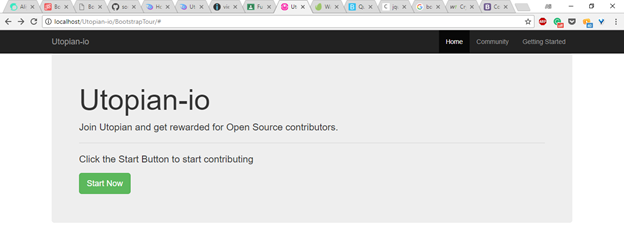
- We are going to add the following piece of code to create a navigational bar and Bootstrap Jumbotron.
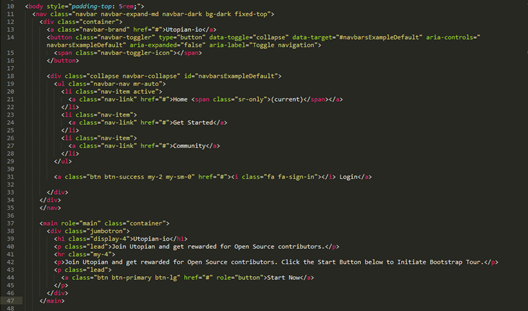
Integrating Bootstrap Tour
We are going to integrate Bootstrap Tour into our web page. We have two options on how to go about it. It’s either we download the resources from here and include it locally into our site or we use the CDN links which is easy and quicker to work out. For this tutorial, we are going to download and include the assets locally.
- Add the following Class to the section of the site we want to introduce to users. The classes are;
tour-step tour-step-three

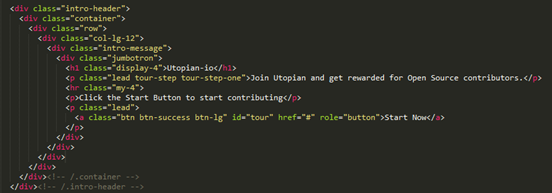
We need to add some code snippets to initiate/start the Bootstrap when the user visits the site or reloads.
(function(){
        var tour = new Tour({
            storage : false
        });
        tour.addSteps([
          {
            element: ".tour-step.tour-step-one",
            placement: "bottom",
            title: "Welcome to Utopian-io!",
            content: "This tour will guide you on how to contribute to Open source projects."
          },
          {
            element: ".tour-step.tour-step-two",
            placement: "bottom",
            title: "Main navigation",
            content: "This is the navigation of the site"
          },
          {
            element: ".tour-step.tour-step-three",
            placement: "bottom",
            backdrop: true,
            title: "Site Name",
            content: "Click this site to go to main site"
          },
        ]);
        // Initialize the tour
        tour.init();
        // Start the tour
        tour.start();
      }());
Code Explanation
The above code explanation. The options used are;
storage: false – By default Bootstrap Tour Stores Introduction steps so in a local storage. By setting it to false. We will initiate it whenever a user reloads that same page.
element: ".tour-step.tour-step-one", - this is the class we setup to the various sections we want to introduce users to
placement: "bottom", - Placement option sets the Boostrap Tour Tooltip to either Top or Bottom
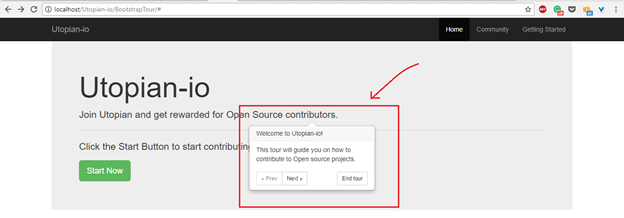
title: "Welcome to Utopian-io!", - this is the title of the Tooltip
content: "This tour will guide you on how to contribute to Open source projects." – the content of the Tooltip
More options can be found in a documentation on the Bootstrap Tour official website.
NEXT
The Next button on the tooltip brings us to the next while Prev to Previews Tour.
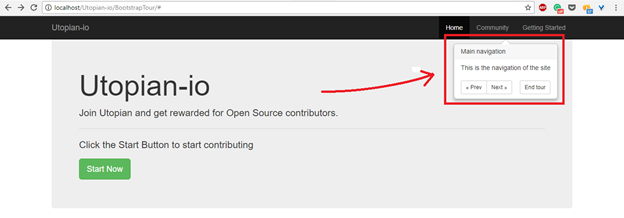
Source Code
<!DOCTYPE html>
<html lang="en">
  <head>
      <meta charset="utf-8">
      <title>Utopian-io | Bootstrap Tour Quick and Easy Feature Introduction</title>
      <link href="https://maxcdn.bootstrapcdn.com/bootstrap/3.3.7/css/bootstrap.min.css" rel="stylesheet" integrity="sha384-BVYiiSIFeK1dGmJRAkycuHAHRg32OmUcww7on3RYdg4Va+PmSTsz/K68vbdEjh4u" crossorigin="anonymous">
      <link href="css/bootstrap-tour.min.css" rel="stylesheet">
  </head>
<body style="padding-top: 5rem;">
  <nav class="navbar navbar-inverse navbar-fixed-top" role="navigation">
      <div class="container">
        <div class="navbar-header">
          <button type="button" class="navbar-toggle" data-toggle="collapse" data-target=".navbar-ex1-collapse">
            <span class="sr-only">Toggle navigation</span>
            <span class="icon-bar"></span>
            <span class="icon-bar"></span>
            <span class="icon-bar"></span>
          </button>
          <a class="navbar-brand tour-step tour-step-three" href="#">Utopian-io</a>
        </div>
        (html comment removed:  Collect the nav links, forms, and other content for toggling )
        <div class="tour-step tour-step-two collapse navbar-collapse navbar-right navbar-ex1-collapse">
          <ul class="nav navbar-nav">
            <li class="active"><a href="#about">Home</a></li>
            <li><a href="#services">Community</a></li>
            <li><a href="#contact">Getting Started</a></li>
          </ul>
        </div>(html comment removed:  /.navbar-collapse )
      </div>(html comment removed:  /.container )
    </nav>
    <div class="intro-header">
      <div class="container">
        <div class="row">
          <div class="col-lg-12">
            <div class="intro-message">
              <div class="jumbotron">
                <h1 class="display-4">Utopian-io</h1>
                <p class="lead tour-step tour-step-one">Join Utopian and get rewarded for Open Source contributors.</p>
                <hr class="my-4">
                <p>Click the Start Button to start contributing</p>
                <p class="lead">
                  <a class="btn btn-success btn-lg" id="tour" href="#" role="button">Start Now</a>
                </p>
              </div>
            </div>
          </div>
        </div>
      </div>(html comment removed:  /.container )
    </div>(html comment removed:  /.intro-header )

    <script src="https://cdnjs.cloudflare.com/ajax/libs/jquery/1.10.2/jquery.min.js"></script>
    <script src="https://maxcdn.bootstrapcdn.com/bootstrap/3.3.7/js/bootstrap.min.js" integrity="sha384-Tc5IQib027qvyjSMfHjOMaLkfuWVxZxUPnCJA7l2mCWNIpG9mGCD8wGNIcPD7Txa" crossorigin="anonymous"></script>
    <script type="text/javascript" src="js/bootstrap-tour.min.js"></script>
    <script type="text/javascript">
      (function(){
        var tour = new Tour({
            storage : false
        });
        tour.addSteps([
          {
            element: ".tour-step.tour-step-one",
            placement: "bottom",
            title: "Welcome to Utopian-io!",
            content: "This tour will guide you on how to contribute to Open source projects."
          },
          {
            element: ".tour-step.tour-step-two",
            placement: "bottom",
            title: "Main navigation",
            content: "This is the navigation of the site"
          },
          {
            element: ".tour-step.tour-step-three",
            placement: "bottom",
            backdrop: true,
            title: "Site Name",
            content: "Click this site to go to main site"
          },
        ]);
        // Initialize the tour
        tour.init();
        // Start the tour
        tour.start();
      }());
    </script>
</body>
</html>
Curriculum
Follow more of my tutorials below;
- https://utopian.io/utopian-io/@aliyu-s/how-to-add-a-content-management-system-cms-to-an-existing-website
- https://utopian.io/utopian-io/@aliyu-s/how-to-create-a-quick-and-beautiful-landing-page-using-bootstrap-4
- https://utopian.io/utopian-io/@aliyu-s/how-to-integrate-a-rich-wysiwyg-text-editor-in-a-website
- https://utopian.io/utopian-io/@aliyu-s/how-to-create-a-spreadsheet-component-using-html-and-javascript
Posted on Utopian.io - Rewarding Open Source Contributors
@aliyu-s, I always try to support who contribute to open source project, upvote you.
Good one there
Thank you!
You did a great job,i hope it is approved
Thank you!
Nice article brother... I love open source projects
Thank you!
A very Badt programmer... It was a bit hard understanding the tutorial oh, mk I no lie, but thumbs up anyways...
Sorry to hear this. I will do better next time. Thank you for stopping by.
Waoh, a lot of the new ideas to learn from. Good job@aliyu-s
Thank you!
Thank you for the contribution. It has been approved.
You can contact us on Discord.
[utopian-moderator]
Hey @aliyu-s I am @utopian-io. I have just upvoted you!
Achievements
Suggestions
Get Noticed!
Community-Driven Witness!
I am the first and only Steem Community-Driven Witness. Participate on Discord. Lets GROW TOGETHER!
Up-vote this comment to grow my power and help Open Source contributions like this one. Want to chat? Join me on Discord https://discord.gg/Pc8HG9x