ArcMap di ArcGis - Primi passi | First steps [ITA - ENG]

 Hi to everyone e bentornati sulla mia steem-page!
In questo post vi voglio illustrare il lato pratico di uno dei software più ampi e complicati del web in termini di mappature geologiche/topografiche: ArcGis. Chi è dell'ambiente, come me, ci si sarà sicuramente imbattuto o ne avrà sentito parlare.. ebbene, se siete pronti, iniziamo!
 Hi to everyone and welcome in the my steem-page!
In this post I want to illustrate the practical side of one of the widest and most complicated software on the web in terms of geological / topographical mapping: ArcGis. Who is of the environment, like me, you will surely have come across or have heard of it .. well, if you are ready, let's start!
Questa è come si presenta la schermata iniziale del nostro progetto bianco!
This is the home screen of the our blank-map!

Parto con l'illustrarvi un po' di elementi:- Table of Contents (a sx): è la nostra “tabella dei contenuti” in cui avremo elencati i vari “layers” in ordine di visualizzazione.
- ArcToolbox (a dx): questo invece è il nostro “archivio degli strumenti” con cui possiamo elaborare i nostri layer e crearne altri.
- Catalog (a dx): è la finestra che ci permette di andare a pescare i file dalle cartelle (precedentemente collegate) del nostro hard-disc.
- Search (a dx): la salvezza per chi non si ricorda mai dove sono di preciso gli strumenti della ArcToolbox!
- Create Feature (a dx): è la tabella che ci permette di selezionare il tipo di modifica che è possibile apportare a un dato layer con la funzionalità Editing.
- Barre degli Strumenti (in alto): sta sotto alla stringa base del software (File, Edit, View, ecc) ed è interamente personalizzabile da noi in base agli strumenti che ci servono per modificare un dato layer.
- Finestra centrale: è ovviamente la nostra finestra di lavoro in cui comparirà il nostro prodotto di volta in volta.
The elements in this picture is:- Table of Contents (to left): is our table in which we will have listed the various "layers" in order of visualization.
- ArcToolbox (to right): this is our toolbox with which we can process our layers and create others.
- Catalog (to right): is the window that allows us to go taking the files from the folders (previously connected) of our hard-disc.
- Search (to right): the salvation for those who never remember where the ArcToolbox tools are!
- Create Feature (to right): is the table that allows us to select the type of modification that can be made to a given layer with the Editing function.
- Toolbars (to up): it is under the basic software command-strip (File, Edit, View, etc.) and is entirely customizable by us based on the tools we need to modify a given layer.
- Central window:is obviously our working window in which our product will appear from time to time.
Bene... ora vi mostrerò come implementare la nostra ArcToolbox di una tool aggiuntiva – nel mio caso sarà ELA Calculation toolbox – preventivamente scaricata, passo dopo passo (le immagini e i comandi sono in inglese, ma potete farlo anche se avete la versione di ArcGis in italiano, è davvero semplicissimo!).
Well ... now I will show you how to implement our ArcToolbox of an additional tool – in my case: ELA Calculation toolbox - previously downloaded, step by step (the images and commands are in English, but you can do it even if you have the ArcGis version in Italian, it's too simply!).

(2) Cartella (Folder) > selezionare la tool > Open

(3) Finish!!

That's all! Visto? Era molto semplice alla fine.
Passiamo alla fase successiva e quindi la vera fase iniziale: cosa fare per creare un nuovo layer (ad es. uno shapefile) su un progetto bianco correttamente georeferenziato.
Let's move on to the next phase and then the real initial phase: what to do to create a new layer (for example, a shapefile) on a correctly georeferenced blank project.

[Attenzione! Dopo questo passaggio non importerà rieseguirlo di volta in volta, ma vi ritroverete la cartella collegata anche le volte in cui userete successivamente il programma - Warning! After this step it will not be necessary to re-execute it from time to time, but you will find the linked folder also the times in which you will use the program later]
- Open Catalog > Extent Folder > tasto destro > New > Shapefile..
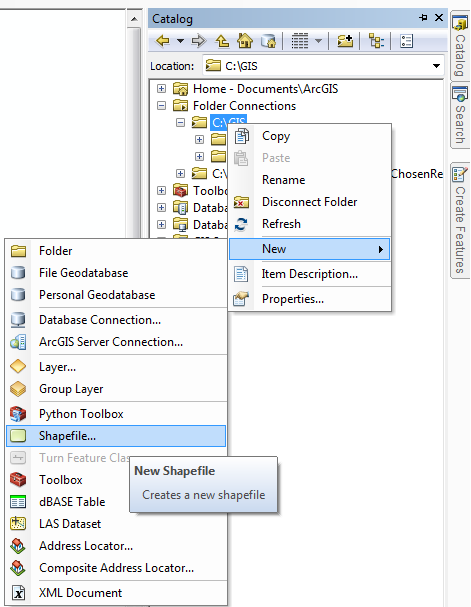
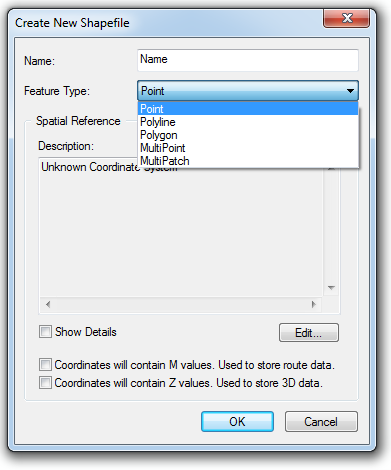
- Feature Type: selezionate ciò che volete disegnare [Ricordate che ogni shapefile può contenere un solo tipo di dato geometrico!]


3. Georeferenziate il vostro file – importante! La georeferenziazione dipende dall'area in cui è situato il vostro layer e quindi su cui state lavorando! Per stare sul sicuro, se avete già un altro file nel vostro hd della stessa zona, vi suggerisco di esportare le coordinate da quello stesso file [fase 3.2]! - We have two alternatives: to select georeferencing from the list [phase 3.1] or import its [phase 3.2]!
3.1 – Edit > Select the correct georeferencing > Ok > Ok.

3.2.1 Edit > Add Coordinate System > Import...

3.2.2 Selezionare il file con le coordinate da importare (Select the file) > Add > Ok > Ok.

3.4 Ora avete il vostro shapefile! - Now you have your shapefile in the Table of Contents!

E per modificarlo?
Dovete cercare il vostro Tool Editor nella vostra Barra degli Strumenti. Se già non ce l'avete, i passaggi per inserirla sono pochi e rapidi:
And to editing?
You have to look for your Tool Editor in your Toolbar. If you do not already have it, the steps to insert it are few and rapid:

Suggerimento: trascinatela nelle toolbars in modo da non averla in mezzo alla finestra di lavoro, ma fissata in alto! Lavorerete meglio!

(1) Editor > Start Editing > (se vi compare questa finestra: Continue)

(2) Create Features > Name > Point (se avete uno shapefile di punti)

(3) Siete pronti per editare! Iniziate pure a posizionare i vostri punti sul foglio! - You are ready!
P.S. Ricordatevi di salvare prima di chiudere! - Save it before close the window!
[Editor > Save Edits]
Bene, direi che per oggi è tutto! Come avete visto ho scelto di iniziare con le basi e di mostrarvi un tipo di approccio iniziale. Spero che questo post sia utile a chi partendo da zero si sia trovato a dover lavorare su questo programma! Se foste interessati, allego qui sotto il link del mio collega @mirkon86, che vi illustrerà il lato teorico di questo software!~
Well, I would say that for today it's all! As you have seen, I have chosen to start with the basics and to show you a kind of initial approach. I hope this post is useful for those starting from scratch has found to have to work on this program! If you are interested, I attach below the link of my colleague @mirkon86, which will show you the theoretical side of this software! See you soon!

[ Ogni foto in questa pagina, se non citata sotto la foto stessa, è mia e personale ~ Only photo in this page, if not mentioned under the photo itself, is mine and personal.]
Ottima Spiegazione!

Spero di vedere altri tutorial fatti da te!
Mi scusi, ma ci conosciamo? :P
Ottima spiegazione :)
Direi di sì xD grazie
Brava Kaiyoko, bella impaginazione e ottima descrizione di un primo utilizzo del programma.
Brava, potreste addirittura pensare di farne un video corso.
Infatti l'idea non è male e ci avevo anche pensato. Secondo me @kaiyoko sarebbe in grado di farlo senza problemi ^^
Ahah per fare un video dovrei prima di tutto avere abbastanza autostima e poi un pc più potente su cui poter installare i dovuti programmi senza paura di sovraccaricarlo.. forse in futuro.. molto molto futuroso.. xD