Learning JavaScript The Hacker Way - 01: Getting our Resources Right
Hello there, and welcome again to this series of tutorials on which we'll delve into the art of programming in a non-boring way!
We'll start by gathering our learning resources which we'll be using during the course of these lessons, which will include a tool called Tampermonkey, that we'll use to run our scripts, and a knowledge database to which we can go to whenever we are in doubt.
I'll also teach you on how to print these pages to offline reading (if you happen to have issues with your connection or you would rather watch it on your handheld device somewhere where you can study quietly, this will surely come in handy).
Without further introduction, let's begin!
Knowledge Base
In order to learn something from scratch, a basic understanding of the ecosystem is pretty much a necessity. We'll start by fetching some websites where you can start learning the core basics of JavaScript from a theoretical and practical perspective, and have the basis of understanding to start tackling the programming language in a acchievable manner.
Guided Learning
These sites are meant to take you by the hand and help you learn your language trough a series of exercises, tasks and projects which will eventually improve your skills in the technology you choose to learn.
- https://www.freecodecamp.org/
- https://www.codecademy.com/
- https://www.codeavengers.com/
- http://www.codeschool.com/
- http://www.khanacademy.org/cs
Offline Solo learning
These kind of sites are usually meant to serve as knowledge base, and gather a lot of usefull information to learn whatever skill you would need. These are the boring counterpart of the guided learning sites; however, these are meant to work for different purposes: if what you're looking for is a offline-like learning, without too much guidance but instead, discover for yourself what the language got to offer, these are great options to start with.
We will, however, focus on one particular site: W3Schools. Why? Because it's simple, with good enough information, and easy to download. It will be the one we'll be using since most of the learning we'll do will be hands-on, and this will pretty much work as a reference guide. Also it's one of my favorites.
Getting your Knowledge
We'll be using an extension called WintoPDF (http://www.win2pdf.com/download/download.htm) that will allow us to "print" documents in a PDF format directly from Mozilla Firefox (However, for simplicity, you can use Chrome to download the page: Open Chrome, hit CTRL + P, hit Change to change the pre-selected printer, select the PDF option, then hit Save to download the PDF).
After having installed win2pdf and restarted Mozilla Firefox, you'll be able to select it as the printer you would like to print your page on.
I suggest you that, if you happen to have a bad internet connection, every lesson you review and every page you open, you save it with a proper name to later inspection.
Getting our Tool
We'll be using a tool called Tampermonkey (https://addons.mozilla.org/en-US/firefox/addon/tampermonkey/). It's an extension, so all you have to do is install it on your Firefox browser, and you can start using it.
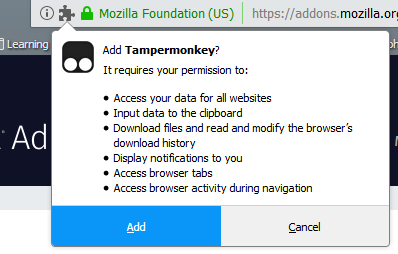
It will show you, on a confirmation message, the permissions you'll be granting to this tool. As you can see, this is a very powerful tool. Use carefully.
After you installed it, you'll see it along your other extensions
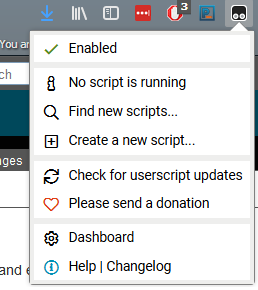
And after you click it, this menu should pop-up
As you can see, we don't have any script running yet, Tampermonkey is enabled, and we can search for other users scripts (One of the outstanding pros of using this script management tool is that you can create scripts and share them with your friends).
Setting our First Script
So, we got our knowledge at hand, we got our tool ready, so we're ready to fire this thing up.
Let's get started then! Let's create our first script, and test it out. Let's go to our menu, and hit the Create New Script.
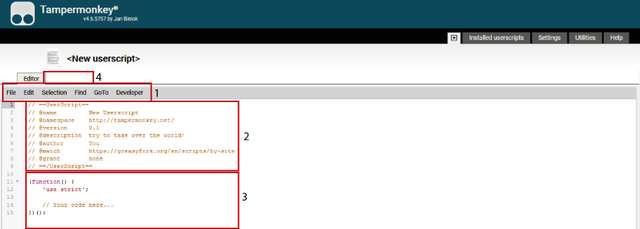
We'll be presented with a new script tab that will look like these:
There are few parts we must pay close attention to here:
- The Tools bar
This will be the bar we'll be using to execute different actions over the script, like saving it, downloading it to disk, and so on. - The Metadata of the Script
This will be read by Tampermonkey in order to execute the script in a certain way, as well as permission, version, namespace and so on. You can read about the specifics of the metadata here (https://tampermonkey.net/documentation.php). - Our editing section
This will be where we'll write our code, right after the metadata is set up. - Settings
We won't be touching this for now, as it is an advanced topics which we don't need to delve into (yet).
We'll proceed to write our very first lines of code, and test out the environment is running smoothly.
We'll update our code as follows:
After having done that, we'll click File -> Save.
We'll go to https://www.google.com
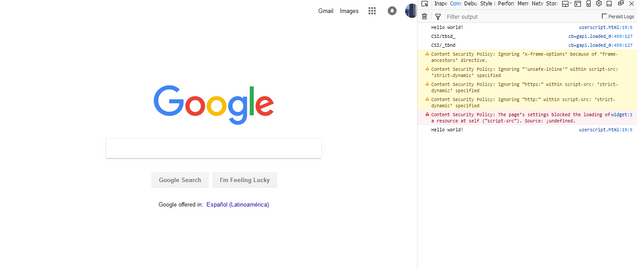
We'll press CTRL + Shift + K, and we should see this window open-up from the right.
Voilah!
Now, you can see the code has been executed (Hello World).
Well done! We have our environment set-up and ready to go.
If you want to try things for yourself, don't hold back. I left a lot of details and information out in order to focus on results; however, feel free to search and delve deeper into what Tampermonkey is and how you can actually use it for something more than a simple "Hello World".
The true hacker doesn't wait: it goes fetching the desired information as soon as it has the opportunity, so I would recommend you to stop by W3School and follow a couple of tutorials for yourself to see where it takes you.
I'll post another post on these series in order to keep teaching you how to learn in a fun and interactive way, delving directly into web pages, and making them do what you want.
Stay tuned! We'll come back tomorrow.



Hola @azolot! Has recibido un voto con peso 50% de @azolot! Únete al equipo de @azolot en el la comunidad en Discord, la comunidad Steemit South America que te encantará!
 Canal de Discord
 Página Steemit
Para apoyarnos, danos un upvote.