Developing Eye-Catching Business Card Using Canva - A Professional Guide
Hello Everyone
I'm AhsanSharif From Pakistan
Greetings to you all, hope you all are well and enjoying a happy moment of life with steem. I'm also good Alhamdulillah. |
|---|

Cover / Final Front
Today I will tell you how to make a business card, and how we can make a professional business card using free resources. Because we have fewer resources and want to make something good, Canva is a good option. You can easily make any business card if you get paid resources on Canva. But if you don't have a paid subscription, how can you make a professional business card?
Front Side:
Step 01
To create this professional card, first of all, we have to open our Canva. We don't need any kind of paid subscription. We will create this card using our Canva resources for free. So, first of all, we have to select our size from here. In which size we want to create it, I will select Landscape here so that it is easy to place and explain things.
When we open Canva, we are presented with different templates at the top, from which we can select one for our size or we can also select it manually.

Step 02
When we have selected our size, then we have four to five options visible on the side, out of which we have to select the option with elements. When we select it, we will have different shapes shown, out of which we have to select a square shape.

Step 03
Now we have to change the color of this shape, so we will go to the top section and click on the color, and on the side, we will have different colors open. From them, we have to select the color with gradients. You can make it any color you want. So I am taking this color that you see in the picture below. After taking it, I made its size a little bigger and fitted it to the bottom left corner.

Step 04
When we have selected it below, now we will make a copy of it again. To make that copy, we have to click on this shape, then we will have three options visible above, here we will click on the plus button, then we will have another new copy of it.

Step 05
Now we have to attach the second shape that we have copied to the top line as a border and we have to reduce its transparency so that it looks lighter and our card looks professional. We will not overdo it.

Step 06
Now we will go to the element section again, from there we have to take a circle and select its color as white. After selecting white, we have to take a template from the elements section again, inside which we have to take our picture, we have to take that too in the circle itself.

Step 07
Now we have to go to our upload folder and upload our first image and after uploading this image we have to select this image from there. After selecting the image, we have to place our image inside the shape that we had taken in the circle and we have to select its position. In between these two, we have to select this shape which is in blue and which has a white color background.

Step 08
Our next procedure is that we have to take the shapes again. We have to take one shape in a square shape and one shape in a circle. We have to make the square shape a little longer and we have to put the round one in front of the long one so that it becomes a beautiful template to write our name.


Step 09
Now we have to take one of the text sections, which is the big heading text, and write our name inside it. After writing the name, we have to place it on top of this black color shape. Now we have to make it bold. After making it bold, we have to make the text that is in Nourd. Now we need to change the color of our text to white so that it stands out clearly on top of the black.


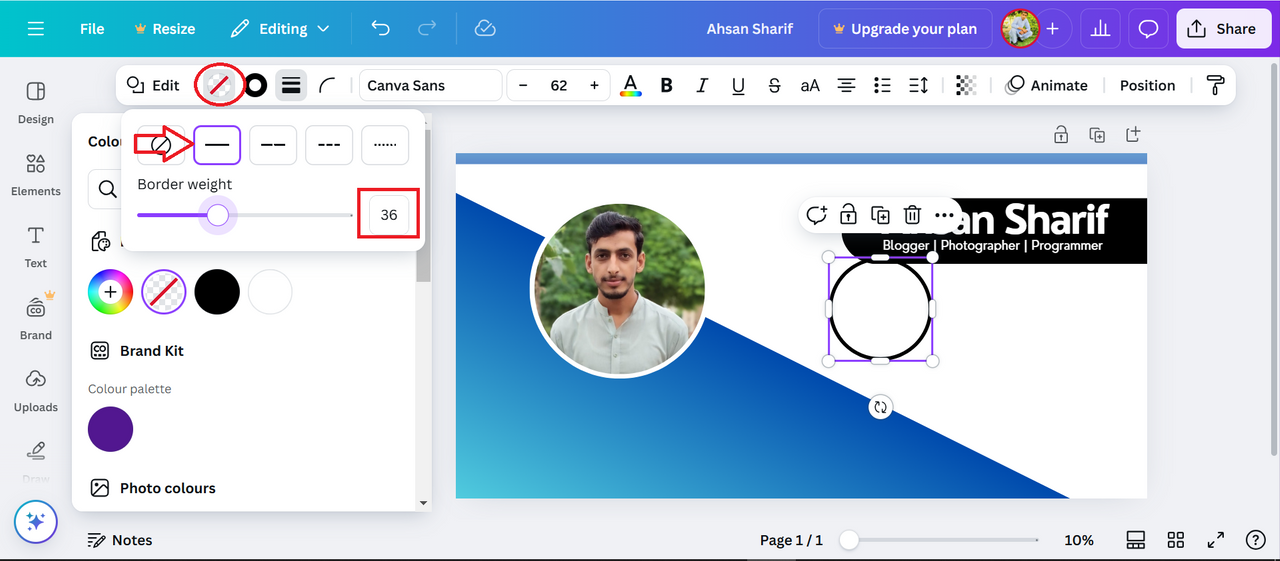
Step 10
Our project depends mostly on shapes. We have to make a professional card using these shapes. So, now we have to take a circle shape again, remove its background, keep its border on one line, and increase the weight of the border. In this way, we will only have the border of the circle visible. We have to make three copies of it and place them one below the other.
Step 11
Now we have to go to the element section again, there we have to search for the icon. First, we have to search for the phone number icon, second, we have to search for the email, and third, we have to search for the location icon. After searching for these three, we have to select the free icons that we have.

Step 12
We have to fit these three icons inside the three circles that we had made earlier and place them one below the other. We have to put the phone number icon at the first number, the email icon at the second number, and the location icon at the third number inside it. After that, we have to take a shape again, from which we have taken only a single line. We have to put this single line under our black shape, under which we have written the Heading and our text. And set the line weight.
We have to copy the text we have written above into the black shape so that its entire format is copied. After copying this format, we wrote the phone number in one, our email in the second, and our address in the third and placed them in front of our icons.

Step 13
Now we have to copy our address text again, after making another copy of it, we have to put it inside the blue color gradient shape. There, as a specialty, we have to add our text, we have to make its color white, the rest of the format will remain the same, there we have to write about our experience.

Step 14
We have to copy our gradient shape again, we have to move the bottom part of it up and set it above the right lower corner. After setting it there, we have to give its position to Backward so that it appears behind and creates a beautiful edge.

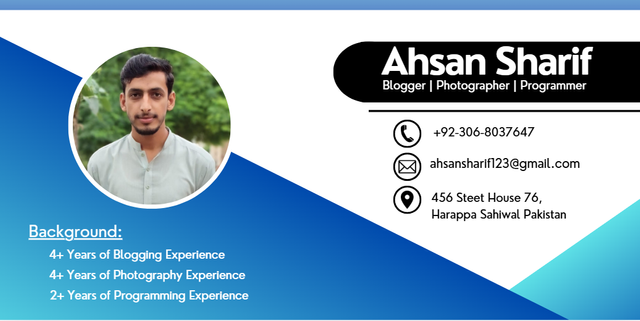
Final Front
You can see below that the front side of our final professional card is ready and it looks very beautiful.
Back Side:
We don't need to work hard to make the back side of our professional card. We have to copy the elements from the first front card we have made and set them in it. First, we have to copy the gradient shape and make two copies of it. We have to place one copy in the lower left corner and the other copy in the upper right corner, the position of which will be approximately 100 degrees.

We have to take another copy of the one that we used for the border on the front card, copy that part from there, and paste it here. We have not changed anything in it. After that, we have to add our text. We have to copy the same text as before, but we have to change the color of the one that is Sharif and the text below has to be kept in black. The format will be the same.
There is an extra thing on the back side, it is our logo. We can put the logo of our company or whatever our business is here. So I will create the logo here in my way. I will copy the same shape in a round shape from the previous format and put it here. After applying it, I will make an icon write a message, and fit it inside it. In this way, our simple logo will be ready. I am doing this just to explain to you. If you have a logo for your company, you can use it here.

Final Back
So we have kept the back side of our card almost simple which adds to the beauty, so now you can see that the final back side of our card is also ready.

Final Back
Professional Bussiness Card
 |  |
|---|
This was my tutorial for today in which I told you how we can easily make a professional card using free resources. Kenma is a platform where we can do all kinds of graphic design. As I showed you by making a professional card, we can do many more things on it. I hope you guys liked this tutorial and now you can easily make a professional card using free resources.
Thank you all very much. I will see you in a new tutorial with new content. Until then, I ask your permission. May Allah protect you. I would like to invite @chant, @suboohi, and @abdullahw2 to join this club.
Cc:
@kafio @mohammadfaisal @alejos7ven

Saludos,
Canva es una herramienta poderosa para poder diseñar todo tipo de recursos, permitiendo que en general la mayoría de ellos nos salgan a un nivel aceptable de calidad. A continuación algunas recomendaciones que podría hacerte:
1- en el texto de las partes inferior en el primer diseño estás utilizando una gradiente de fondo por lo que al principio el texto puede verse un poco opacado y puede resultar un poquito difícil para leer. Las gradientes aunque se ven muy bien muchas veces no funcionan por este desequilibrio.
2- el texto con la información de contacto está muy pegado a los elementos de la parte inferior, cada uno con una separación distinta. En la imagen que te mostraré al final en el recuadro amarillo puedes ver como este último toma distintas porciones de estos elementos. Trata de que las separaciones sean simétricas para que sea equilibrado visualmente.
3- tienes distintas separaciones entre los íconos de contacto y el texto trata de qué esto sea siempre igual para mantener un equilibrio.
por último si quieres mantener la línea de diseño en tus dos tarjetas ya en la segunda se pierde un poco nuevamente por el uso de gradientes. En esta ocasión vemos elementos en los bordes que parecen tener un color sólido sin embargo los elementos que utilizaste anteriormente tienen una gradiente que va a un color claro por lo que no se está generando el enlace visual que probablemente quieres lograr. Está bien usar gradientes, pero mi recomendación es siempre tratar de evitarlas por lo menos en algunas situaciones
Thank you so much for sharing such a valuable feedback. I appreciate your effort to highlight my mistakes. Yes, the gradient color looks beautiful but your suggestion have also weight. I would try my best to remove these mistakes and make a professional card using simple colors. Let's see what simple color look like. Have a nice day.