How to Make Your Own Lightroom Presets
To save time while editing photos in Lightroom, you can use presets. Belajarfotografi.com itself has made several lightroom presets that you can download and use. But in your personal opinion, the best presets are what satisfy your visual gratification. If you have tampered with a photo and are very satisfied with your processed products in Lightroom, it's good that your editing process is stored in Lightroom Presets.

How to? Easy, follow these steps:
CREATING LIGTROOM PRESET
First, select the photo you have edited and you are satisfied with the result.
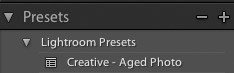
On the left of the screen (Develop module), you will see the words "Presets", click the + button.
A new window will appear that contains many options, selecting as needed:

SAVE YOUR PRESET
In the top field, fill in the preset name. Use the name as descriptive as possible. So just by looking at the preset name, you immediately know what effect it produces. After that click "Create" button.
Your preset will be listed under "User Preset" in the Develop module. You can also send presets to your friends by right-clicking the preset and selecting "Export".
FIND YOUR PRESET IN FINDER / EXPLORER
If you are using a Mac and want to backup all your presets, the presets file is stored in a folder in the Library folder. Exactly here: Home> Library> Application Support> Adobe> Lightroom> Develop Presets. See picture below

If you are using Windows, in Lightroom click on Edit> Preferences and then select the Presets tab. Clicking on the "Show Lightroom Presets Folder" button will open Windows Explorer where all your presets files are saved
and here are some examples of presets that I often use to edit prewedding photos and model photos
.png)
.png)
.png)
.png)
.png)

may be useful...

wao how romantic pics i like it
thank bro
I love you sharing tutorials like thia with us buddy. Keep on it.
Thank you buddy