Access IoT SSH Remotely over the Web
Learn how to set up remote access for your IoT device through the internet with our step-by-step guide on configuring and using SSH.
The merchant notes that the Internet of Things (IoT) has greatly transformed our interactions with the world.
Experience the ease and effectiveness of connecting and managing devices globally with IoT technology.
With the increasing connectivity of devices, secure remote access is becoming essential. One possible solution is the use of Secure Shell (SSH), which provides a safe and reliable method for connecting to these devices.
This article will help you gain a deep understanding of utilizing SSH for secure remote access to your internet-connected IoT devices, including Nvidia Jetson Nano, Arduino, Raspberry Pi, and other embedded Linux devices.

Overview
Here is an overview of what we plan to achieve in this article:
1.Install, configure and enable SSH server in your Linux based IoT device.
2.Easily set up SocketXP agent on your IoT device to establish an SSL/TLS reverse proxy connection to your device's SSH server using SocketXP Remote Access Solution. -No need to manually configure port forwarding in your WiFi router or Firewall. -Access your IoT devices remotely, even behind a NAT router and firewall, over the internet.
1).Utilize the SocketXP Web Portal or a third-party SSH client (such as PuTTY, SecureCRT, or OpenSSH's SSH command line client) to remotely connect to your IoT device's SSH server.
2).Effortlessly transfer files to and from your IoT device with the SocketXP Web Portal or via a variety of SSH clients, including Filezilla, PuTTY PSFTP, SecureCRT, and OpenSSH’s SCP/SFTP command line client.
Understanding SSH
What is SSH?
SSH stands for Secure Shell, which is a cryptographic network protocol for secure remote access to devices over an unsecured network such as the internet.
How does SSH work?
SSH utilizes encryption in order to establish a secure connection between two devices. This results in the formation of a safe tunnel that enables the transmission and reception of data.
In this model, the SSH client operates on your access devices, while the SSH server is located on your IoT device. This allows for secure communication between the two devices.
How to install and setup SSH server
The SSH server must be downloaded, installed, and set up on your IoT device to allow for remote internet access.
Ensure that an SSH client is downloaded and installed on your access device, such as a laptop or PC.
Why is SSH important for remote access?
With SSH, users can securely access and manage their IoT devices from anywhere in the world. It enables tasks such as firmware updates, settings changes, and troubleshooting, making it an essential tool for remote monitoring and management.
Remotely connect to IoT device via SSH
Assuming you own an IoT device, whether it is located in your office, your customer's space, or a remote area.
The device can utilize a WiFi network, SIM card, cellular internet, or satellite internet for internet connection.
You can easily connect to the device remotely through SSH over the internet to execute commands in the device terminal.
Please make sure that SSH is activated on your IoT device and that the SSH server is currently operating within the device.
For remote access to the SSH server, a SocketXP IoT remote access solution creates an SSL-encrypted reverse proxy tunnel from a laptop to the SSH server in an IoT device.
What is SocketXP
Discover SocketXP - the secure and efficient solution for managing and accessing IoT devices from anywhere, even behind a NAT router or firewall. Easily connect to devices like Raspberry Pi, Arduino, and Nvidia Jetson with SSH through secure SSL/TLS VPN tunnels.
SocketXP's IoT remote access solution eliminates the need for any changes to your gateway NAT router configuration. No port forwarding setup or firewall pinholing is necessary when using SocketXP.
SocketXP enables secure remote SSH access by creating a SSL/TLS encrypted tunnel through your firewall, NAT router, and internet, comparable to a secure VPN solution that also utilizes SSL/TLS encryption.
SocketXP implements two-factor authentication for secure user authentication prior to SSH login on any remote device.
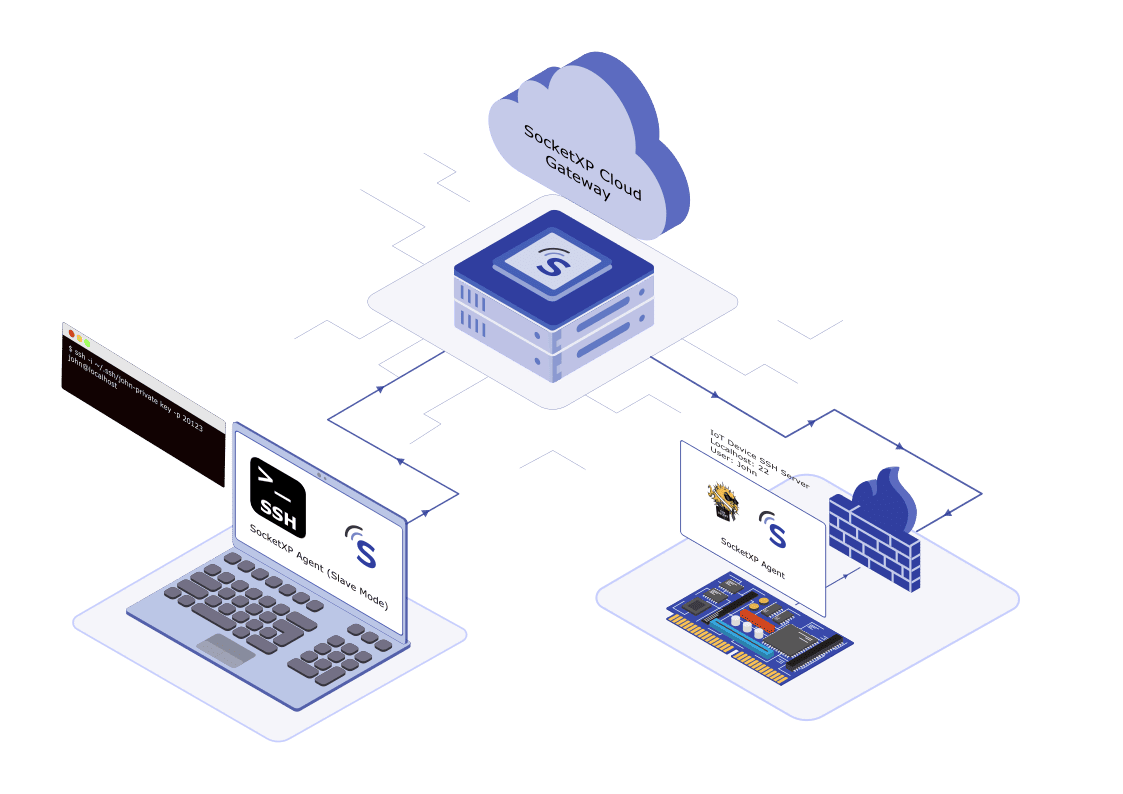
How SocketXP IoT Remote Access solution works
First, you need to install a SocketXP IoT agent on your IoT device.
The SocketXP agent connects devices to the SocketXP IoT Cloud Gateway by establishing a secure SSL/TLS tunnel, providing a reliable and safe connection.
Using a secure SSL/TLS tunnel, you can connect to the IoT device through the SocketXP IoT Cloud Gateway's portal page, enabling you to remotely SSH into the device.
Please follow these steps to set up the SocketXP IoT agent and remotely access your IoT device using SocketXP's IoT Remote Access solution.
Step 1: Download and Install
Download and install the SocketXP IoT agent on your IoT device from here.
Step 2: Get your Authentication Token
Sign up at https://portal.socketxp.com and get your authentication token.

Follow these instructions to access the SocketXP IoT Cloud Gateway with your authentication token.
$ socketxp login [your-auth-token-goes-here]
Step 3: Create SocketXP SSL Tunnel Endpoint for Remote SSH
Use the following command to create a secure and private SSL tunnel endpoint at the SocketXP IoT Cloud Gateway.
$ socketxp connect tcp://localhost:22
Connected to SocketXP Cloud Gateway.
Access the TCP service securely using the SocketXP agent in IoT Slave Mode.
Note:
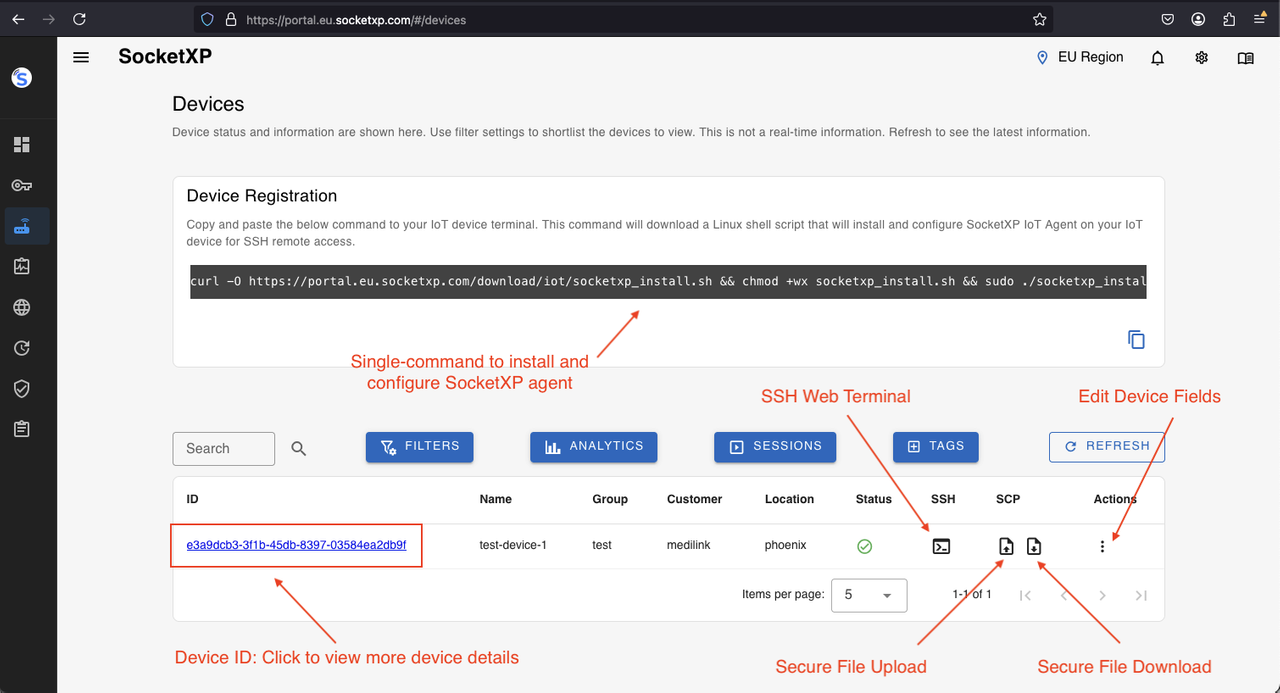
On the SocketXP web portal's "Devices" page, you can simply click on the "terminal" icon to easily access your remote device via SSH.


Take advantage of the choice between SSH password-based authentication or SSH public-private key-based authentication for logging into your remote devices. SocketXP streamlines the process by automatically creating and downloading a public key to your device, handling all key management operations seamlessly.

To securely transfer files using SCP from the web client, simply click the "File Upload" or "File Download" button next to your IoT device. This will prompt a SCP dialog window in which you can follow the provided instructions.
File Download Dialog Window:

Upon successful file download, a file browser window will open allowing you to select a local folder to store the file. If a login error or source file error occurs on your IoT device, the download will be terminated.
File Upload Dialog Window:

SocketXP IoT Solution does not generate public TCP tunnel endpoints for external connection via SSH clients. This is done to ensure the security of your device.
SocketXP private tunnel endpoints are only accessible through the SocketXP agent or XTERM terminal in the SocketXP Portal page, ensuring secure access with the user's auth token.
It's significant to note that this also prevents internet-based port scanners or hackers from accessing your IoT device's SSH server port.
IoT SSH Remote Access using Third-Party Tools - PuTTY, OpenSSH SSH client
This is an alternate method for remotely connecting to your IoT device’s SSH server using the SocketXP solution.
For remote SSH access to your IoT device, use a third-party client such as OpenSSH, PuTTY, Filezilla, or SecureCRT. Simply follow the provided instructions to connect without using the SocketXP web portal.
Install the initial SocketXP agent software onto your accessing device (e.g. laptop with Windows or Mac OS), in addition to the previous installation of the agent on your IoT device. This step is necessary for the same reason as a VPN client connecting to a VPN server.
Next, configure the agent to run in slave mode using the command option “–iot-slave” as shown in the example below.
$ socketxp connect tcp://localhost:3000 --iot-slave --peer-device-id "2233-4455-abcd-34445" --peer-device-port 22 --authtoken
Listening for TCP connections at:
Local URL -> tcp://localhost:3000
Discover the device ID of your IoT device by referencing the devices table on the Devices page of the SocketXP Web Portal.
When configuring your SSH server to run on a non-default port, remember to specify the port in the "—peer-device-port" option in the command above, rather than using the default port 22.
Connecting to your IoT SSH through SocketXP Local Proxy Server
Utilize a third-party SSH client to access your IoT device's SSH server using the SocketXP local proxy server, as demonstrated in the examples provided.
The product utilizes OpenSSH client tools including scp, sftp, and scp, all of which are command line based.
$ ssh -i ~/.ssh/john-private.key john@localhost -p 3000
You shall find the device ID of your IoT device (--peer-device-id) from the SocketXP Web Portal’s Devices Page.
Now, with the provided SocketXP local endpoint, you can easily access the SSH server of your IoT device. See below for details.
Utilize your own SSH client, such as PuTTY, to establish a connection with the SSH shell of your remote Linux device.
This example utilizes OpenSSH's SSH client, a command line utility.
$ ssh -i ~/.ssh/john-private.key john@localhost -p 3000
Efficiently move files from a remote IoT device to your local machine using the OpenSSH SCP command, demonstrated below.
scp -i ~/.ssh/john-private.key john@localhost:/path/to/remote/file.txt /path/to/local/directory/ -p 3000
file.txt 100% 12KB 12.0KB/s 00:00
Easily transfer files from your computer to a remote device using the OpenSSH SCP command, following these instructions.
$ scp -i ~/.ssh/john-private.key /path/to/local/file.txt john@localhost:/path/to/remote/directory/ -p 3000
file.txt 100% 12KB 12.0KB/s 00:00
Note:
1.The above method involves using SSH private key based authentication to access your IoT device. Alternatively, you can utilize SSH password based authentication by omitting the "-i" option in the command.
2.Next, our SSH/SFTP/SCP client tools are connected to a local proxy server, specifically the one listening on TCP port 3000 on your machine.
3.In addition, you can efficiently and securely connect to your remote IoT devices or embedded Linux devices using third-party SSH/SFTP/SCP client tools like PuTTY or OpenSSH. This enables easy file transfers between devices and Linux machines/servers.
Below we show you the step-by-step instructions on how to securely connect to your IoT device using a free SSH client tool named PuTTY. PuTTY provides a GUI window to login and SSH connect to your remote IoT devices.
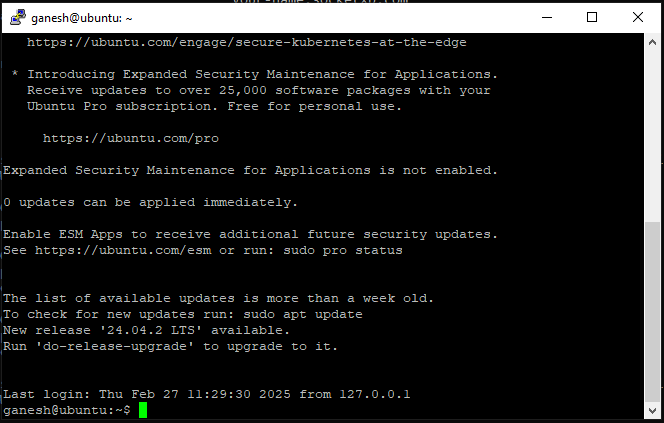
Login using your IoT device’s login username and password.

Access the Linux shell prompt.
The SocketXP agent, operating as a local proxy server in IoT Slave Mode, awaits connections from PuTTY at the localhost IP 127.0.0.1 on TCP port 3000. This enables it to establish secure reverse proxy tunnels between Filezilla and your remote IoT device, providing a convenient solution for managing your connections.
In this window, you'll see that we've entered the localhost IP 127.0.0.1 and adjusted the SFTP port from 22 to 3000.
This is required because:
1.The PuTTY SSH client can establish a connection to a remote IoT device using SocketXP, which is operating in "IoT Slave" mode or local-proxy mode.
2.When set to "IoT Slave" mode, the SocketXP agent serves as a "local-proxy server". It listens on local IP 127.0.0.1 and TCP port 3000.
3.When a TCP connection is received on the IP 127.0.0.1:3000, the local-proxy server will then relay the connection to the SocketXP IoT Cloud Gateway. From there, the connection will be directed to your remote IoT device, after authenticating the provided agent's auth token.
4.The SocketXP agent establishes an SSL encrypted reverse proxy tunnel between your PuTTY SSH client and the SSH server on your remote IoT device.
Learn how to securely transfer files to and from your IoT device using the Filezilla SFTP/SCP tool. Filezilla acts as a client and connects to the remote device through the SocketXP agent, which operates as a local-proxy server on IP address 127.0.0.1 and TCP port 3000.

Login using your IoT device’s login username and password.

To proceed, accept the host key verification request and trust the SSH server's host key (from the IoT device).

Utilize Filezilla to securely transfer files between a local machine and remote device, using SFTP and SocketXP's local-proxy server. The server listens on local IP 127.0.0.1 and local TCP port 3000.
The local-proxy server establishes a secure reverse proxy tunnel to connect the Filezilla client with your IoT device's remote SSH server.

SocketXP SSH Public Key Management Tool:
SSH public private key based authentication is a highly secure and recommended method for production usecases. It is advised to avoid using SSH password based authentication due to its vulnerability to attacks.
The SocketXP Web Portal automatically generates a temporary and unique SSH public key for your Ubuntu Linux device. This allows for secure remote login from any location, without the need for password authentication. The key is removed as soon as the user logs in.
Instructions will be given by the merchant on how to rewrite the input, and it is important to adhere to those instructions. The tone of the description should be formal, educational, informative, and objective, using scientific and objective language and relying on statements of fact and domain expertise. Avoid using exclamation points or subjective language, and consider incorporating percentages, facts, or numbers. Keep in mind that the user can only SSH into your Ubuntu Linux machine from the SocketXP web portal after successfully completing SSO login, along with 2FA authentication from a provider such as Microsoft 365 or Google G-Suite.
The built-in SSH public key management tool provided by SocketXP automates the process of managing and syncing SSH public keys between your Ubuntu Linux system and the SSH web client. Additionally, it automatically cleans up the key after use, streamlining the public key setup for future login attempts by the same user.
To enhance security, it is also possible to completely disable password-based authentication on your Ubuntu Linux SSH server. However, if you still prefer password-based authentication, simply choose the "Password authentication" option when prompted to login on the web portal. The default option is "SSH Public Key Authentication."
Single-Touch Installation and Configuration Command
The process of setting up SocketXP on an IoT device can be tedious, especially when dealing with a large number of installations, configurations, and registrations. The instructions, which consist of three simple steps, may require a significant amount of time and effort.
In addition, with SocketXP IoT Remote Access Solution, you can easily install and configure SocketXP IoT Agent on a large number of IoT devices using a single-touch command.
Retrieve the one-step installation and setup command from the SocketXP Web Portal's device page and enter it into the Linux shell terminal on your IoT device.
The provided device registration command will download a shell script that will install, configure, and set up the SocketXP IoT agent on your IoT device.
After executing the command, the IoT device will appear as "online" on the "Devices" page of the SocketXP Web Portal.
This product can be accessed by using any SSH client or by clicking the "terminal" icon next to it.
SocketXP SSH Public Key Management Tool:
SSH password based authentication is typically seen as a weaker and less secure option, making it unsuitable for production environments. Instead, SSH Public Private key based authentication is a highly secure alternative and is strongly recommended for any production usecases.
SocketXP Web Portal will automatically generate and synchronize a temporary single-use SSH public key for your Ubuntu Linux system. This enables secure remote login from anywhere in the world, eliminating the need for password-based authentication. The key is then promptly removed upon user login.
Remember that users can securely access your IoT or embedded Linux device through the SocketXP web portal. This is possible after successfully completing a single sign-on (SSO) login and two-factor authentication (2FA) with your chosen provider, such as Microsoft 365 or Google G-Suite.
SocketXP includes a convenient SSH public key management tool that automates the syncing of public keys between your Ubuntu Linux system and the SSH web client. It also cleans up old keys, ensuring a new public key will be needed for the next login attempt by the same user.
The merchant provides an option to disable password-based authentication on your Ubuntu Linux SSH server for enhanced security. However, if you still prefer password-based authentication, you can select the "Password authentication" option when prompted in the web portal login. The default setting is "SSH Public Key Authentication."
Conclusion:
The SocketXP Remote Access Solution, described in this article, provides a secure way to transfer files to your IoT devices behind a NAT router or Firewall, or those connected via a cellular network. All file data is encrypted using SSH during transmission over the internet with SocketXP.
Utilizing the same cryptography technology employed by financial institutions and government entities, SSH provides a secure means of transmitting sensitive information over the internet.
The data is securely encrypted between the SSH client and server, providing end-to-end protection.
SocketXP does not have the ability to decipher or access your encrypted data without your SSH private keys. It only serves as an online reverse proxy server for your encrypted data traveling through the SSH connection.
https://remoteiot.com/blog/remote-iot-device-management.html
https://en.wikipedia.org/wiki/IoT_security_device