Steemit Learning Challenge-S22W5; Golfer's Elbow
Hi friends,
I am Jyoti from India I am glad to submit my entry to the contest SLC22-W5 : https://steemit.com/hive-127432/@ashkhan/steemit-learning-challenge-s22w5-physical-therapy-intervention-golfer-s-elbow organised by @ashkhan
What's a golfer's elbow? Write in your own words after getting knowledge from the lesson post.
Golfer’s elbow is characterized by inflammation of the tendon towards the middle of the elbow. This inflammation is commonly experienced when an area of the body is overused, or has become strained through repetitive stress. This is particularly the case when performing wrist flexion and gripping type of activities are needed. Just like making busy our hands in golf practice.
Tendon damage can be as simple as tendonitis (inflammation) or more severe tendonitis (degeneration) or even having a break in the tendon. Most of the instances that we discuss in clinic can be classified into the group of old tendonitis.
What Causes Golfer's Elbow?
Understanding the causes of golfer's elbow is key to preventing it. Here are some common culprits:
Overuse: Repeatedly using your elbow in the same motion—like that perfect golf swing—can take a toll over time.
Poor Technique: Whether you’re on the golf course or at your desk, incorrect form can lead to strain. Make sure you’re using proper techniques in whatever activity you’re engaged in.
Sudden Trauma: A sudden injury or trauma to the elbow can also trigger symptoms.
Age-Related Wear and Tear: Aging of people exposes bodies to many things, which cause them to wear out as they advance in age. Some of the muscles as well as the tendons that you possess within your shoulder areas could have lost their pliability factor.
History of Injuries: It is a common knowledge that in case of an initial elbow injury occurrence it will be easier to have a repeat of golfer’s elbow.
Poor Ergonomics: Another group of people who may be at risk of the condition are those who sit for most of their working hours without having correct posture.
Recognizing the Symptoms
So how do you know if you're dealing with golfer's elbow? Keep an eye out for these common symptoms:
Pain and Tenderness: You’ll likely feel discomfort on the inside of your elbow.
Swelling or Redness: Should the inflammation occur, there will be inflammation and sometimes slight redness at that point on the skin.
Weakness: It may also mean that lifting any object above the shoulder or lifting items down from the shelf becomes a difficult task.
Numbness or Tingling: Sometimes, pressure on the nerve could cause what doctors refer to as paresthesia — the feeling of pins and needles on your fingers and wrist.
Reduced Range of Motion: Some of the possible symptoms include; rigidity which impairs the normal bending of the wrist.

How would you diagnose a golfer's elbow? Any clinical investigation or assessment tests?
Due to development of sophisticated symptoms of Golfer’s Elbow, diagnosis starts with a history-taking process. This is the part where your doctor or your physical therapist have to inquire with you regarding your family medical history, your work environment character, and any of the previous medical or surgical experience. It is always good to disclose any information which may in one way or another help to understand the nature of the complain.
The second in the sequence of the assessment procedures is perhaps the most comprehensive and only clinical-biological test – the physical one. Your ortho doctor may tap on the area around your elbow to search for an area of soreness as well as evaluate how well you are able to flex the elbow and how much strength is present in the muscles. But they won’t stop there.
Techniques that include X-Ray, Ultra-sound, CT and MRI scans can help in eliminating other conditions such as arthritis and tendon tears. They help shed more light on what lies beneath, these tools.
Also, EMG and NCS can be used to assess nerve injury and muscle power. It also enables all of these methods to provide detailed and balanced information about your condition.
Special Tests: Putting It to the Test
However, after your healthcare provider has collected all the information needed, special tests do come in handy in supporting the diagnosis. Here are three key tests that are commonly used:
1. Medial Epicondyle Test
This is actually quite simple! This will ensure that you are comfortably seated with your elbow cocked at ninety degrees angle to your wrist which will be in a extended position. Your therapist will press at the medial epicondyle – if there is some pain and tenderness when the therapist does this– well done (nearly) Golfer’s Elbow is indeed present.
2. Cozen's Test
In this test you will be asked to sit with your elbow flexed to 90 degrees and your wrist fully extended, there is some amount of resistance for this one. In case, you experience pain in that ‘tough-to-handle’ area when applying resistance while stretching your wrist then consider it as a sign you may be having Golfer’s Elbow.
3. Valgus Stress Test
For this test, you stay seated and your therapist helps to have support for your elbow and then apply pressure on the joint in a forward manner. If you have positive findings during this maneuver, The pain felt on the medial epicondyle strengthens the diagnosis.
Try to practice at least 3 exercises that you have learned from the lesson. Share images, gifs or videos while practicing preferably gifs or videos.
After watching the video demonstarion I practiced the same exercises at home and took photographs, here I'm going to shrae how I did it :
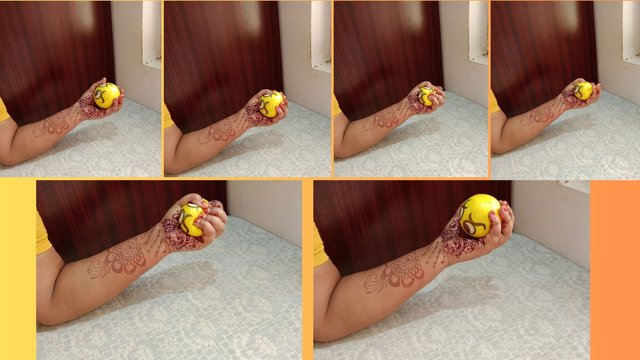
Ball Squeezing
So there I was, sitting at my desk one afternoon after a long stretch of work. My hands felt stiff from typing away on my keyboard, and I thought to myself, “Why not give that ball squeezing exercise a try?” I grabbed a soft stress ball (a little too squishy for my liking) and settled into my chair.
I rested my elbow comfortably on the table, ensuring that my arm was well-supported. This position allowed me to focus solely on my hand movements without straining any muscles. Holding the ball gently in my hand, I squeezed it firmly for about 5 to 10 seconds.
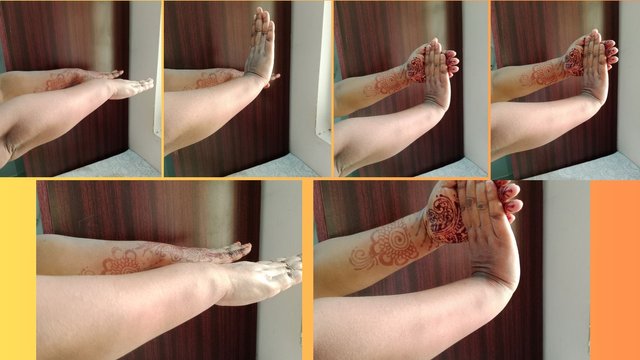
Wrist Flexors Stretch
I began by sitting comfortably with my arms extended straight out in front of me, palms facing down. This position really helps to stabilize the wrist and gets the blood flowing.
Next, I focused on my right hand. I lifted each finger upward one by one while keeping the rest of my hand steady. Once I lifted my right fingers upward, it was time for a little stretch! Using my left hand, I gently pulled my right fingers backward. This stretch feels fantastic and helps to enhance flexibility while working those tiny muscles.
After holding that stretch for a few seconds (I aimed for about 5-10), I slowly released my fingers back to the normal position. It’s crucial to take this part slowly so you don’t strain anything. Repeating this process two or three times really made a difference.
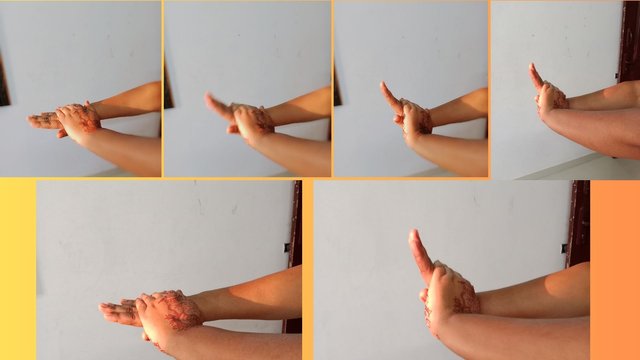
Wrist Isometric Exercises
I sat down on a comfy chair. It’s important to be seated because it helps you maintain balance while focusing on the stretch. I extended my right arm straight out in front of me, palm facing down. This position is crucial as it sets the stage for what comes next.
Once I had my right hand in place, I used my left hand to gently press down on my right fingers. The key here is to keep everything relaxed—no need to force anything! With my left palm resting on my right hand, I slowly lifted the fingers of my right hand upward.
I repeated this lifting and lowering motion several times, making sure to listen to my body. I switched things up and repeated the same process with my left hand. Sitting comfortably in that chair again, I extended my left arm out with my palm facing down and placed my right palm on top of those fingers.
Share your review after performing these exercises either on yourself, a healthy individual or a patient.
The results have been pretty impressive! Not only have I noticed significant improvements in my grip strength , but I've also found that this exercise has become an anchor for managing stress throughout my day. Whenever life gets overwhelming, squeezing that little ball helps me refocus and recharge.
My experience with the wrist flexors stretch was nothing short of refreshing and beneficial. It’s quick to do and perfect for those moments when you're feeling stiff or fatigued from all that screen time.
Incorporating wrist isometric exercises into my routine has been a game-changer for me. Not only do they help build strength and flexibility in an area that often gets neglected, but they also feel pretty good too!
If you’re looking for an easy way to boost your wrist health and functionality, I highly recommend giving these exercises a try—trust me; your hands will thank you later!
I would like to invite my friends
To take part this contest
Discord : @jyoti-thelight#6650 Telegram :- https://telegram.org/dl

.jpg)

.jpg)
.jpg)
Thank you for understanding the lesson and sharing your assignment; I hope that you will enjoy this week's lesson and try to implement it in your life if you see any such case.
Observations
Task 1 (2.6/3)
You have shared a great knowledge about golfer's elbow, its symptoms, causes, but didn't add its types and stages. A bit more depth require to complete the answer. I appreciate your effort.
Task 2 (3/3)
In the second question, you tell us about how you have to assess a patient by doing physical examination, history taking, and investigations. That's good you add special tests and also explanation of both special tests and investigations. Excellent.
Task 3 (3.8/4)
You try the ball squeezing, wrist isometrics, and wrist flexors stretch. You did the ball squeezing, wrist isometrics, and wrist flexors stretch correctly. It would be better to add the gifs if you don't want to add videos of exercises for better understanding and stretch time. Always remember to apply heat pack in chronic condition and ice pack in acute condition before performing exercises to relax the muscles and reduce stiffness. I appreciate your efforts.
Overall you made a great attempt to answer all the questions. I appreciate your efforts. But next time try to avoid the above written suggestions. Keep learning and try to implement your knowledge to the people suffering from golfer's elbow or any type of elbow issue. Thank you.