Build a Macro Keyboard "Stream Deck" with Raspberry Pi Zero and Hyperpixel 4.0 Graphical Touch Screen
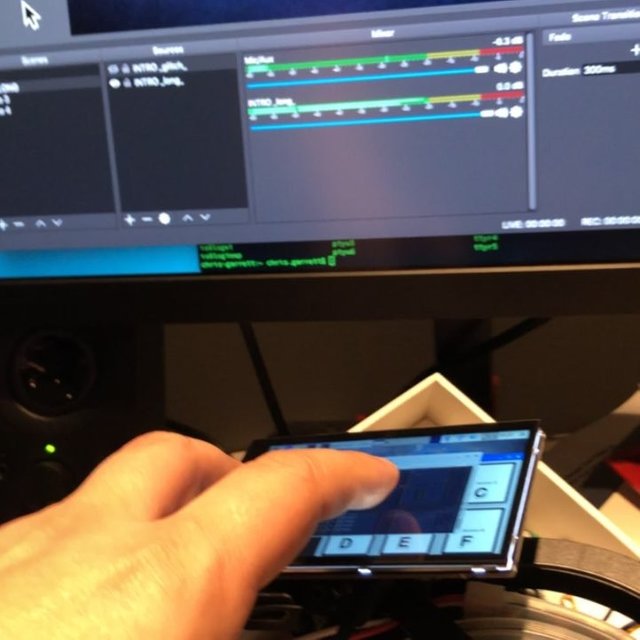

Can you build a DIY version of the Elgato Stream Deck? Many people could tell this is what I was building up to. I think we are getting a lot closer.
This, of course, continues my previous Raspberry Pi Zero keyboard emulation article. Where that project used an obnoxiously large red button, however, this project is all graphical. This means you have enormous flexibility and limitless possibilities in what you can achieve with this little macro monster!
The way it works is we build a graphical button interface with Python. When a button is pressed we send an assigned keyboard combination over USB to the host machine, so the machine responds as if a keypress has been activated (because in a way, it has).
Whatever software is running, responds accordingly. That could be OBS, a game, Photoshop, whatever your macro keyboard combination heart desires.
View this post on InstagramA post shared by Maker Hacks DIY Projects (@maker_hacks) on Sep 22, 2018 at 12:39pm PDT
The Hardware
This is all made possible by, naturally, the Pi Zero, plus the Pimoroni Hyperpixel 4 touch screen for the Raspberry Pi. It is high resolution and has a high frame rate. Now, of course, you could go with a cheaper touch screen, and you might question why my basic buttons justify it, but eventually I will have more high resolution buttons and that 800 pixel wide screen will definitely come in handy.
Now there is a downside of this screen - it uses ALL the pins. No biggy for this, seeing as I only need the screen and USB, but something to take into account.
The Code
For this project I used tkinter, as I felt it was the most direct for what I needed, and it only needs to run on my mac (for development and testing) and on the Pi Zero (Linux) for actual execution.
You could easily do this in Qt5 or whatever your GUI toolkit of choice, heck you could probably do it in Pygame, but this works for what I need.
As before, the keyboard signals are sent using codes to /dev/hidg0 as if we are writing a file. This automagically sends along the codes to the host computer.
Follow the previous article linked resources for how to set your Pi Zero up for this to work.
When a button is pressed we call our button_click function which checks against our pre-determined list and fires off the keypress combinations. For now I am using a-e, but in actual usage I will find some keyboard combinations that don't conflict with normal usage.
My buttons are aligned in a grid, which is all conveniently handled by the TK features. I just need to load in six images and create my six buttons (I will also have start and stop buttons for streaming most likely, my high resolution touch screen will accommodate more).
# modules
import time
import tkinter as tk
from PIL import Image, ImageTk
initialise tk
root = tk.Tk()
function to send the key data
def write_report(report):

with open('/dev/hidg0', 'rb+') as fd:

fd.write(report.encode())
click event
def button_click(caller):

print("Button: {} was clicked, sending keypress".format(caller))
if "button1" == caller:
    write_report("\0\0\4\0\0\0\0\0")
elif "button2" == caller:
    write_report("\0\0\5\0\0\0\0\0")
elif "button3" == caller:
    write_report("\0\0\6\0\0\0\0\0")
elif "button4" == caller:
    write_report("\0\0\7\0\0\0\0\0")
elif "button5" == caller:
    write_report("\0\0\10\0\0\0\0\0")
else:
    write_report("\0\0\11\0\0\0\0\0")

time.sleep(0.2)
write_report("\0\0\0\0\0\0\0\0")

load icons
image = Image.open("a.png")

photoa = ImageTk.PhotoImage(image)
image = Image.open("b.png")

photob = ImageTk.PhotoImage(image)
image = Image.open("c.png")

photoc = ImageTk.PhotoImage(image)
image = Image.open("d.png")

photod = ImageTk.PhotoImage(image)
image = Image.open("e.png")

photoe = ImageTk.PhotoImage(image)
image = Image.open("f.png")

photof = ImageTk.PhotoImage(image)
add buttons
button1 = tk.Button(root, compound=tk.CENTER, image=photoa, text="Button 1", command=lambda: button_click('button1'))

button1.grid(row=0, column=0)
button2 = tk.Button(root, compound=tk.CENTER, image=photob, text="Button 2", command=lambda: button_click('button2'))

button2.grid(row=0, column=1)
button3 = tk.Button(root, compound=tk.CENTER, image=photoc, text="Button 3", command=lambda: button_click('button3'))

button3.grid(row=0, column=2)
button4 = tk.Button(root, compound=tk.CENTER, image=photod, text="Button 4", command=lambda: button_click('button4'))

button4.grid(row=1, column=0)
button5 = tk.Button(root, compound=tk.CENTER, image=photoe, text="Button 5", command=lambda: button_click('button5'))

button5.grid(row=1, column=1)
button6 = tk.Button(root, compound=tk.CENTER, image=photof, text="Button 6", command=lambda: button_click('button6'))

button6.grid(row=1, column=2)
start the event loop
root.mainloop()


Posted from my blog with SteemPress : https://makerhacks.com/graphical-pizero-stream-deck/
Hello! Your post has been resteemed and upvoted by @ilovecoding because we love coding! Keep up good work! Consider upvoting this comment to support the @ilovecoding and increase your future rewards! ^_^ Steem On!
Reply !stop to disable the comment. Thanks!
Looks cool! One question:
So is the Raspberry actually acting as a USB-Keyboard for an other computer?
Correct :)