Top Beginner Photography Tips

Being a beginner in photography is an exciting time. You see all these amazing photos and you just can’t wait to take some of your own. But if you find when you go out to take your own photos they leave some what to be desired, then never fear as the Lumusphoto Ultimate Beginner Photography Tips are here!
Photography Basics
Photography is essentially just capturing light. Learning how to adjust your camera settings to get a good exposure is the foundation to build the rest of your photography on.
The exposure triangle is simply the balance between the Aperture (hole in your lens that allows light to pass through it), Shutter speed (How long the cameras shutter stays open allowing more light to pass onto the sensor) and the ISO level (the light sensitivity setting of a cameras sensor).
Aperture – this is simply the hole is the lens. This is where light first enters your camera. A lens has blades inside which can open or close to let more light or less light pass through it.
Aperture has 2 main functions, the first lets you control how much light enters your camera making an image brighter or darker. The second function is controlling how much of a photo is in focus. This is called depth of field. You can use this creatively to control where the focus and attention is drawn to in a photo.
The more open the aperture blades the less in focus. The more closed the aperture blades are the more of your photo will be in focus.
Aperture is measured in F numbers. The lower the number the wider the aperture. So f/1.8 is a wide aperture. A small aperture would be f/16.
Shutter speed
Once the light has travelled through the lens the shutter has to then open to expose the cameras sensor to that light. Depending on the scenario you are in and how much light there is will determine how long the shutter will be open.
Shutter speed is measured in seconds and fractions of a second. So a long shutter speed would be 1 or 2 second and a fast shutter speed would be 1/1000th of a second.
Just like aperture the shutter speed has 2 functions.
First is how much light it lets pass through to hit the sensor. The longer the shutter is open the more light will rush through and land on your cameras sensor. If you are shooting at night you will need to use very long shutter speeds to suck up as much light as possible. On the flip side to this if you are shooting during the day with plenty of light you will be using much faster shutter speeds as the sensor will not need as much light to make an exposure.
The second is how much motion you will capture. Using fast shutter speeds will freeze motion. So taking pictures of fast moving action will need much faster shutter speeds.
Here are 2 photos taken at different shutter speeds.
The car drifting is frozen in time at 1/1000th shutter speed![4.jpg]
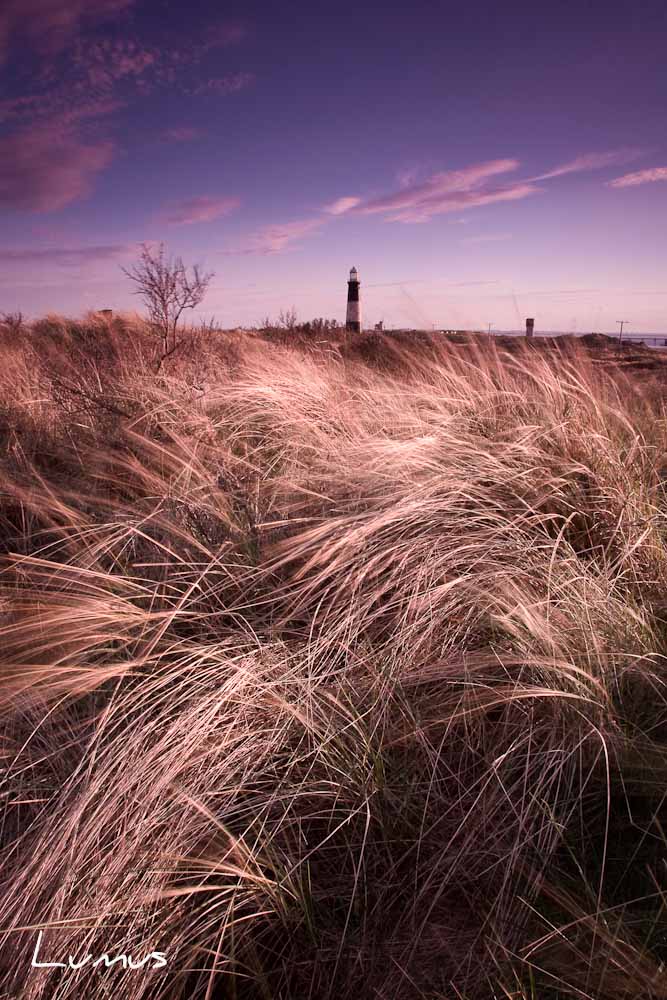
2 seconds – slow shutter speed allowed use to see motion in the long grass.
The last element of exposure is ISO.
ISO
This is the sensitivity setting of the sensor in your camera. The higher the ISO the more sensitive the sensor is to light. Sometimes there just isn’t enough light and your pictures are too dark. This is time to increase your ISO. The downside to increasing the ISO is you get noise and grain in your photos.
Click on the images below to see exactly how much grain is in the photo at 6400, a high ISO. ISO 100 which is usually the lowest setting you can choose will give you the best image quality.

ISO 100 gives little to no noise or grain.

ISO 6400 is quite a high ISO and produces a lot of noise. But this will depend on your camera.
Once you understand how these work together you have the knowledge to move on and start taking the next steps in your photography.
Composition
When learning photography it is sometimes easy to forget about composition. The best advice I ever got was, “keep it simple”.
A great place to start is the rule of thirds. Imagine a scene in front of you now divide it up into thirds horizontally and vertically. Placing a point of interest on one of these lines or a point were they cross tends to give a more pleasing photo.

Try placing points of interest on these lines.
A mistake seen a lot in beginner photography is placing the horizon slap bang in the middle of your image. But don’t forget rules are there to be broken so don’t be afraid to try out your own compositions from time to time.
White balance
The white balance determines how accurate the colours are captured in the scene you are shooting. Different light has different colours and to balance this we use white balance.
For example if shooting indoors most lights will be tungsten and give off a very orange warm light. To balance this we set a cooler temperature in the cameras white balance to capture the photo with the most accurate colours possible.

The cameras auto white balance made the scene look cold.
Leaving your camera in auto white balance works quite well most of the time with most modern DSLRs, but taking control and setting this manually will really start to make your photos stand out from other beginner photographers.

Manually setting the white balance captured the correct colours of the setting sun on the grass.
White balance can seem hard to understand at first but it’s something that will dramatically improve your photography once you grasp it.
Metering modes
Metering modes tell your camera which part of the image it wants to make the exposure for. Most cameras have several metering modes. Here are 3 which are most commonly used.
Evaluative metering/matrix metering – takes a reading from the entire scene and makes an exposure based from that. This is usually the default metering mode and works well for most situations but if you find you photos are coming out a little under exposed then try using a bit of exposure compensation.!
Spot metering – makes an exposure for a tiny area in the middle of the sensor.

This works great for portraits but you need to be careful with this as you can over expose your photos if you aren’t used to using it. Have a play around with it and take a few test shots.
Partial metering – Like spot metering but measures the light coming from an area a bit bigger than spot. Works very well for backlit subjects like in this photo below.
Great for backlit portraits
The best way to learn is to get out there and try all this out for yourself!
Nice tips! Experimenting is key!
Exactly! Thanks for stopping by! Leon