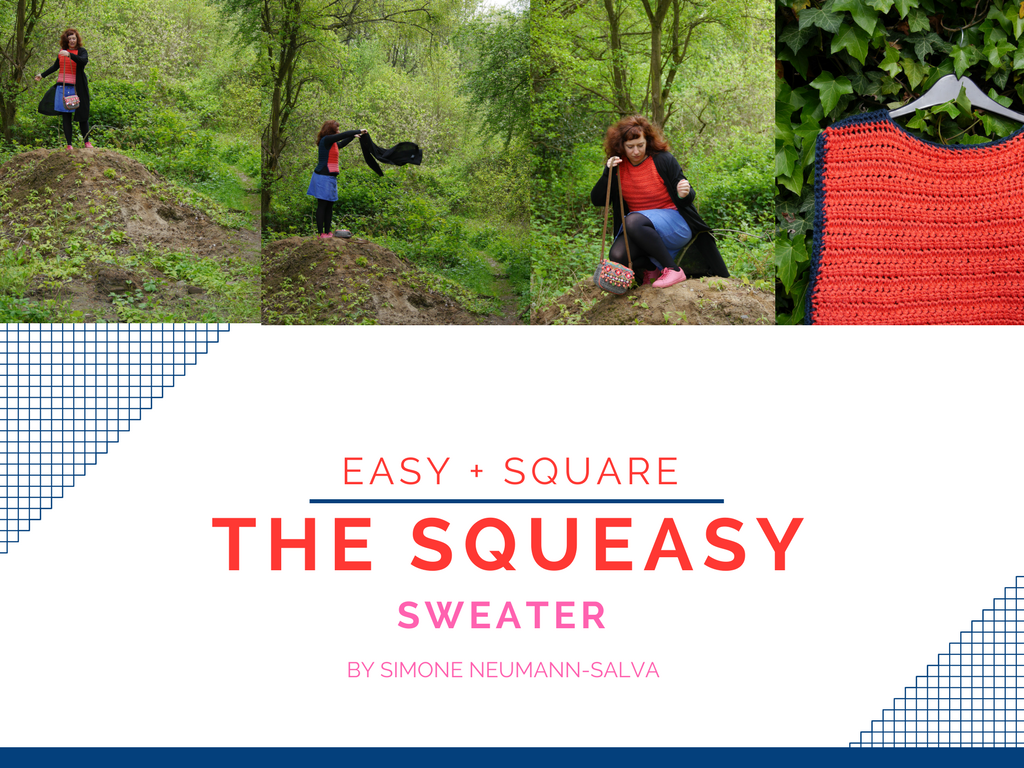
The Sqeasy Sweater - an easy crochet pattern

The weather outside is lovely and I thought I needed a break from all the (complicated) knitting.... so I improvised a really simple crochet sweater pattern:
Square + Easy = Squeasy (someone laughing already?)
I know the pun is not the cleverest, but honestly, neither the sweater. Actually it is so easy to make, I should not only be ashamed of the title, but also for writing the pattern down.
I’m going to do it anyway 😊
Here comes the mystery recipe: just crochet two squares and sew or crochet them together, that’s it. Haute Couture…If you like, you can go on and make another two squares and in a flash your sweater has sleeves. Because of my aversion against driving I used cheap acrylic yarn from the Dutch shop “action”, which is within spitting range. The yarn is a little fuzzy so I used a big hook, to give it an airy quality. At the same time, I wanted the sweater to be not see-through, therefore I crocheted it completely in linked double crochet; besides this results in a lovely pattern. On Moogly Blog you will find a very comprehensive explanation in word and video how to make this stitch. But if I have time enough I will make in the next week(s) a video tutorial for the linked double crochet.
Construction
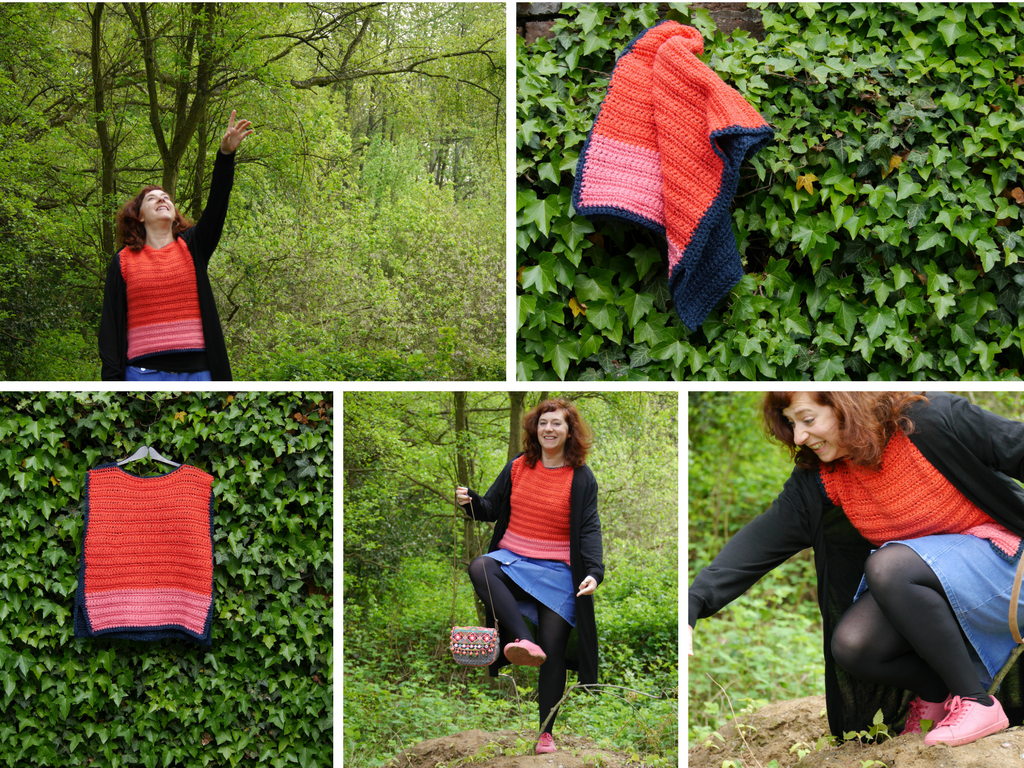
The sweater is made of two equal squares – the front and the back. Both are crocheted from the bottom up in rows. The range of colours and stitch patterns you can use is limitless. I, as said above, have chosen linked double crochet and crocheted the front in pink and brilliant red and the back in a dark blue. To link the colours of font and back together, I bordered everything with dark blue in single crochet. To assemble the sweater, you begin with closing the shoulder seams and afterwards you have to seam the sides beneath the armpits. The sweater is a little bit longer and reaches be-neath the hip, to accommodate my wide hips my feminine figure in a square sweater, a trick is needed: I simply didn’t close the side seams completely, so that I have a slit on every side, which gives way for my pelvis. The sweater has a about 4 cm ease, but you can change the pattern easily to your liking.
Which size should I make?
First, you must decide for a stitch pattern and yarn. Then use both to make a tension square. The next step is to measure yourself – shoulder width, waist- and hip width and the height between armpit and shoulder. Now you must decide the fit and the length of your sweater.
Now we start to calculate. To calculate the width, you need the following formula:
(Desired width x stitches per 10 cm) / 10
The height is calculated similarly:
(Desired height x rows per 10 cm) / 10
My sweater is 48 cm wide (including the sc edging) and 50 cm high.
(48 cm x 10 stitches) / 10 = 48 stitches
(50 cm x 6 rows) / 10 = 30 rows
Because of the single crochet edging I needed only 46 stitches per row and only 29 rows. So, if you also want to make an edging, you must take this into consideration. Without the edging, you only need the formulas above.
Tension
1o stitches and 6 rows are 10 x 10 cm
Material
Made by me Medium, Yardage 100 g / 238 m.
One skein in pink and red and two skeins of the dark blue.
Hook 7 mm
Tapestry needle
Scissors
Pattern Notes
Turning chains count as stitches throughout. The Pattern is written in US Terms
Skills used / Abbreviation
ch = Chain
fsc = Foundation single crochet (UK foundation double crochet)
sc = Single crochet (UK double crochet)
dc = Double crochet (UK treble crochet)
ldc = Linked double crochet (UK linked treble crochet)
Sewing front parts and back together
Size and numbers
Width
Cuff 48 cm
Shoulder neckline 48 cm
Neckline 26 cm
Height
Armhole to cuff 28 cm
Armhole 22 cm
Total heigth 50 cm
Slit 8 cm
One after another….
Front piece
Row 1: 46 fsc in pink (46 stitches)
Row 2-8: 3 ch, ldc in each stitch across (46 stitches)
Row 9-29: change to red yarn, 3 ch, ldc in each stitch across (46 stitches)
Secure yarn and fasten off.
With dark blue yarn crochet an edging in single crochet around the front piece. On the sides, you should crochet two single crochet into the side post of every double crochet. When you get to a corner make 1 sc, 2 ch, 1 sc.
Back piece
Row 1: 46 fsc in dark blue (46 stitches)
Row 2-29: 3 ch, ldc in each stitch across (46 stitches)
Don’t fasten off and crochet an edging in single crochet around the back piece. On the sides, you should crochet two single crochet into the side post of every double crochet. When you get to a corner make 1 sc, 2 ch, 1 sc.
Fasten off.
Finishing instructions
Turn front and back on the wrong side and pin both together and close the shoulder seams. De-pending on the length of this seam, the neckline will be wide or narrow. I closed 11 cm on each side. Now close the seams between cuff and armhole. I left 22 cm open for the armhole, so the side seams are 20 cm and the slit 8 cm.
If you like you can crochet some more rows of single crochet around the armhole or you can crochet a complete sleeve. In the latter case I would make the armholes narrower, so the sleeves will be smaller.
Weave in all ends on the wrong side.
Now it is essential to put the sweater on and to find somebody who tells you the whole day long, how nice its fit you, how adept you are in crochet and that you are generally the best person ever.
And by the way... I have new pink shoes
Photos are again by @giavellottista (thank youuuu)
.png)
.png)


I like your sweater a lot and your new pink shoes! :) Your post put a smile on my face!
Happy you like it and thank you so much for the compliment. I had no other chance than to buy these shoes - soooo pink 💕💕
I love this recipe for a squeasy sweather <3 haha you made me laugh as always :) I think it looks really great on you, @neumannsalva :) The colours are veeeery nice, too. My adventure with yarn begins with making pom poms for my bags and drawstring backpacks. Wish me luck ;P Have a beautiful spring :)
Love,
Klaudia
Yarnlove and woolyluck to you. Hopefully you get infected with the fibre virus :-D I love pompoms, but have to admit, that I think they need too long to make (I found on pinterest a pompom rug - sooooo cute... but I had to give up, too many pompoms)
Thank you for the praise - and I have chosen the colours, so I never get lost in a forest ;-)
baciolino sim
You make it look and sound so easy! Crocheting clothing intimidates me so. I guess My Haute Couture is destined to be a teeshirt and jeans!
And this from you!!!!! With your intricate filet designes, which I would mess up in minutes 😄 But nothing against shirt and jeans 😄😄
haha...just between you and me...part of the reason I don't like to make my clothes is it takes too much time as I have a (ahem) larger body!
That is nice that you shared the pattern! It is really cute!! :) Like the new pink shoes!!
Happy you liked it. I wanted so badly something that fits with these shoes... 😄
I love the sweater and the photos @neumannsalva! I think it's all in the colour combination and those colours look great together :)
Thank youuuu... Looking on the photos I also think it fits very well (in reality it is - ahem -
blindingbold)What a pretty sweater!! I love the color combo you chose...and those pink shoes go so well with it!
I am so glad you decided to write out the pattern because I feel I can accomplish a sweater like this. I appreciate the measurements and calculations you added because this is an area I struggle with...I suck at Math period. Thank you for sharing this simple way to create a crochet sweater. Another round of great pics!!! 😃💕
Thank you for the compliment : we were so happy, that the weather is fine, and everything is green again that we took the photos spontaneously in this little forest. It's an old mining area with many holes and ponds - lovely, but you must be careful not to have an accident.
Yes... numbers are sometimes very intimidating. And because I always forget how to estimate my size, I thought I should write these formulas down (nevertheless I very often knit or crochet garments, which do not fit perfectly... as you know from my last posts)
You are very welcome! I’m glad you had nice weather too and that you didn’t fall in any holes! 😳😲🤭
Nice idea! I like the simplicity. I must try it once I come back to Germany. I was too chicken to put my knitting needles in my onboard luggage ... I should have tried with crocheting needle 😄
I miss needlework being away from my home!
Thank you 💕 My idea was to use a very simple fit to try out these linked double crochet, which were new to me. I love these stitches very much, because the fabric is airy and without holes - a little atypical for crochet.
And with the plane and needles... sigh. I never triedd it out myself, but have read that some people managed to get them on board.
The sweater turned out really cute as are your new pink shoes! You wrote it up so well I can almost follow the pattern! And I don't even crochet...
Thank youuuuu 💕 and I had to laugh... because of visualizing someone who poses as a crochet expert :-D
I think I always assume, that you can also crochet, because you are so experienced in knitting and embroidery (and crochet is much easier) But the principle of the sweater is so simple, perhaps it would also be lovely knitted in garter stitch.
Or... I could break down and learn to crochet! I have done some but my mind does not work in chains very well. If I did it more, I am sure I could figure it out. But one of my friends crochets so I tend to rely on her for doing crocheted things, and she has me do the knitting. :)
@maggiegrace if you’re ever looking for a super simple crochet sweater pattern ❤️
Thank you for recommending me ❤️❤️❤️
I absolutely adore this sweater😍😍😍 . It is so lovely ! The colour red, pink, blue three of my favourite 5 colours.
You say its pretty easy to make
lolI laugh at my unbeknownst state. Well for folks like me , thanks for putting up the procedure anyway. It fits you so nicely☺Also I can never get enough of the pretty scenes you choose to take your pictures. Knitting and photography be cool with you. Lets not forget your unique poses . Lovely 💕
Uhhh I am blushing because of these lovely compliments. As I wrote to @crosheille we finally have nice weather and the trees are green gain. And for the photos I am standing on a little hill which is a part of an old mining area. Everything is overgrown and lush, full of little ponds (holes from the mining) and hills. But it is a bit dangerous to walk into the bushes, because the ground can collapse...