Making a table, on a balcony! Part 2 - makeshift clamps and glue
One of the ways I justified making a table to my wife was that I could make it cheaper! Or is that how I convinced myself... meh, whatever.
Now I can count, knowing full well that I would have to buy tools JUST to be able to cut the wood, it's obvious that if I took all the money spent on tools, that it is going to be a verrry expensive table!
So let's ignore money spent on tools! Problem solved 😉
Or so you would think, thing is I am quite tight fisted and hate spending money when I think there is an alternate solution.
Hold me tight
That brings me to one of the things you can never have too much of...
Clamps!
I did not have any, at all. In my wisdom I decided to glue up my own table top, so I needed clamps. Luckily I found some super low price 150mm clamps at the hardware store. Hmmm I am thinking I should go and get some more, you can never have too many!
Those clamps would help me hold the boards relatively level while the glue dried, but I still needed to clamp the board together across the breadth of the boards.
The dimensions (roughly) of the table top 850mm wide by 600mm deep. The longest clamps I found were 600mm, so I could probably make them work in a pinch, but at nearly €30 a clamp I was floored. There is simply NO way I am paying that much for something, that I still need to hack about with!
A couple of rods
My brain started working, as I recovered from the shock of thinking 😉 a plan hatched!
Inside every hardware store, the stand in wait, tucked away, out of direct sight, readying themselves for the day they will prove useful...
Threaded rods!
I have mis-used and abused these a few times, they are some of the handiest things I have come across, 'coupled' with coupling nuts, they are awesome and you can exert a fair amount of force without fear os tripping a nut's threads.

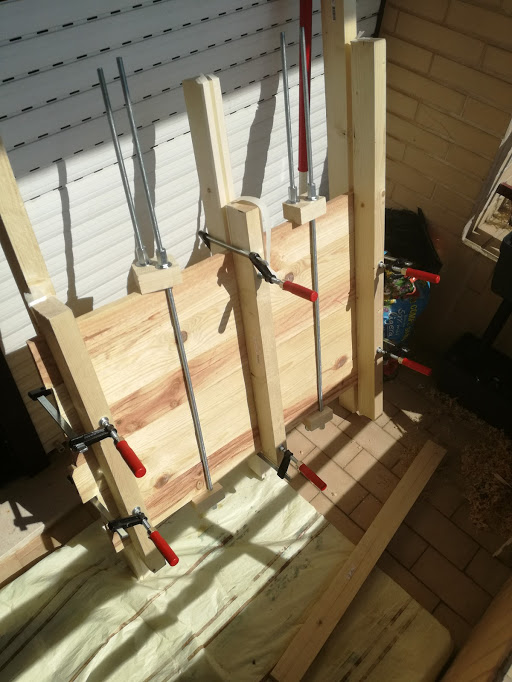
Here they are in action, I cut some blocks and drilled 10mm holes through for the rods. At 1 meter in length I had plenty thread left to play with.
Best of all the threaded rods were less than € 1 each! Including nut's and washers I got a away with paying less than €10.
A classic example of using what is at hand, the next table I make will be even easier! But I do need more clamps.
These worked, but I do think the finish would have been much better with more clamping force.

It worked! This picture is from two days later, I glued and clamped the pieces on a Saturday, then took it all off on the following Monday.
It all stuck together, and felt nice and solid.
It's all about that base
Drunk on my victory, I pushed on and started work on the part that will form the base of the table.
I am hoping to avoid having ant screw heads visible on the table, so had to make a plan with holding the parts together while the glue dried.

Playing with the threaded rod again, I realised that my makeshift clamps could be pressed into use yet again. I did a trial run without glue, measuring diagonally from one corner o another, checking if the frame stayed square as I tightened the nuts.

Fortunately it did, slue was applied, and the rods and wooden blocks were hurriedly applied to the frame and tightened up.
A few quick checks that it all looked fairly square and I put the frame aside to dry.
The wait for the glue to dry begun again.
What's missing from this post is images of the process I followed to plane the edges of the board to fit. That's because I never took any!
The last thing missing, is a show of appreciation to my understanding (and long suffering!) wife, who has given me support on this and many other hair brained schemes. I once changed a motorcycles valves in out living room, with no garage, we had a bike parked next to the TV for a week or so as I sorted out parts!

There is more to come, I know this because I have photo's, so please follow me for updates.
Leave a comment if you enjoyed reading this, I appreciate all feedback!
Spot on! :D