DC 12-volt solar fan repair. | Problem: motor burnt out and voltage regulator replaced.| With a video tutorial
Assalamu alaikum Everyone. I am @imranhassan From #Bangladesh
.png)
A few days ago, my younger sister gave me one of her solar fans to repair. And she told me that when she turned on her switch and wanted to turn on the fan, its circuit power went off, and it got very hot. Then I realised that the circuit was shocked or something was broken. Then I took the entire fan apart and found the problem: its motor was broken, due to which it was shock-circuiting, and the switch that was used to turn the fan on and off told me to change it, so I installed a voltage regulator. Here, let's see step by step how I repaired it.
Step -01

First of all, you can see that I took the fan on my worktable and gave it 12 volts DC input voltage; it was not working somehow, and the power light was going off. It means the complete circuit, including the motor, got shocked.
Step -02

Here in the second picture, what I want to tell you is that after giving a 12-volt power supply, if I do not open the switch, then the red indicator light on the circuit board lights up, and if I give the switch, then this light goes out, meaning the lines are negative-positive together.
Step -03
So I will change this switch. I will not keep it. My sister got addicted to the voltage regulator, and she was saying that I should replace it. You will not use it, so I will throw it away, so I took out two lines from here, positive and negative, with white and black wires.
Step -04

When I realised that the motor was bad, I bought a new DC 12-volt motor from the market for 320 taka, which is controlled by a solar fan, so I gave it a 12-volt input voltage, and you can see the motor is spinning very nicely.
Step -05

Now the white and red wires that you see in my hand and the motor that you see are the old motor and the wires. I will throw them away. I will attach new wires to the new motor.
Step -06

So I have placed the motor inside the fan body cover, and I have placed the covers around the motor nicely, and if you watch the video, you will understand them very well.
Step -07

Now you can see that after installing the motor cover and the gear of the motor, I have fitted the entire body cover around the motor.
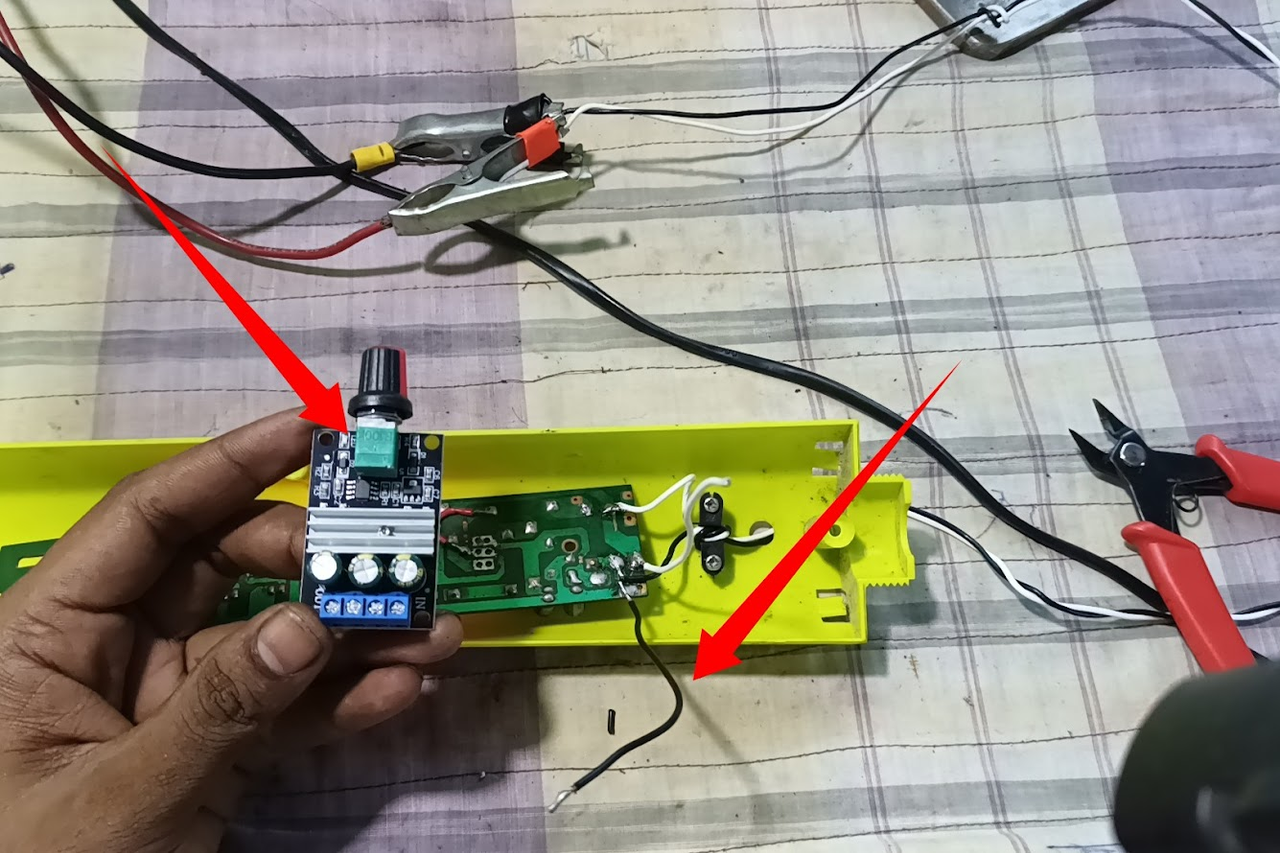
Step -08

Now you can see that I have connected the voltage regulator to the circuit board, and I have given the voltage regulator input voltage through two jumper wires, black and white, to control the motor, and you can see that the red light is on in the voltage regulator.
Step -09

Now I have connected the blades of the fan to the motor, and I have connected the two negative and positive wires of the motor to the output of the voltage regulator.
Step -10

Now you can see, Mashallah, the new motor fan is spinning very fast, and the voltage regulator is controlling it very nicely, and I feel very happy to see it, and my sister, who was next to me, was also very happy.
Step -11

Then I cut a little plastic next to the old circuit and replaced the voltage regulator, and I modified it so that the speed can be reduced and increased.
Step -12

But I put a mesh cover under the fan and put the blades back on, then replaced the voltage regulator and fitted all the body covers and ran the fan again, and now it is ready for use.
Step -13

So now you can see the complete fan in the fitting condition, and it is running very nicely. A red light is indicating this circuit. I just kept this red light to indicate and took another output from this circuit and gave it to the voltage regulator again and took the output from the voltage regulator and gave it to the motor, and this is how the work is done.
Step -14

I took a selfie with my repair work. It is very important to keep proof of yourself with every work, and I feel very good about it. It cost me about 400 taka to do it, and my sister tried to force me to give her a gift. I didn't want to take it, but then she gave me 300 taka to eat something.
| Video Tutorial: To better understand the practical part of this tutorial, you can watch the video below. |
|---|

✅ CC: My friend @rmm31
✅ We support @pennsif and @pennsif.witness for the growth of this platform. pennsif.witness his contribution to the Steemit community. Vote for him as a Witness here: Click to Vote
| Photography Details | 📱 Device: Walton Xanon90 | 📍 Location: Narayanganj, Bangladesh | 📷 Captured By: @imranhassan |
|---|
By improving the marked items you could get Higher Votes!
Curated by @marvinvelasquez
Congratulations! This post has been voted through steemcurator03.
Hello there, you have posted a great quality post and we are happy to support you, stay up with good quality publications