SLC-Home Repair Club | S23W3 | Complete Tutorial: LED Chip Testing & Repair.
Assalamualaikum Everyone. I am @imranhassan
From #Bangladesh
.png)
In today's post, I will show you how to test an LED chip in a simple way and what effect the use of resistance has on the current flow. Those of us who work with electronics have to face problems when the LED chip is damaged. Many times it becomes difficult to verify whether the LED chip is really damaged or not. So in today's test, we will learn about the easy method of checking the LED chip and the effectiveness of using resistance.
Introduction:
We often see that the LED light in our house is damaged, and when we go to fix it, many times we do not understand whether the LED is damaged or the circuit is damaged. In that case, if you cannot check the LED light with a 220 volt input voltage, I have found a simple method that can easily find out whether the LED chips are OK. The LED chip is not working, but it is difficult to check whether it is really damaged. So in today's post, I will show you a simple method to check the LED chip and what effect the use of resistance has on the current flow.
Materials required to check the LED chip:
✅ 12V power supply
✅ LED chip
✅ 2KΩ resistance
✅ Probe and connection wire for wiring connection
Easy method to check the LED chip
Step -01
 |  |
|---|
 |  |
|---|
First, I took a 12 volt power supply to make a device to test the LED chip, took a 2k resistance, took some LED chips, and took the old negative and positive probe wires of the multimeter.
Step -02
 |  |
|---|
 |  |
|---|
Then the power supply that you see in my hand is a 12 volt power supply. It was broken; I just kept it with me. Today I will make it as the first tool for my LED chip testing. Then I opened the power supply and took out the internal circuit and checked the plus and minus of the 12 volt output voltage with my hand, which way it goes.
Step -03
 |  |
|---|
 |  |
|---|
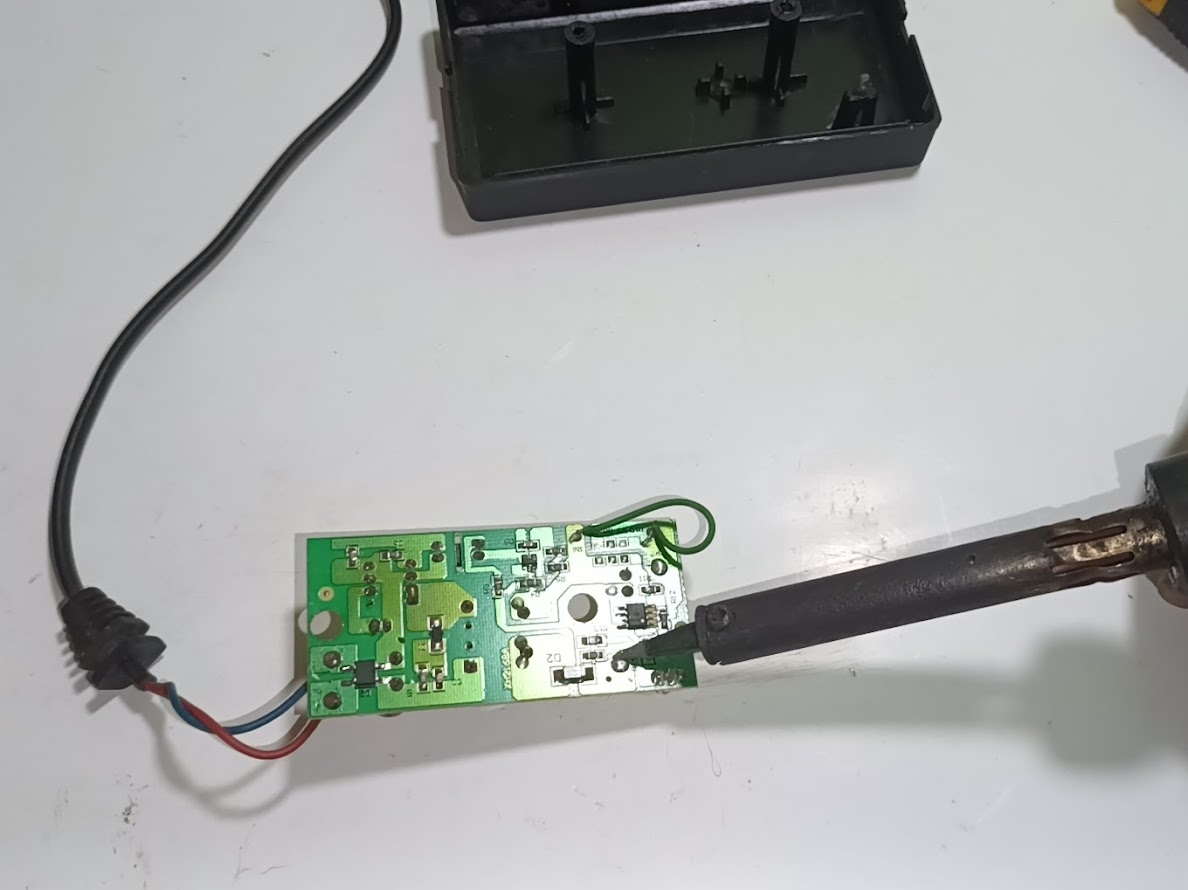
Then I tore the two wires of the output voltage with a soldering iron. And I put a 2k resistance on the plus line of the 12 volt output voltage. As a result of putting this resistance in, the voltage will be correct and the current ampere will decrease. When I check the LED, I will not see much light in my eyes. Then I measured the output voltage; here it shows 15 volts without any load. Then I took a red and a black wire for soldering the positive and negative output.
Step -04
 |  |
|---|
 |  |
|---|
Then, after I soldered the 2K resistance to the output voltage, I put a positive red wire on the output above the resistance. Then I applied negative voltage and took the probes of the multimeter in both hands, saying that I would solder with 12 volt output voltage. And I soldered the wires neatly to the ground, positive to positive and negative to negative line.
Step -05
 |  |
|---|
 |  |
|---|
Once my connections were connected, I took an LED light and tested the chips before fitting them inside the circuit body. Then, as you can see here, my LEDs are glowing very nicely while I am testing, and the light of the LED chip is not causing any harm to my eyes due to using 2K resistance. Then I checked two to three types of LED chips in this way, and it worked 100% completely. Then I also put it in the body cover for fitting.
Step -06
 |  |
|---|
 |  |
|---|
Then, to verify the authenticity of the work, I created my necessary project and took all the materials together. Putting my club name and my username, I tested an LED chip through a DC 12 volt output with a 220 volt input voltage. And I took a selfie with my work as per the community guidelines.
Why did I use a 2k resistor on the positive line of the 12 volt output voltage?
 |
|---|
I used a 2K resistor because it reduces the current so that the voltage is correct and the light from the LED chip is not harmful to my eyes. As a result, the light from the LED chip will not be too bright and will not harm my eyes, and it will not be dark in the eyes.
Resistance calculation:
Voltage (V): 12V
Resistance (R): 2kΩ (2000Ω)
Current (I) calculation:
I = V / R = 12V / 2000Ω = 0.006A (6 milli-amps)
Conclusion
|
|---|
Through this experiment, we saw what is the easiest way to check the LED chip and how the current is reduced by using a resistor, but the voltage remains unchanged. This is especially useful when controlling the brightness of the LED chip.
If you encounter any problems while checking the LED chip, you can tell us in the comments. I hope this post will be useful for you.
| Category | Description |
|---|---|
| Project Name | LED Chip Testing Device |
| Materials Used | 12V Power Supply, 2kΩ Resistance, Multimeter Leads, Red and Black Leads, Soldering Iron, LED Chip |
| Steps | 1.The 12 volt power supply output connection has been made. 2. Checking the Output Voltage 3. Adding the 2kΩ Resistance 4. Connecting and Testing the LED Chip |
| Resistance Calculation | Voltage: 12V Resistance: 2kΩ Current: I = V / R = 12V / 2000Ω = 6mA |
| Results Obtained | The LED chip worked properly and the excess light did not harm the eyes |
| Benefits | 1. LED chip can be tested in an easy way 2. Low current flow does not cause damage to the eyes 3. LED light can be repaired safely |
| Video Tutorial: To better understand the practical part of this tutorial, you can watch the video below. |
|---|
| 📢 Course and Challenge Deadline: These courses and challenges will start on February 3, 2025, and will run until Sunday, March 9, 2025, at 11:59 PM (UTC). So be sure to participate in time. |
|---|
Here are our selection criteria for the Home Repair Club; if you want, you can read the post and understand it: Clubes de Aprendizaje de Steemit Temporada 23 | Introducción y Bienvenida al Home Repair Club
I invite you to join the Home Repair Club. @sergeyk @ariful2 @kalidsyfulla
Photography Details: 📱DeviceWalton Xanon x90
Best regards
@imranhassan
My friend @rmm31

Alhamdulillah, I learned something important through this post.The descriptions of the work are given in such a beautiful way, it is truly amazing.I hope many people will benefit from this.Thank you @imranhasan Bhai for sharing an important post.
Thank you for your comment. I am very happy to hear that the post was useful to you. I have created this post in such a way that everyone can benefit, especially those who work with LED lights or want to do so in the future.
Using this method, there is no need to test the light directly with a 220 volt input voltage. It is possible to easily test the LED chip with the light off, which will help avoid the risk of electrical short circuits. Because, I myself have received electric shocks many times while testing LED chips in the past. So I have decided, never to test LED lights with a 220 volt line again.
In my next tutorial, I will show you how to replace a burnt LED chip by soldering it with a new one and making it work like new again. Hopefully, this will be more useful for you.
Hello friend, how are you? Thank you very much for such a nice post. Your photography was great. And you made a complete LED light yourself with different light circuits which is really appreciated. I pray you move forward on this platform. And get an opportunity to further develop your own knowledge. Be well, God bless.
Hello @saifulislam5 friend I am fine; I hope you are fine too. Thank you very much for your nice comment.
Your appreciation is really inspiring. Working with LED lights and circuits was a great experience for me, and it is good to know that you enjoyed it.
Thank you for your prayers and good wishes. InshaAllah, I will try to share more good things in the future. Stay well, stay healthy. God bless you.