Hello friends, you are welcome to this season 23 of the learning contest. Join me as we discuss the matters arising...
 Source
| Task 1 Examine the power supply unit of your computer or any other device and determine its type. Then, refer to the label on the unit to identify and note its input and output voltage specifications. |
|---|
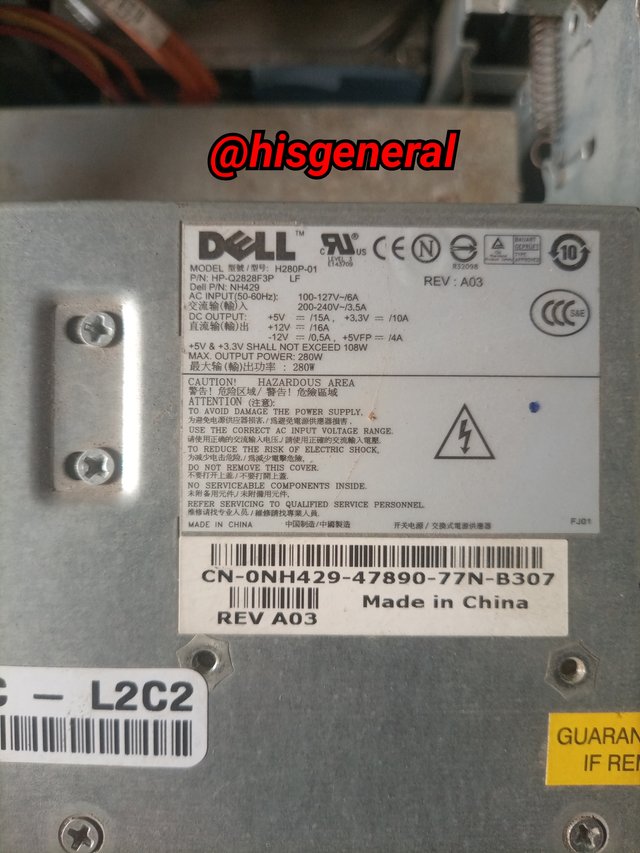
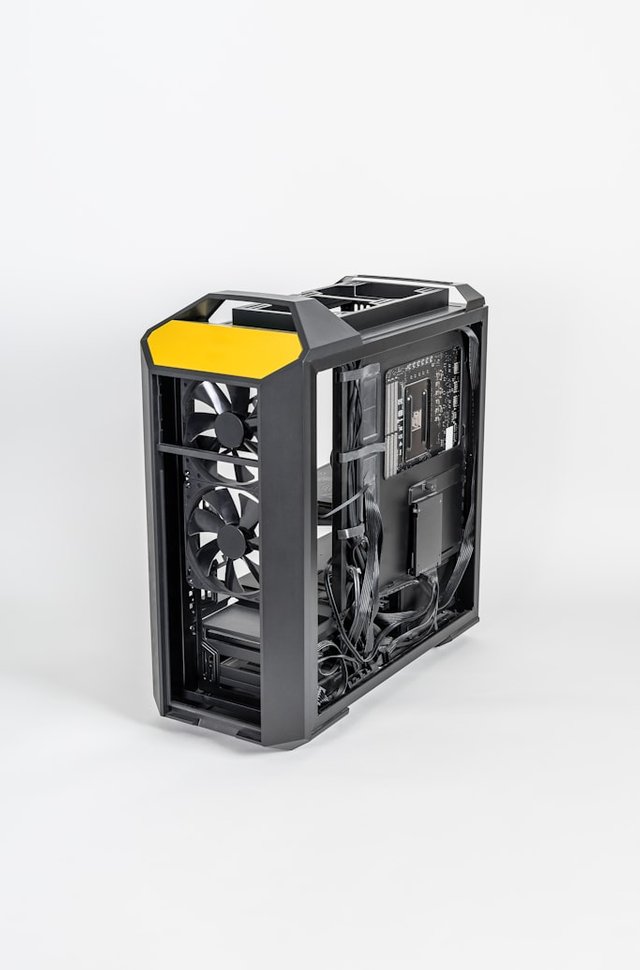
The above is the power supply unit of my computer, and below are the input and output voltage specifications:
| Input/Output | Details |
|---|
| AC INPUT (50-60Hz) | 100-127V~/6A |
| Communication experience (input) | 200-240V~/3.5A |
| DC OUTPUT | +5V == /15A, +3.3V == /10A |
| DC cushion (wheel) out | +12V == /16A -12V == 0.5A, +5VFP == /4A |
| The largest city (output) | 280W |
| Maximum output power | 280W |
Note: some information was translated; hence the accuracy of the translation is not ascertained.
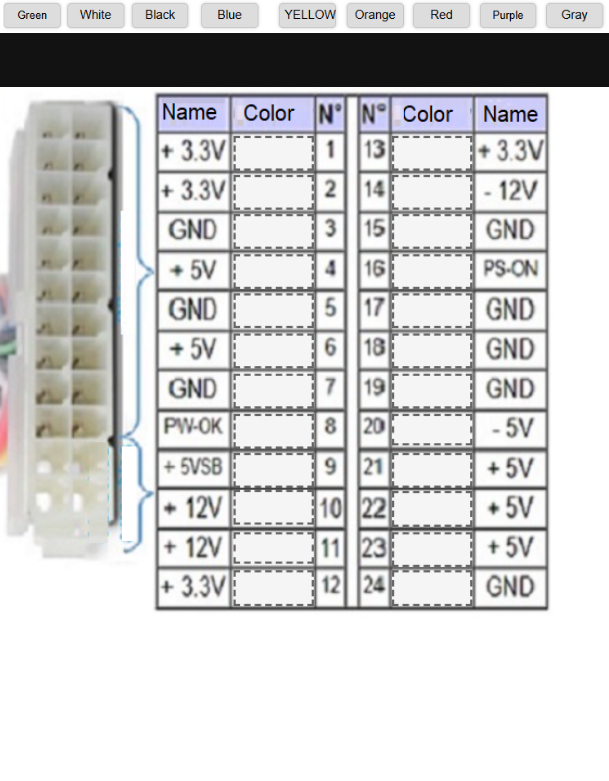
| Task 2 ATX power supplies supply power to ATX cards through a 24-pin connector. List the wire colors used for each number in the following table. |
|---|
 Copied Copied
| Name | Color | N⁰ | N⁰ | Color | Name |
|---|
| + 3.3V | Orange | 1 | 13 | Orange | + 3.3V |
| + 3.3V | Orange | 2 | 14 | Blue | - 12V |
| GND | Black | 3 | 15 | Black | GND |
| + 5V | Red | 4 | 16 | Green | PS-ON |
| GND | Black | 5 | 17 | Black | GND |
| + 5V | Red | 6 | 18 | Black | GND |
| GND | Black | 7 | 19 | Black | GND |
| PW-OK | Gray | 8 | 20 | White | - 5V |
| + 5VSB | Purple | 9 | 21 | Red | + 5V |
| + 12V | Yellow | 10 | 22 | Red | + 5V |
| + 12V | Yellow | 11 | 23 | Red | + 5V |
| + 3.3V | Orange | 12 | 24 | Black | GND |
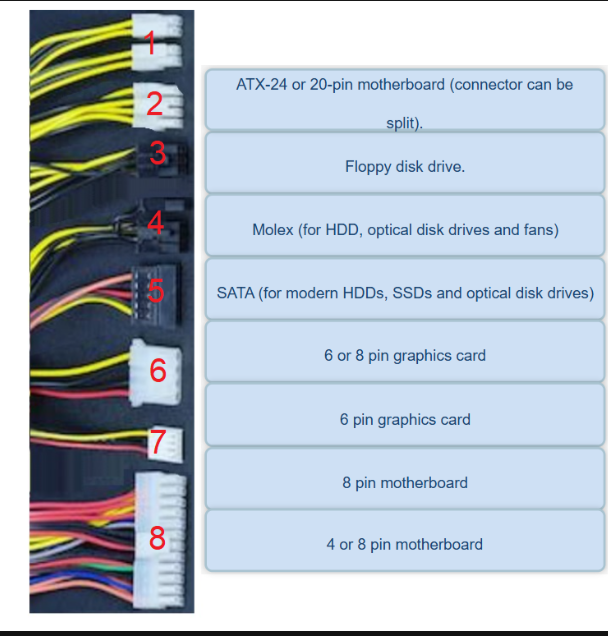
| Task 3 Look at the image above showing different power connectors on a computer power supply. Match each numbered connector to its specific use based on the information provided. Then, explain the role of each type of connector in the operation of computer components. |
|---|
1 — 4 or 8-pin motherboard
2 — 8 pin motherboard
3 — 6 pins graphics card
4 — 6 or 8-pin graphics card
5 — SATA (for modem HDDs, SSDs, and optical disk drives)
6 — Molex (for HDD, optical disk drives, and fans)
7 — Floppy disk drive
8 — ATX-24 or 20-pin motherboard
The role of each of the connectors in the operation of computer components
4 or 8-pin motherboard
- The 4 or 8-pin motherboard connector is responsible for providing the CPU, motherboard as well as its components extra power, supporting RAM, configurations of multi-GPU, higher-power components, and advanced characteristics such as overclocking as well as more demanding systems.
8-pin motherboard
- This connector shares the same role with the previously mentioned 4 or 8-pin motherboard connector.
6 pins graphics card
- This connector provides graphics cards extra power and supports GPU memory, high-end GPUs, as well as configurations of multi-GPU and power monitoring as well as overclocking.
SATA (for modem HDDs, SSDs, and optical disk drives)
- Serial Advanced Technology Attachment (SATA) connector plays an important role by making provision for a high-speed interface for the connection of storage devices like HDDs, SSDs as well as optical disk drives to the motherboard, allowing for high-speed transfer of data, hot-swapping abilities, and power supply.
Molex (for HDD, optical disk drives, and fans)
- This is the connector that is responsible for the provision of power to various computer devices, including hard disk drives, optical disk drives, and fans, making sure there is dependable and steady operation.
Floppy disk drive
- The Floppy disk drive connector was of significance for the connection of floppy disk drives to motherboards, allowing for storage and retrieval of data. Nevertheless, it has in a widespread been replaced by more recent storage technologies.
ATX-24 or 20-pin motherboard
- This connector is necessary for the provision of power, signaling, as well as control to different motherboard components, guaranteeing the appropriate and correct functioning of the computer system.
| Task 4 What are the common signs that a computer power supply is failing, and what steps should you take to diagnose the problem before replacing the power supply? |
|---|
Numerous common signs indicate a computer power supply is failing, they include the following:
Random Restarting or Shutdowns
- Any time a computer begins to randomly shut down or unexpectedly restart, it could be an indication that the power supply is defecting to provide a steady power output.
Burning Smell or Overheating
- Whenever the computer begins to overheat or emit a burning smell from the power supply, it's an explicit sign that the power supply is beginning to fail and might be approaching a catastrophic failure.
Failure to Power On or Intermittent Power
- In the circumstances that a computer is having difficulty powering on or is undergoing intermittent power problems, it might be an indication that the power supply is failing to provide the system with enough power.
Diagnostic steps to be taken before replacing the power supply
Visual inspection
- Carry out a visual inspection of the power supply as well as its cables to examine for any indications of physical damage like marks of burn, broken connectors, or frayed cables.
Voltage Testing
- A multimeter should be used to test the power supply's voltage output at the motherboard, CPU, as well as other components. Readings should be compared to the recommended voltage levels to spot any voltage fluctuations or drops.
Systematic Troubleshooting
- A systematic troubleshooting process should be carried out for the isolation of the problem. Also, unnecessary components like graphics or sound cards may be removed to see if the problem goes on. Additionally, we may try using various power outlets or circuits to preclude any problems with the electrical supply.
These diagnostic steps, if followed can help ascertain whether or not the power supply is actually the culprit and make a knowledge-based decision about replacement.
| Task 5 What precautions and best practices should be applied when maintaining and cleaning a power supply to ensure its proper functioning and extend its life? |
|---|
Disconnect Power Cords
- Prior to the cleaning or maintenance of the power supply and for the prevention of electric shock, make sure to unplug it from the mains and any other power sources.
Ground Yourself
- The power supply's internal components can be damaged by static electricity. For a little grounding, try touching a metal object or putting on an anti-static wrist strap. It is an easy way to feel more connected.
Carefully Use Compressed Air
- Whilst dusting the power supply, utilize compressed air cans particularly designed for electronics. The can should be held upright and the air sprayed in short bursts to eschew further push of debris into the power supply.
Avoid Liquids and Chemicals
- While cleaning the power supply, Never use liquids, cleaning solutions, or chemicals should never be used as they can compromise the insulation or damage the internal components.
Inspect and Replace Filters
- Frequently examine critically or carefully and substitute the power supply's air filters to make sure there is suitable airflow and prevention of dust buildup. Make use of replacement filters designed particularly for the power supply.
By adhering to these precautions and best practices, one can be able to maintain and safely and efficiently clean the computer power supply making sure it is properly functioning and its lifespan extended.
Thank you
Let me invite @lirvic, @sduttaskitchen, and @ruthjoe
|
|---|
X promotion link