SLC S23W5/ Puppet Theater

With a child between 4 and 12 years old, create a puppet theater using materials of your choice. Consider the child's age to determine whether or not they can cut. The most important thing is their safety; if necessary, you can do the cutting while they participate in the decoration. Remember to indicate the materials you'll use, as well as the step-by-step process and the final result. Include photographic evidence. Also include both the children and you performing the puppet show and showing the final result.
Last week, I created a puppet and now I'm making a puppet theatre where they hide, get dressed and then start a show where a large audience gets to watch. This is how I made the theatre. I invited an 8 year old boy and a 6 year old girl to help make this theatre. The materials of my choice included;
Carton
Sugar paper
Cardboard paper [White]
Scissor
Ribbon [Yellow]
Pen crayon
Red lining cloth
Marker [Black]
Stick and Gum/Glue
 |  |
|---|

These were the materials I used in making this theatre. First of all, I thought of how I'm going to make this theatre look perfect. This was when creativity was put into play, but before doing that, I purchased some snacks for these children to serve as motivation for them. They were so happy to participate in this creativity. We started off by deciding on how we would be able to create this puppet theatre.
Creativity before
- An extended roof at the top of the building where the theatre is for accessibility. It should or must be coloured like a circus, though this particular roof was flat due to the unavailability of materials to make it more like a circus tent.
- Back end behind the curtains, which would be easily unwrapped and closed by loosening the ropes attached at the extreme ends
- Fancy colours of red, white, and yellow to give this glittering mixture. A theatre is popularly known in red. It has this red curtain that uncovers when the puppets are out.
- A theatre with a bridge so you won't completely see behind the stage. Just the puppets would be seen depending on the type of show put up. A billboard that tells the public what kind of show it is.
Steps in Making the theatre |
|---|
Using the materials listed above, I ensured I carefully crafted and designed the box which I would use for my theatre. Here are the steps.
Step 1 With my carton, I used the back side, which was sealed, to make an opening. With the help of these children, I was able to mark and cut out an opening from the back side of the carton. After marking where I would cut, I used a marker to trace it. After tracing one side, I gave him the other side to draw, and he drew a straight line perfectly for the cutting. He's good at handling scissors, so he took up the scissors and cut a particular side while I helped him complete the cutting of the down length. Together, we carved out the opening and took to making the roof.
 |  |  |
|---|---|---|
 |  |  |

Step 2: We were done making an opening that is not too open but concealed from the floor to serve as a barrier. I then used another carton and made it plain with taps hovering in the middle. I then curved it more like a flat roof and made designs on the ends of the roof. He did the colouring while I did the carving. We used the marker to make it black and attractive. After carving out the design, I made some openings under the carton paper to glue it to its theatre. While he glued the back, I glued the front. We were done mounting the roof, and its structure was solidly placed.
 |  |  |
|---|---|---|
 |  |  |
 |  |  |
 |  |  |
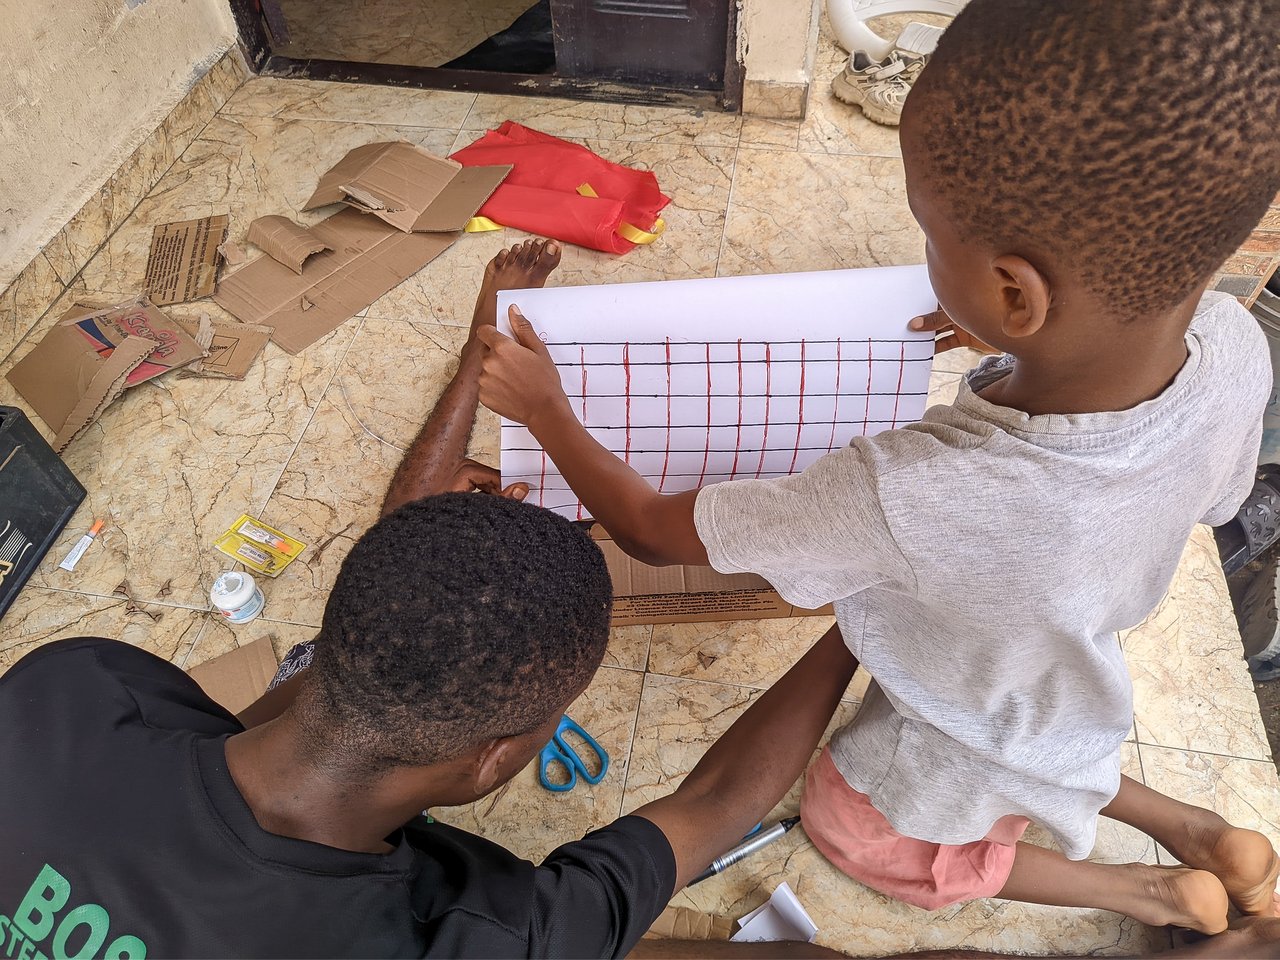
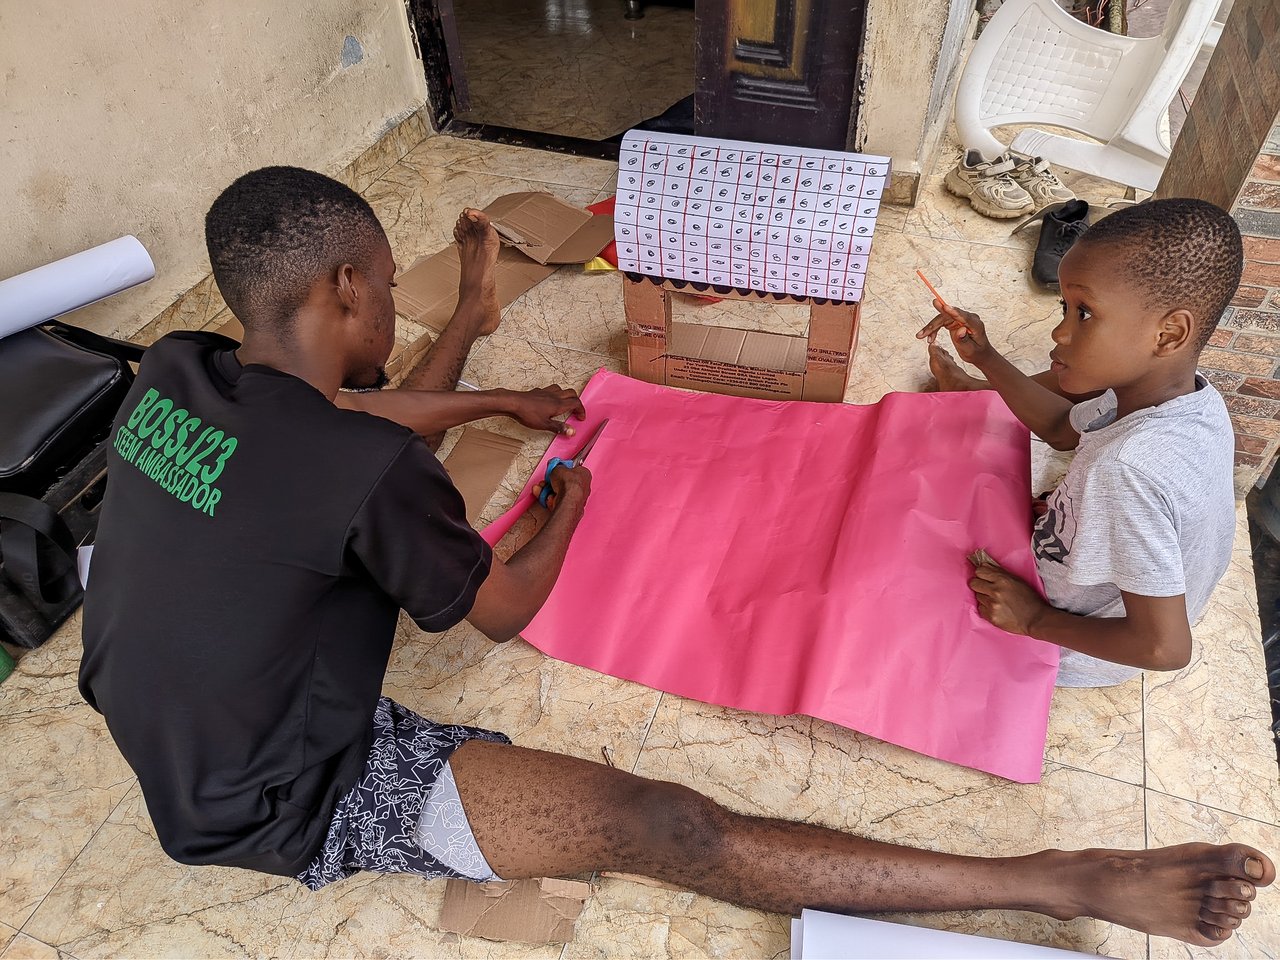
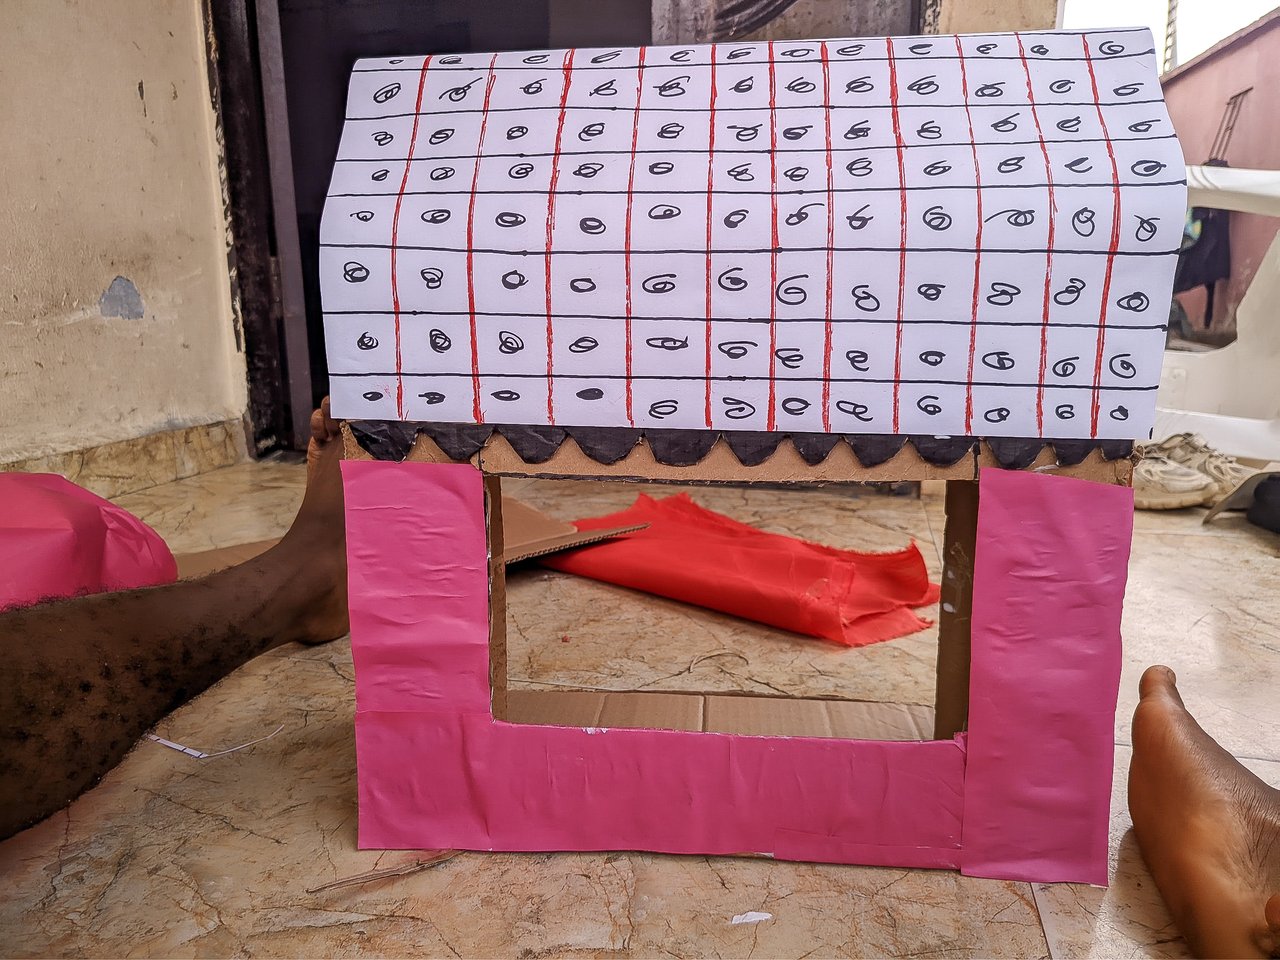
Step 3: The roof won't be like this, uncovered. He helped me cut out a sizable cardboard paper with markings that would be fitted on the roof, front and back. It's white, though, but before placing it on the roof with glue, I made parallel lines with a red colour pen and then made horizontal lines across the parallel lines. Reward helped me shed the red colours to be more appealing and visible. He then made circles in the holes, which he said are designs. I respected his views and allowed him to colour it with black colour. We then glued the rooftop to its roof, and boom, our theatre was half ready.
 |  |  |
|---|---|---|
 |  |  |
 |  |  |

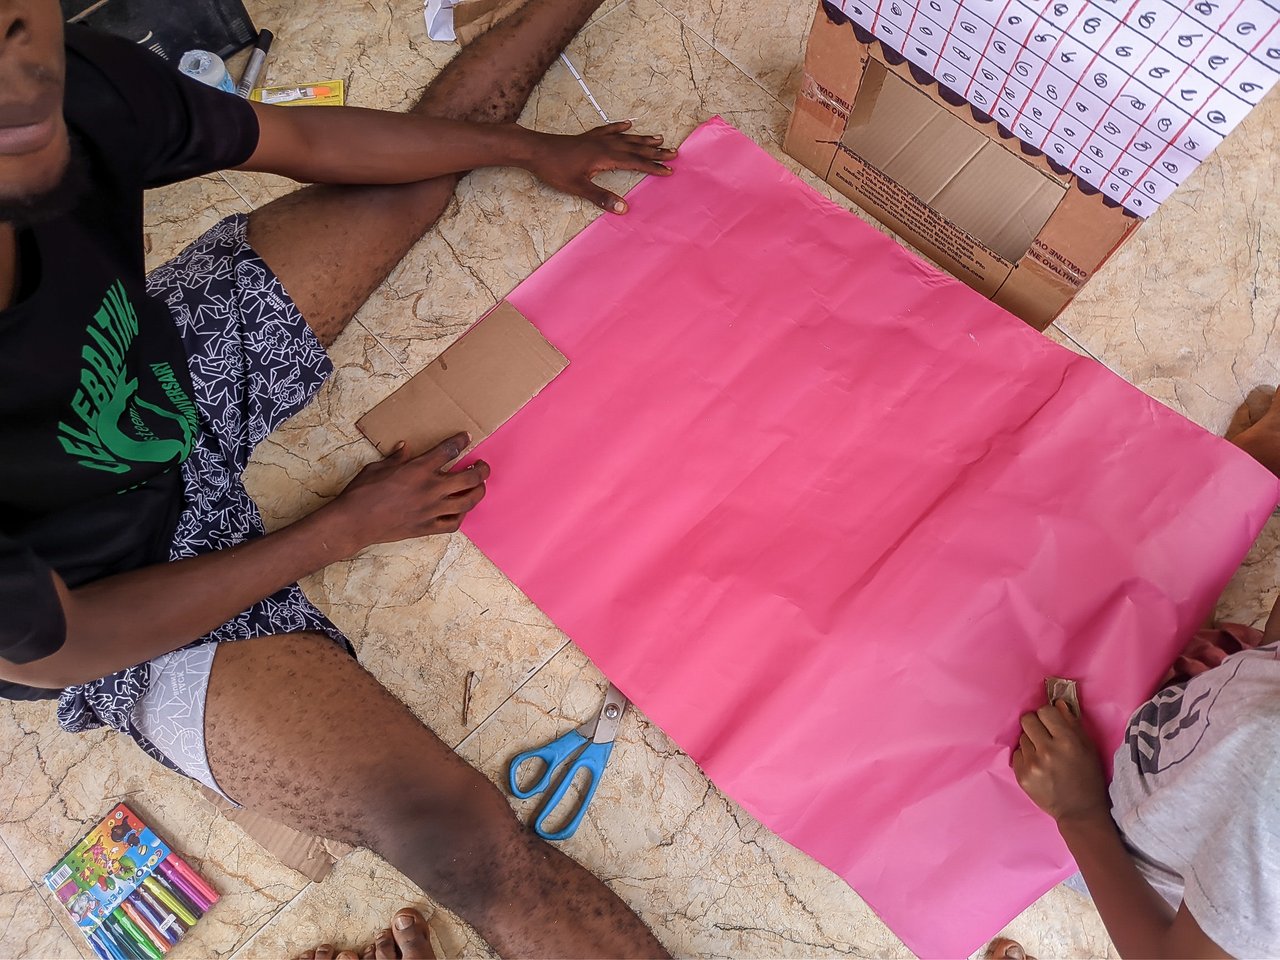
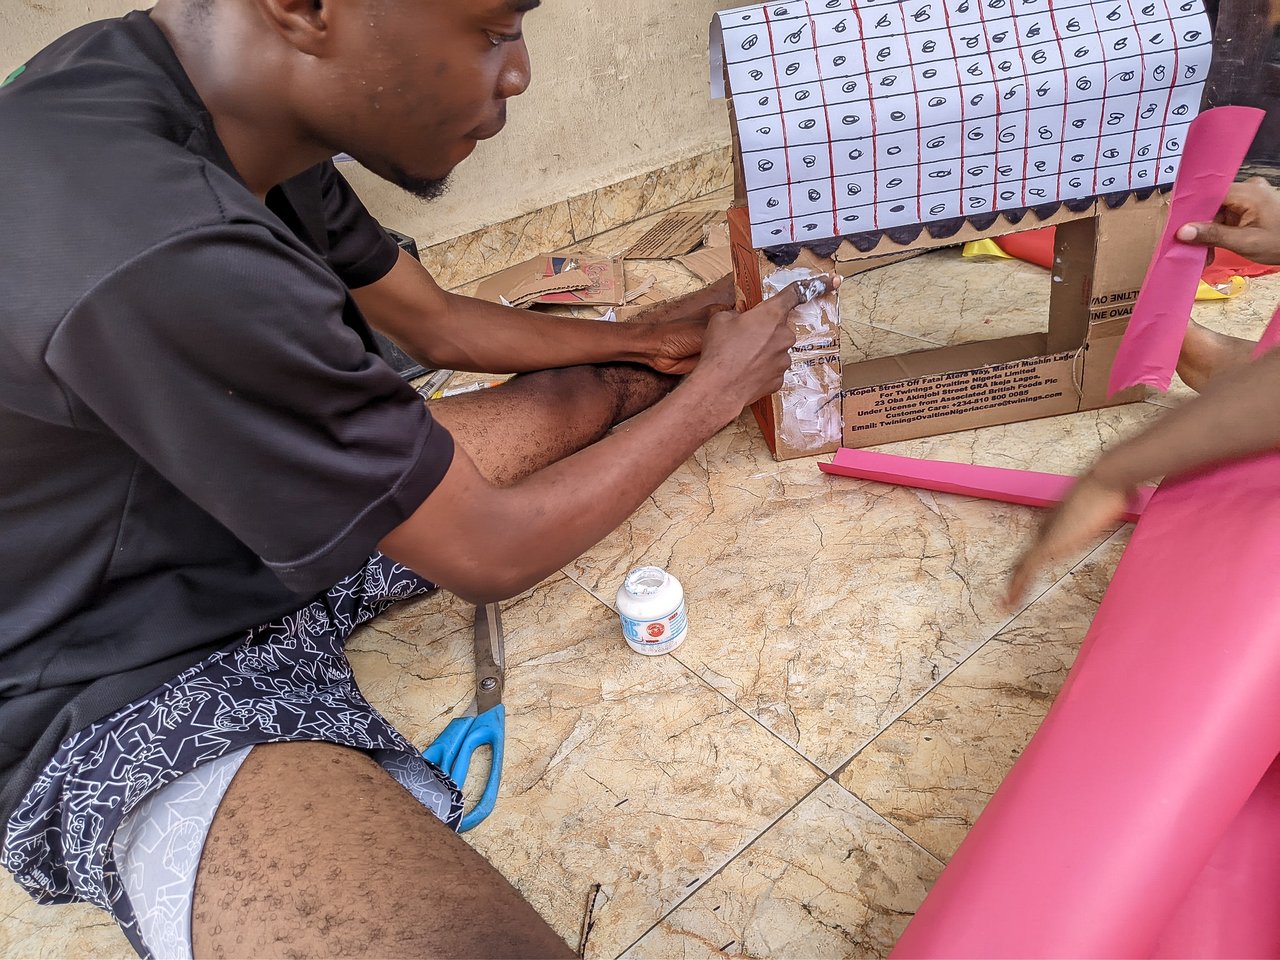
Step 4: I then covered the brown carton with sugar paper to make it more attractive and appealing. We cut it sizably to fit into the edges of the theatre front. The sugar paper is the dark pink-coloured material you see in the pictures. He did the glueing to the walls while I worked on the curtains.
 |  |  |
|---|---|---|
 |  |  |
Step 5: The curtains are to be placed in a way that I can be closed and opened. I used the red lining material to do these curtains. I cut a part out of it, folded it like we used to do fans when we were in primary school. After that, I placed it with a rope across each end so it can be folded and closed. I made a bonny in front which serves as a design for lighting when the curtains are closed. Reward helped me tie the ends of the curtains, and we pinned it using a small stick from behind. We did the same on both sides and then used a large red lining material to cover the red carpet behind the stage. It looks so appealing and attractive.
 |  |  |
|---|---|---|
 |  |  |
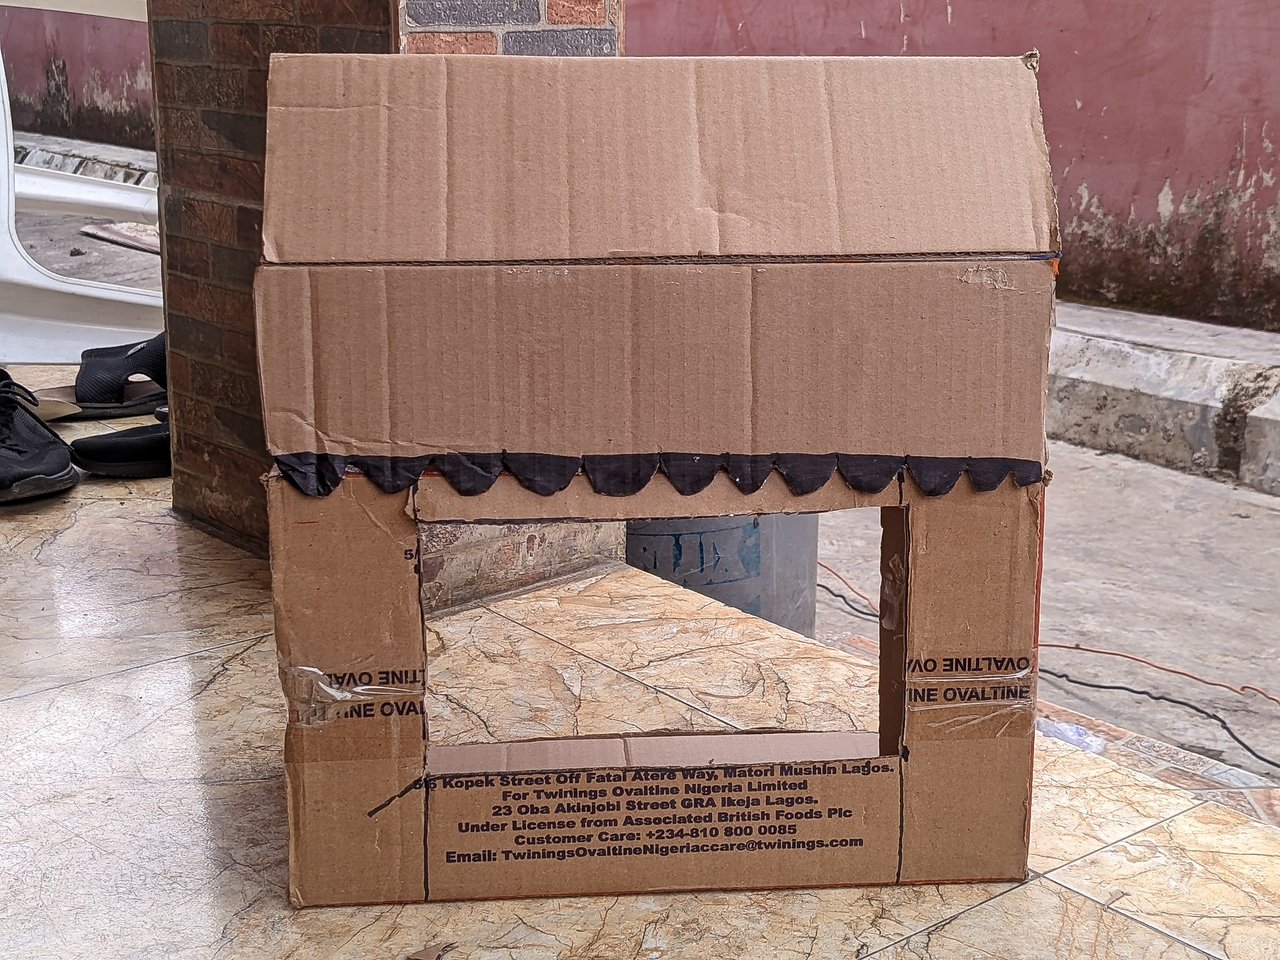
The final product? This is it, but I'm not done. I would say I'm 80% done. My puppet theatre needs a name to be visible and clear to the audience to know what they are watching. The name is hung on the left-hand side of the theatre with an enlarged grip around the roof. I did this billboard sort of by carving a rectangular part out of the cardboard; Reward helped me cover it with white cardboard, and I did the writing. He used a stick to attach it to the theatre.
 |  |  |
|---|---|---|
 |  |  |
 |  |
I'm not still done. I made puppets with the carton and clothed them with sugar paper. This was for the lady puppet. The man puppet was dressed using my black marker with a shade on its face, and boom, we did the puppet show together by placing it on a table. This is the final product.

This is a picture of me and the child performing the show from behind.

What was the experience like when creating this play? |
|---|
My overall experience was filled with joy and fulfilment. You know this experience of trying to do something difficult. At some point you feel like giving up but then, you completed it and smiled. When creating this play, the child brought out suggestions for exterior design while I did structural design.
The experience involving combined creativity and agreement was just there. One thing most people don't like doing is sharing important projects with children as they can spoil things. He didn't spoil anything though. The more we did it together, the more careful he was and the more beautiful the designs were. I felt happy and the child felt happy too after using three hours to start and complete this project.
What do you think was the most difficult step to take? |
|---|
The most difficult step to take was the roofing aspect. It was just so difficult for us to make it firm and windy was a barrier. We would mount the roof and it would fall of even with the support underneath it. I think I spent over 45 minutes making this roof. The gum wasn't that strong to hold it . What helped me overcome this difficult step was to think of ways to make this work.
I took my mind to how carpenters make roofing tops and the understood something exclusive. Despite being difficult, I was able to complete it. It was also difficult to create the design on the roof top. Aside from this, other parts were easy going for me. It was this roof that made me nearly give up in participating in this week's challenge.
Were you inspired by a specific theme or did you just let your imagination run wild when decorating the puppet theatre? |
|---|
There are these TV shows we usually watched when we were kids. It's called double P, i.e., Puppet perfect. Anytime we heard of Puppet Perfect by 1AM, we would run and turn on our televisions to watch. We don't like missing any shows because they tell a lot of stories.
So I was inspired by this theme and then brought it to life other than just being seen virtually. It was my best puppet show then. I could feel the stage presence, the composure and consistency of the people behind the stage who made it a success. So this is a physical puppet-perfect show which had imaginary stories to tell, especially to kids.
I also allowed my imagination to run wild, as it's just the theme, but the theatre is quite different. This is when I made my imagination run wild as to the structure and design. I bet this theatre is rare. We imagined how we want the theatre to be and then combined ideas to make it work.
What was the child's favourite part during this activity |
|---|
The child's favourite part was in design. He loved colouring, as he's been taught in school how to combine colours to make it beautiful and attractive. So I left all the colouring to him to shoulder, and he did it so perfectly. In effect, he smiled anytime he wanted to colour. He shows that eagerness and drags the coloured pens from me when I doubted he would be perfect in colouring.
He smashed it. Aside from the colouring aspect, he is also pinning the curtains and cutting the cartons according to the marker lines. He felt complete and satisfied that he cut it out perfectly. Anyway, we're good. That was how we made this puppet show.
I invite @eveetim, @mile16 and @suboohi
Cc,
@anailuj1992
You did a very great job, I could just imagine the effort you and the children put to achieve this.
Thanks for the invitation.
I'm telling you. Took me 5 hours. I just spent the whole day on creativity. Thanks for the commendations
https://x.com/bossj23Mod/status/1903900956674212033?s=19
Congratulations, your post has been upvoted by @scilwa, which is a curating account for @R2cornell's Discord Community. We can also be found on our hive community & peakd as well as on my Discord Server
Felicitaciones, su publication ha sido votado por @scilwa. También puedo ser encontrado en nuestra comunidad de colmena y Peakd así como en mi servidor de discordia