SLC S23 Week4 || Quadrilaterals
Hello steemians,
Here is my homework for SLC23 Week 4, with the corresponding tasks assigned by @sergeyk!

Build a parallelogram, demonstrate its elements and properties.
I started by drawing a segment ( AB ) which represents one of the sides of the parallelogram, then I placed a point ( C ) outside of this segment to define the direction of the second side, to ensure that the opposite sides were parallel and of the same length, I used a vector AB to translate ( C ) and get the fourth vertex ( D ), I then connected the points in order ( A, B, D, C, A) to make a parallelogram.
In order to verify its properties, I measured the lengths of the sides and found that ( AB = CD ) and ( AD = BC ), then I traced the diagonals ( AC ) and ( BD ) which intersected in the middle, thus confirming an essential property of this figure, finally, I verified that the opposite angles are equal and that the consecutive angles are supplementary, which allowed me to conclude that all the properties of the parallelogram were respected.
Properties of the Parallelogram
- Opposite sides are equal and parallel: 𝐴𝐵=𝐶𝐷 and 𝐴C=𝐵D.
- Opposite angles are equal: ∠𝐵𝐴𝐶=∠𝐵𝐷𝐶 and ∠𝐴𝐵𝐶=∠𝐴𝐶𝐷
- Consecutive angles are supplementary: ∠B𝐴𝐶+∠𝐵𝐶𝐷=180∘.
- Diagonals bisect each other: E is their intersection, then 𝐴E=ED and 𝐵E=EC.
- Diagonals divide the parallelogram into congruent triangles:
△𝐴𝐵𝐶≅△𝐶𝐷𝐴.
△𝐴𝐵𝐷≅△𝐶𝐷𝐵. - The sum of the interior angles is always 360∘.

Build a trapezoid, demonstrate its elements and properties.
I started by drawing a segment BD which represents the lower base of the trapezoid, then I placed a point A above and slightly to the left of B in order to define the first non-parallel side, to ensure that the upper base remains parallel to the lower base, I used the parallel line tool in order to trace a line passing through A and parallel to BD, I then positioned a point C on this line in order to obtain a second non-parallel side and thus complete the construction of the trapezoid, to finalize the figure, I connected the points in the order A,C,D,B,A, which allowed me to obtain a well-defined trapezoid.
Right Trapezoid
I started by drawing a segment AB which represents the lower base of the right trapezoid, then I placed a point C above and slightly to the left of B in order to define the first non-parallel side, to ensure that it was indeed a right trapezoid, I used the perpendicular tool to draw a line passing through B and perpendicular to AB, which allowed me to ensure that one of the angles of the trapezoid was a right angle.
Then, I positioned a point D on a straight line parallel to AB passing through C in order to complete the construction of the trapezoid, finally, I connected the points in the order A,B,D,C,A, which allowed me to obtain a right trapezoid respecting all its properties, I then checked the interior angles and noted that two of them were right angles, namely ∠B=90∘ and ∠D=90∘, which distinguishes a right trapezoid from an ordinary trapezoid.
Isosceles Trapezoid
I started by drawing a segment AB representing the lower base of the isosceles trapezoid, then, I determined the midpoint M of the segment AB , which allowed me to identify the axis of symmetry of the figure, from this point M, I traced a perpendicular to AB, thus ensuring that the construction remained perfectly symmetrical.
I then placed a point H on this perpendicular in order to fix the height of the trapezoid, thus defining the position of the upper base, to construct it, I drew a horizontal segment from H and I placed a point C on this segment, to the left of the axis of symmetry, in order to obtain an isosceles trapezoid, I used the axial symmetry tool to create the point D, symmetrical of C with respect to the axis of symmetry, which ensured that the oblique sides AC and BD were of the same length.
To finalize the construction, I connected the points in the order A→B→D→C→A using the polygon tool, thereby obtaining a perfectly symmetrical isosceles trapezoid.
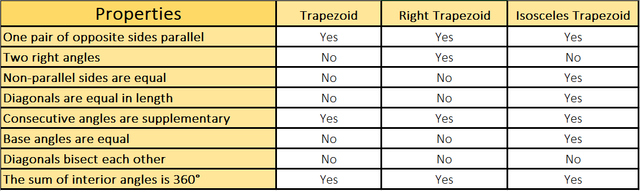
Properties of each Trapezoid

Build a rhombus, demonstrate its elements and properties.
I started by drawing a segment AB, which represents one of the sides of the diamond, then I placed a point C outside this segment in order to define the direction of the second side, to guarantee that all the sides were of the same length, I used the circle tool by drawing a circle with center A and radius AB, as well as another circle with center B and radius AB, the intersection of these two circles allowed me to obtain point C, then, to finalize the construction, I used the same process by drawing a circle with center C and radius AB, then finding its intersection with a circle with center A, which allowed me to obtain the fourth vertex D.
I then connected the points in the order A,B,D,C,A to form a diamond and measured the sides to verify that they were all equal, thus confirming one of the fundamental properties of the diamond, I drew the diagonals AD and BC, which crossed each other at a point E, and I noted that these intersected perpendicularly and in the middle, which is a characteristic property of the diamond.
Properties of the Rhombus
- Quatre côtés égaux : AB=BD=DC=CA.
- Les angles opposés sont égaux : ∠A=∠D et ∠B=∠C.
- Les diagonales sont perpendiculaires et se coupent en leur milieu : E est l’intersection et AE=ED, BE=EC.
- Les diagonales sont les bissectrices des angles internes.
- La somme des angles intérieurs est toujours 360∘.
- Chaque diagonale divise le losange en deux triangles isocèles et perpendiculaires.

Build a rectangle, demonstrate its elements and properties.
I constructed a rectangle by first drawing a segment AB, which represents one of the sides of the figure, then, to ensure that the angles were all straight, I used the perpendicular tool to draw a line through A and perpendicular to AB, then I placed C on this line, I repeated the same process to obtain D, drawing a perpendicular from B, thus ensuring that AC and BD were parallel and equal.
I then connected the points A,B,D,C,A in order to close the figure and obtain a rectangle, to check its properties, I measured the interior angles and I found that each was equal to 90°, thus confirming that the constructed figure was indeed a rectangle, then, I traced the diagonals AD and BC, which crossed at a point E.
Properties of a Rectangle
- Four right angles: ∠A=∠B=∠C=∠D=90∘.
- Opposite sides equal and parallel: AB=CD and AC=BD.
- Diagonals of equal length: AD=BC.
- Diagonals that intersect at their midpoints: Point E is the midpoint of AD and BC.
- The sum of the interior angles is always 360∘.
- Each diagonal divides the rectangle into two congruent right triangles.

Build a square, demonstrate its elements and properties.
I first drew a segment AB, which represents one of the sides of the square, then I used the perpendicular tool to draw a line passing through A and perpendicular to AB, then I created a circle with center A and radius AB, which allowed me to obtain a point C on this perpendicular, guaranteeing that AC=AB.
I then drew a second perpendicular line passing through B, then I used a parallel line to ensure that the fourth vertex D was correctly aligned with the other points, using these tools I was able to verify that all angles were equal to 90° and that all four sides were the same length.
Finally, I connected the points in the order A,B,D,C,A in order to close the figure and form a perfect square, I traced the diagonals AC and BD, which crossed at a point E located in their middle, thus proving that these diagonals are equal and perpendicular.
Properties of a Square
- Four equal sides: AB=BC=CD=DA.
- Four right angles: ∠A=∠B=∠C=∠D=90∘.
- Opposite parallel sides: AB∥CD and AC∥BD.
- Diagonals of equal length: AD=BC.
- Diagonals perpendicular and intersecting at their midpoints.
- Each diagonal divides the square into two congruent isosceles right triangles.
- The sum of the interior angles is always 360∘.
Thank you very much for reading, it's time to invite my friends @graceleon, @adrianagl, @karianaporras to participate in this contest.
Best Regards,
@kouba01
