SLC S23 Week1 || Geometry with GeoGebra: Points, Lines, and Angles...
Hello steemians,
Here is my homework for SLC23 Week 1, with the corresponding tasks assigned by @sergeyk!
What is geometry? When and why did it appear? How did you study geometry in school? Were you familiar with any geometry software?
What is geometry?
Geometry is a mathematical discipline which, although based on axioms and rigorous demonstrations, oscillates between algebraic abstraction and visual intuition. Initially perceived as the study of shapes and spaces, it can turn out to be rigid and limited in its classical Euclidean framework, where the manipulation of objects is constrained by strict rules, however, enriched by modern tools such as formal logic, model theory and analysis, it becomes an approach more flexible and powerful of the structure of spaces and transformations, linking algebra, analysis and topology to better understand the deep nature of mathematical objects.
When and why did it appear?
Geometry appeared since Antiquity in response to concrete needs, notably in the Egyptian and Mesopotamian civilizations, where it was mainly used to solve problems linked to the surveying of land, the construction of buildings and the observation of the stars, however, it was only in the 3rd century BC that Euclid undertook to formalize this discipline by writing The Elements, a fundamental work which structured geometry around a set of axioms and rigorous proofs, thus establishing a logical and deductive framework.
Its appearance is therefore not limited to a simple response to practical problems but also reflects a deeper desire to organize and understand in a systematic way the properties of figures and spaces. However, over the centuries, this Euclidean approach, although powerful, has proven to be rigid and insufficient to understand certain complex notions which has led to the development of new approaches integrating algebra, analysis and formal logic, thus offering a more flexible and richer vision of the structure of spaces and spaces. geometric transformations.
How did you study geometry in school?
When I was young I loved Euclidean geometry, especially two-column proofs, which seemed like a first introduction to formal logic and a machine-readable proof, my interest in computer programming may have strengthened this affinity, however, although I excelled in this discipline, it seemed closer to algebra than to true intuitive geometry, as it lacked the continuity and flexibility, which I was looking for in geometry actually brought it closer to analysis, a subject that I would have liked to discover in high school.
Despite my performance in competition, I found the axioms of Euclidean geometry difficult to manipulate and would have preferred to explore more advanced tools such as the projective plane, barycentric coordinates or Möbius transformations. Later, at university, I rediscovered this geometry from a new angle, approaching it with modern notions of logic, algebra and analysis. A course on its historical development allowed me to see its limits and subtleties, notably Euclid's approximations with the SAS criterion and his difficulties with 3D volumes, this approach offered me a much deeper and more fascinating understanding of Euclidean geometry.
Were you familiar with any geometry software?
Yes, I have been familiar with several geometry software programs, and among them, MATLAB has occupied a particular place due to its advanced capabilities in numerical calculation and visualization, what particularly interested me in the use of MATLAB for geometry is the possibility of linking this discipline to the concepts of linear algebra and analysis, in particular by studying geometric transformations in matrix form, by manipulating rotation, translation or homothety matrices, I was able to experiment with a more computational approach to geometry, which seemed much more flexible and intuitive to me than the rigidity of classical demonstrations of Euclidean geometry, moreover, the possibility of writing scripts allowed me to automate constructions and explore complex structures without being limited by the constraints of manual manipulation.
Explain different geometric primitives (point, line, angle, segment, ray) and illustrate them in GeoGebra.
Point:
A point is the basic element of any geometric construction, it has no length, width or thickness which means that it is purely abstract and only exists as a position in space, it is usually represented by a capital letter such as A, B or C.

In analytic geometry, a point is defined by a set of coordinates like (x, y) in a plane or (x, y, z) in three-dimensional space.
Example: A(-7,4), B(4,-3) and C(2,3)
Line & Segment
A line is a straight path that extends infinitely in both directions with no beginning or end, meaning that it has an indefinite length, no matter how far you zoom in, you will never see its ends.

A segment, on the other hand, is a portion of a line which has two well-defined ends. Unlike a line, it does not extend to infinity and has a fixed length, for example, a segment A-B stops at points A and B.

Ray (Ray)
A ray is similar to a line but only extends in one direction, it has a fixed origin point and continues indefinitely on the other side, unlike a segment it only has one end and does not have a defined length.

Angle
An angle is formed by two rays which start from a common point, called a vertex, the space created between these two rays represents the angle, which is measured in degrees or radians, the angle represents the gap or rotation between these two directions.

Construct an arbitrary angle, then extend one side to create a supplementary ray—show that the sum of adjacent angles is always 180 degrees.
Construct an angle with two supplementary rays—show that the resulting vertical angles are always equal.
Construct an arbitrary angle, then extend one side to create a supplementary ray—show that the sum of adjacent angles is always 180 degrees.
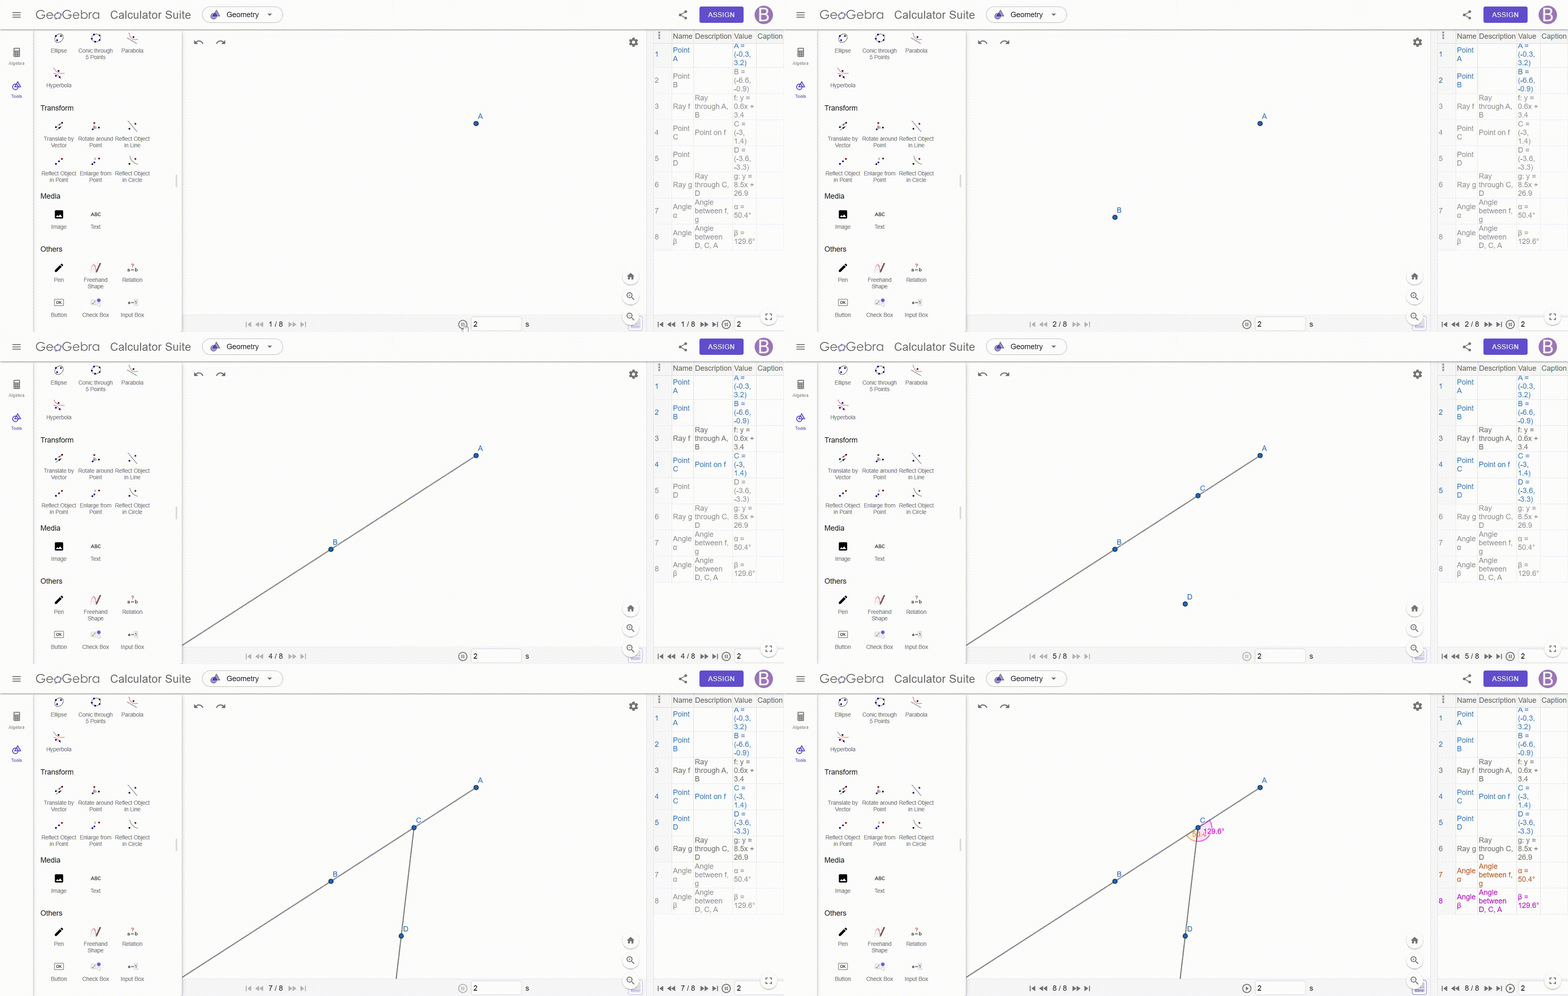
We will start by precisely tracing the two rays which define the angle we wish to examine, these two rays share a common point, called vertex of the angle, and when a third point is placed on one of the rays, it becomes possible to define two adjacent angles which evolve according to the movement of the moving ray.
Once this construction is completed, we must measure these angles using the Angle tool, a particularly useful tool in dynamic geometry software like GeoGebra, this tool allows us to select three specific points, which gives us the possibility of precisely obtaining the measurement of the angles BCD and DCA, by applying this method we can immediately see the relationship between these two angles and begin to analyze their behavior when the figure is modified.
In order to make these angles more easily identifiable and improve the clarity of the representation, we can apply a custom style to them, adjusting parameters such as color, thickness or type of display, this step is essential because it allows us to better visualize the different variations that occur when one of the rays is moved, and thus to better understand the interaction between the two angles.
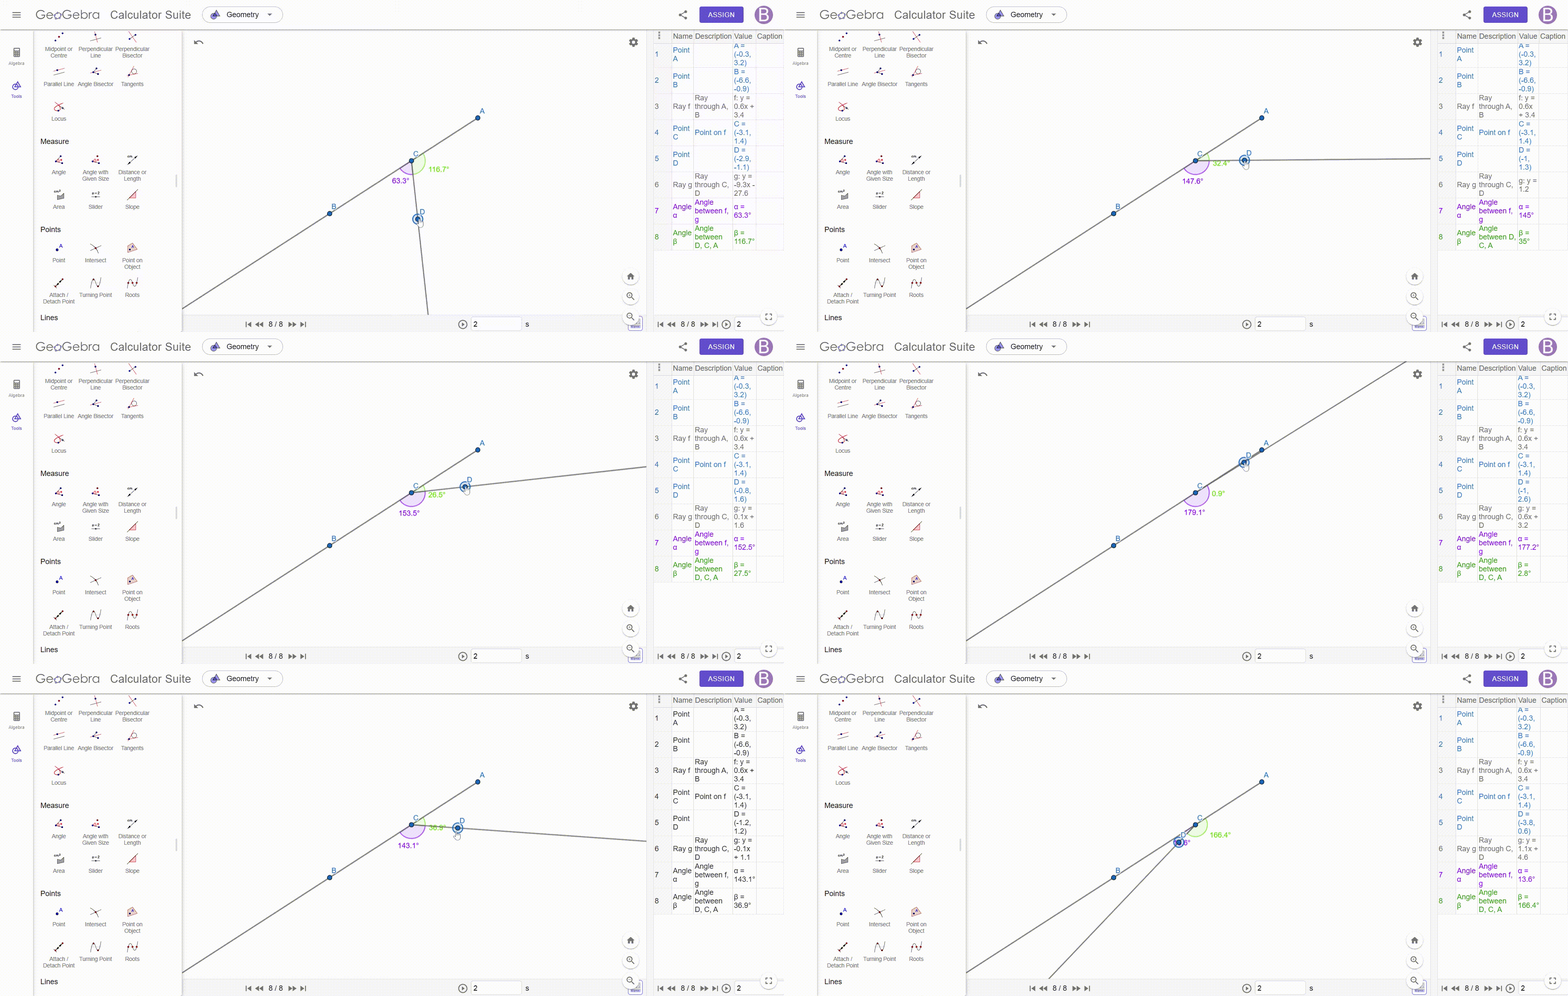
Now, if we proceed to the progressive displacement of one of the rays, we can observe in real time how the measurements of the two angles evolve simultaneously, when one of the angles increases, we see that the other decreases proportionally, which highlights a complementary relationship between them, however, and this is a fundamental aspect of this geometric property, the sum of these two angles remains permanently equal to 180 degrees, whatever the displacement applied to the ray changeable.
Finally, by consulting a dynamic preview, we can confirm this fundamental property by observing that whatever the final position of the displaced ray, the sum of the two adjacent angles formed continues to be equal to 180 degrees, this observation highlights an essential rule of Euclidean geometry, namely that two angles formed on the same straight line are always supplementary, which means that their sum is constantly equal to 180 degrees, regardless of modifications made to the figure.
Construct an angle with two supplementary rays—show that the resulting vertical angles are always equal.
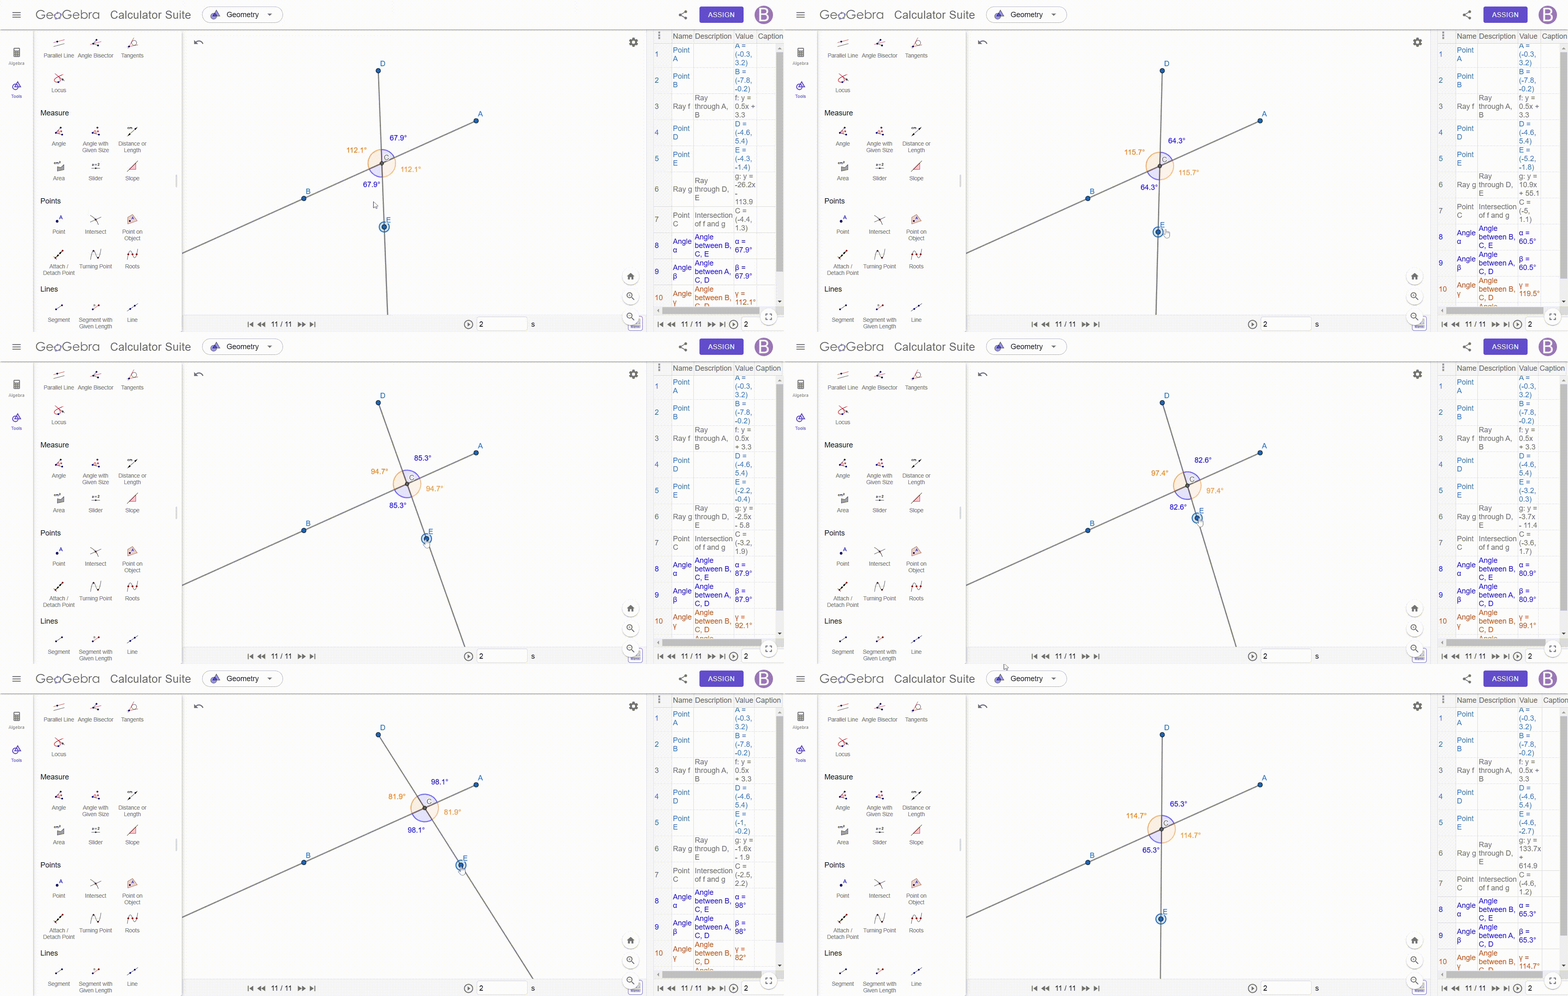
To construct an angle with two additional rays and prove that the opposite angles are equal, we must draw two rays which intersect at a point, thus forming four angles, this intersection is essential, because it allows us to identify the vertical angles, which are the opposite angles created by these two rays.
Once this construction is completed, we add a point at the intersection, which allows us to precisely measure each of the angles formed, using an angle measurement tool, such as that of GeoGebra, we determine the values of the angles ACE, DCB, DCA and BCE, while taking care to respect the notation to avoid any confusion, for better readability, we can also stylize these angles by adjusting their color or thickness to make them easier to distinguish.
Once the measurements are made, we immediately observe that the opposite angles are always equal, no matter how the rays are positioned, for example, we see that ACE = DCB and DCA = BCE, which illustrates a fundamental property of vertical angles, to confirm this observation we can test different configurations by changing the position of the rays: opposite angles always keep the same value.
Construct parallel lines and perpendicular lines.
Construct two lines intersected by a third line (a transversal). Label the angles on the figure (using letters, numbers, or colors). Name the pairs of angles that have special names.
Construct parallel lines and perpendicular lines.
Parallel lines
Two or more lines are said to be parallel if they maintain a constant distance between them at all points, this means that they will never cross, regardless of their extension.
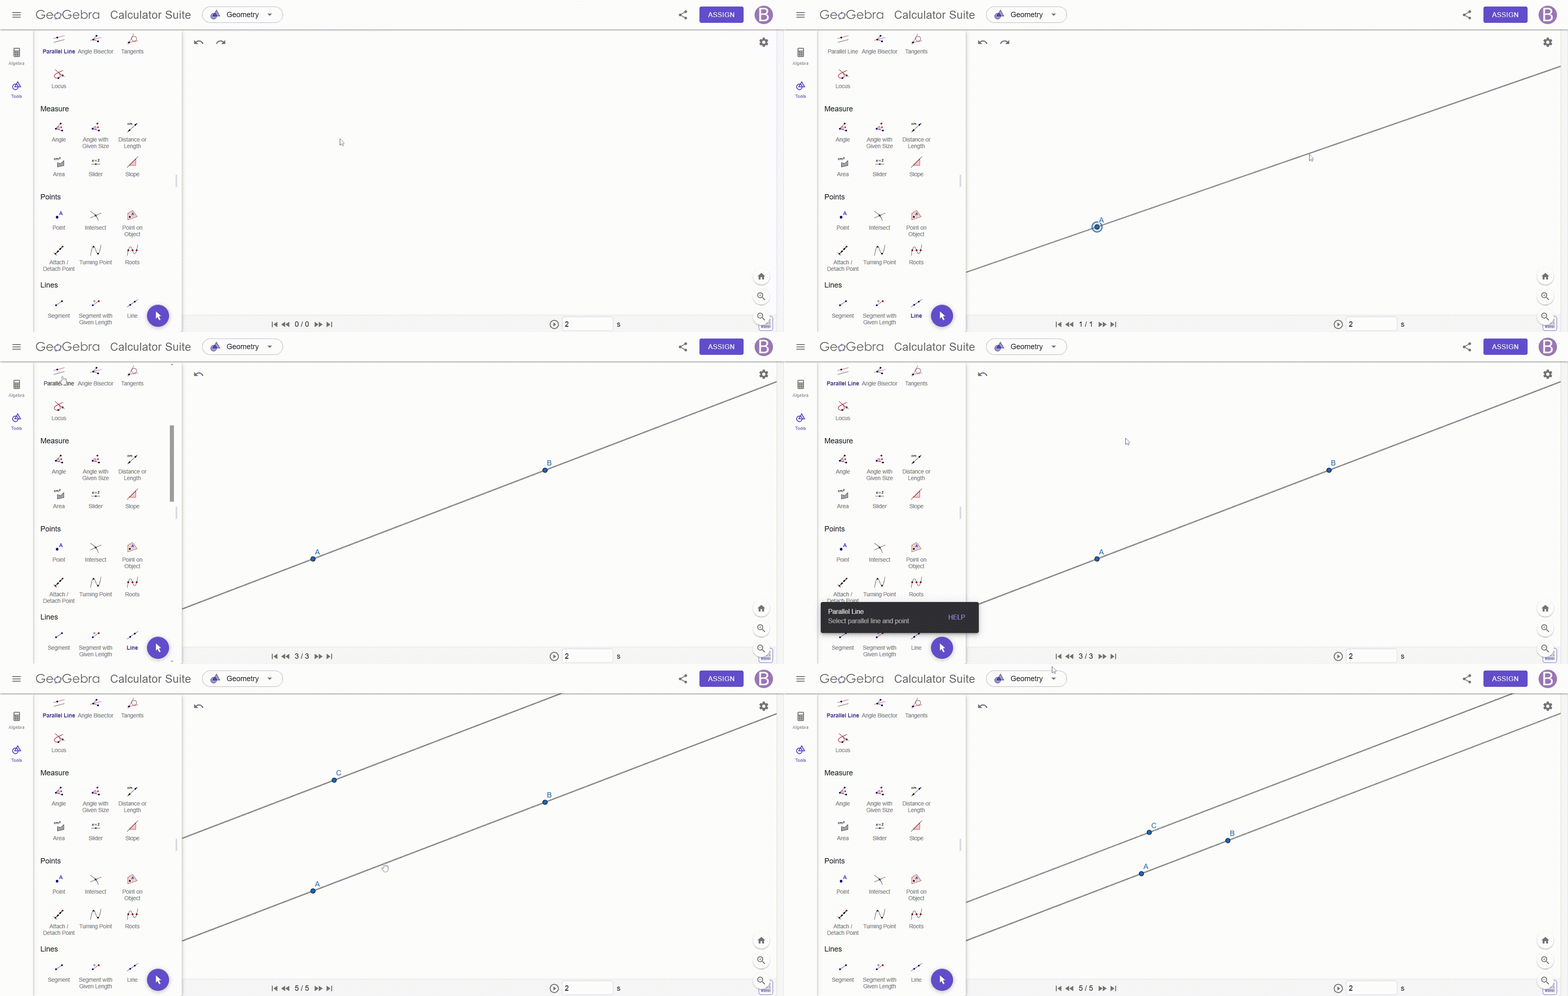
To draw parallel lines, we start by drawing a first line, then we choose a point located outside it, using the tool Parallel Line, simply select this point, then click on the initial line, a new line is then drawn, passing through the selected point and remaining parallel to the original line.
Perpendicular lines
Two lines are considered perpendicular when they intersect at a 90 degree angle.
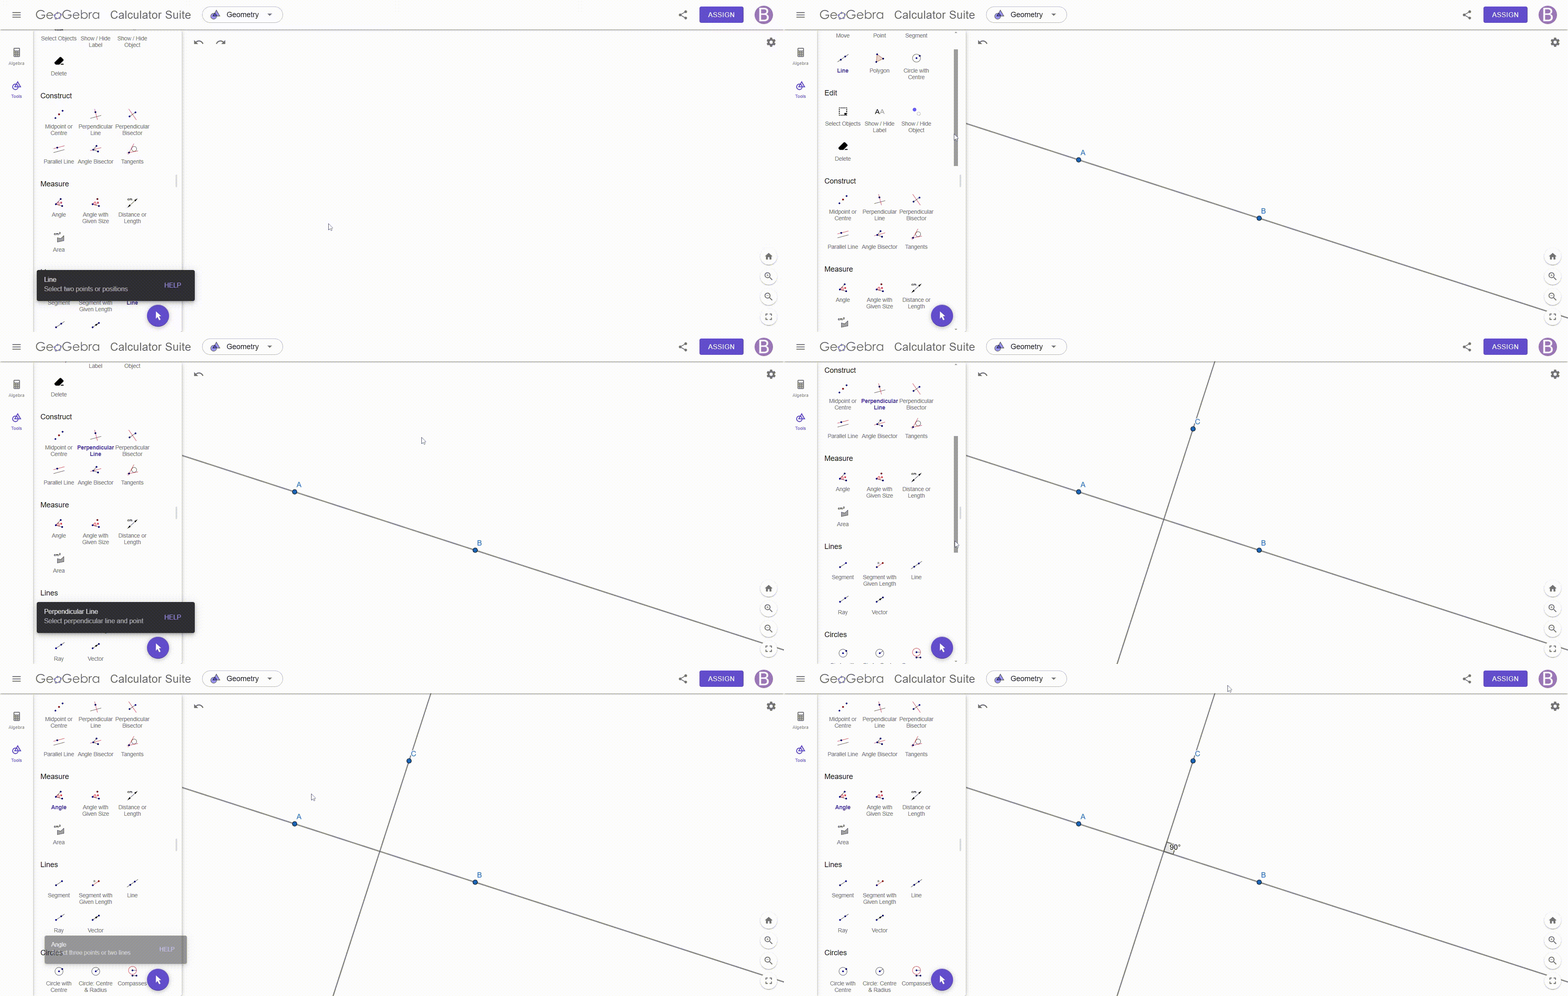
To draw a perpendicular line, we follow a process similar to that of parallel lines, after drawing a first line, we choose an exterior point, with the Perpendicular Line tool, we click on this point, then on the initial line, this automatically generates a new line which intersects the first at 90 degrees.
It is possible to verify this perpendicularity by measuring the angle between the two lines, which must be precisely 90 degrees.
Construct two lines intersected by a third line (a transversal). Label the angles on the figure (using letters, numbers, or colors). Name the pairs of angles that have special names.
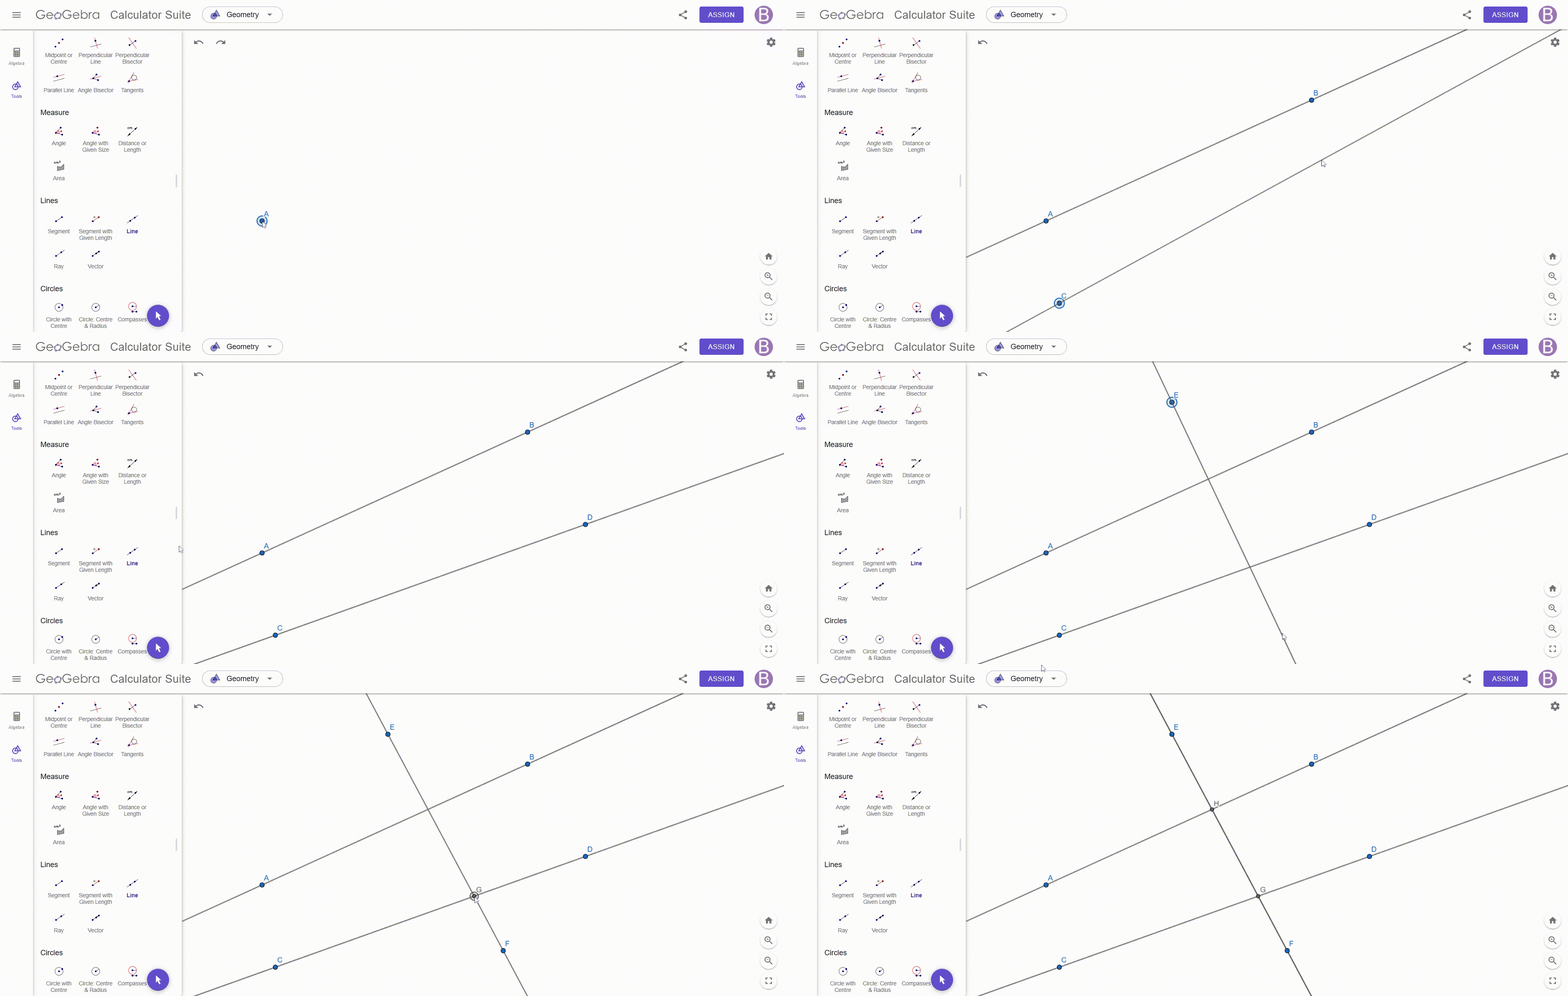
Draw the two lines by opening GeoGebra and selecting the Line tool, click on two distinct points to create a first line, for example line (AB), then repeat the operation to draw a second distinct line, such as line (CD).
Add the transversal by drawing a third line which intersects the first two, this transverse line must cross the two previously drawn lines to form angles, let's name it (EF).
Place the points of intersection by identifying where the transverse intersects the two lines, note these points as follows: (H) for the intersection between (AB) and (EF), (G) for the intersection between (CD) and (EF).
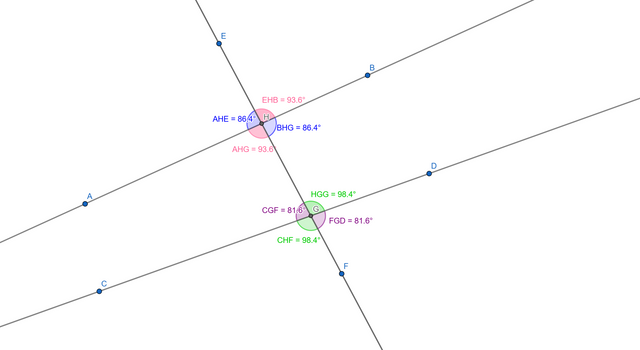
Measure the angles by selecting the Angle tool in the toolbar, click on three points defining an angle to display its measurement, for example (angle AHE), (angle EHB), (angle BHG), repeat the operation for all the angles around points (H) and (G).
Color and annotate the angles by clicking on each angle measurement and choosing a color to differentiate the types of angles, add text via the Text tool to name the angles and their values.
Identify special angles by associating measured angles with their categories, such as corresponding angles, alternate internal and vertical, check relationships between angles, for example, the sum of adjacent angles must be 180°.
| Type of Angles | Angles |
|---|---|
| Corresponding Angles | (AHE - AHG), (EHB - BHG), (HGG - CGF), (CHF - FGD) |
| Interior Different-Sided Angles | (BHG - HGG), (AHG - CGF) |
| Adjacent Angles | (AHE - BHG), (AHE - AHG), (BHG - EHB), (AHG - EHB), (CGF - HGG), (CGF - FGD), (HGG - CHF), (FGD - CHF) |
| Vertical Angles | (AHE - EHB), (BHG - AHG), (CGF - CHF), (HGG - FGD) |
| Interior Same-Sided Angles | (BHG - CGF), (AHG - HGG) |
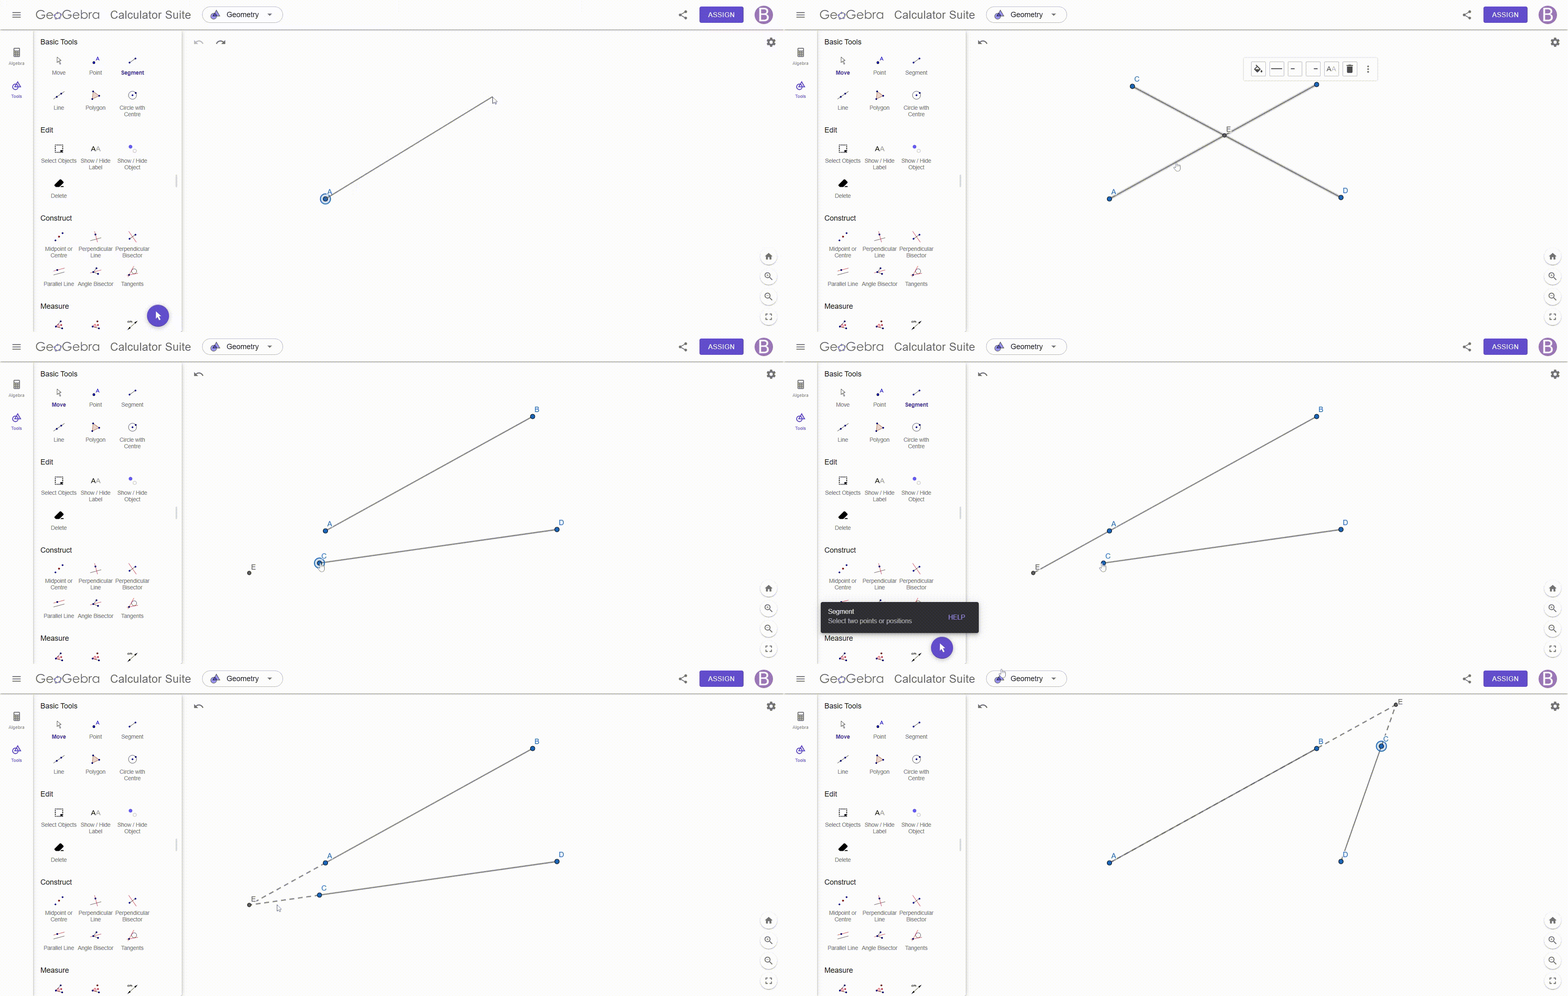
Construct the intersection of two segments. Ensure that the intersection point is always displayed, even if it does not lie on the segments themselves. If the intersection point lies outside the segments, represent this with dashed lines.
I started by drawing two segments [AB] and [CD] which would serve as the basis for the construction, once the segments were placed I added an intersection point where the two segments joined, to ensure that the intersection behaved dynamically I selected each segment and in the Basic tab of the settings I checked the option "Allow Outlying Intersections", this setting allowed the intersection point to move dynamically even when adjusting the ends of the segment, without displaying additional dotted lines.
At this point the main structure was in place, but I still needed to add the dotted line representing the projection, to achieve this I created two additional segments, one from 𝐸 to A and one from E to 𝐶, then set them to display as dotted lines, since the dotted lines initially overlapped the original segments, they were not visible until they were moved to exterior, at which point they appeared as a projected path extending toward the intersection of the original segments.
Thank you very much for reading, it's time to invite my friends @pelon53, @crismenia, @bossj23 to participate in this contest.
Best Regards,
@kouba01





@tipu curate
;) Holisss...
--
This is a manual curation from the @tipU Curation Project.
Upvoted 👌 (Mana: 7/8) Get profit votes with @tipU :)