SLC21/WK3 | Managing Bleeding: The Basics of Controlling External and Internal Bleeding
Today I again had the opportunity to take part in the contest organized by @abdu.navi03
and I also invited three friends again @patjewell @fajrulakmal99 and @humaidi
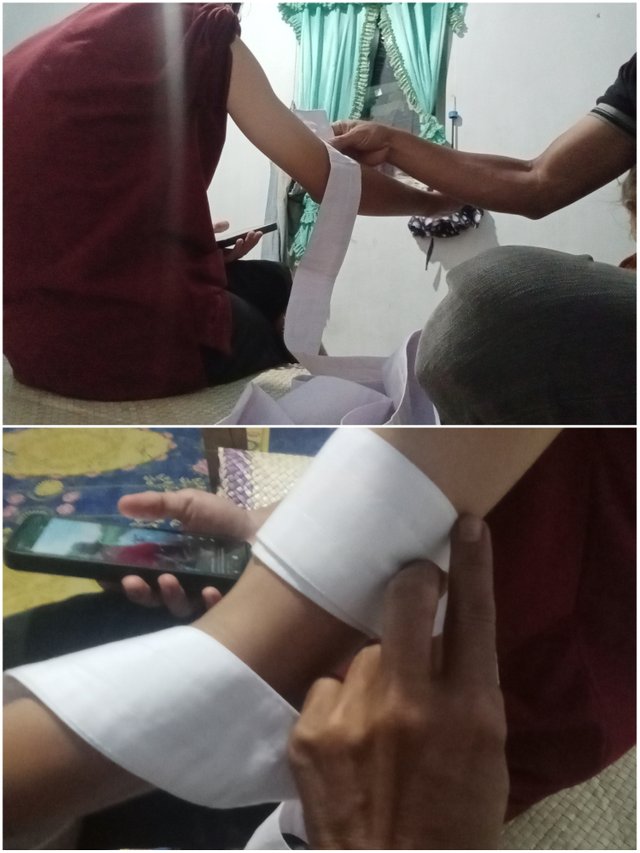
Q1. Apply a bandage to the forearm of any peer, family member, or child. Attach a picture as proof and outline the steps you followed to apply the bandage.
To apply bandages to the forearms of peers, family members or even children. Here are the steps we can follow...
Prepare bandages and materials... Make sure you have a sterile bandage that is long enough and other materials such as plaster or additional dressings if needed. Wash your hands first to avoid infection.
Position the arm... Ask the person being helped to sit or stand with the injured forearm in a comfortable position. Make sure they don't move much so that the bandage can be applied stably.
Check the wound... Check the wound on the forearm, making sure there are no foreign objects left behind or dirt that could cause infection. If there is blood coming out, press gently with a clean cloth to stop the bleeding.
Apply the bandage... Take the bandage and start applying it from the wound, covering the entire wound area evenly. Make sure the bandage covers the wound completely and is not too tight to ensure blood flow continues smoothly.
Tighten and secure... Once the bandage is in place, use tape or bandage tape to secure the ends of the bandage so that it stays in place. 6. Double check... Make sure the bandage is not too loose or too tight. If necessary, apply light pressure around the wound to stop further bleeding.
Q2. Apply a cloth tourniquet to any peer, family member, or child. Write down the steps for applying the tourniquet. Explain how, when, and by whom a tourniquet should be removed.
A tourniguet is a device used to stop heavy bleeding, especially in injuries that cause blood to flow out of large blood vessels. In an emergency, the ability to properly apply a tourniguet is essential. The following are the steps for applying a cloth tourniguet to someone who is injured.
Prepare a cloth tourniguet... Take a cloth or material that can be used as a tourniguet, such as a scarf or other wide cloth. Make sure the fabric is long enough, around 1.5 to 2 meters.
Position it over the wound... Place the tourniguet about 5-7 cm above the wound itself
Twist and tie the fabric... The fabric is tied in a twisting manner to put pressure on the blood vessels. Continue turning it until the bleeding stops.
Secure the tourniguet position... Tie the remaining ends of the fabric to secure the tourniguet in place.
When and by whom is the tourniguet removed? The tourniguet should be removed only by trained medical personnel, in a hospital or healthcare facility. This is because careless release of the tourniguet can cause bleeding again and endanger life. The tourniguet can be removed after appropriate medical treatment has been performed, usually after the bleeding has stopped and the patient's condition has stabilized.
Applying a tourniguet is an emergency procedure that requires skill. Be sure to seek medical attention immediately after tourniguet application.
Q3. Case Study 1:
You are treating a person who has sustained a deep cut on their forearm following a car accident. The wound is bleeding heavily, and the person is feeling faint.
a) What steps should you take to control the bleeding?
b) How would you assess whether the bleeding is arterial, venous, or capillary?
c) What would you do if pressure alone does not stop the bleeding?
If someone has a deep cut on their forearm after a car accident and is bleeding profusely, the first step is to remain calm and ensure the safety of themselves and the victim.
a. To control bleeding, the first thing to do is apply pressure to the wound with a clean cloth or bandage to apply direct pressure to the wound. If blood continues to flow, raise the victim's arm to reduce blood flow.
b. To assess the type of bleeding, arterial bleeding usually comes out in spurts, venous flows in a more steady and darker flow, while caliper bleeding is slower and in the form of small droplets.
c. If direct pressure is unsuccessful in stopping the bleeding, the next step is to apply an additional dressing or tourniguet over the wound to further compress the blood vessels. Next, immediately seek medical assistance for further treatment and prevention of shock.
Q4. Case Study 2:
A person has fallen from a height and complains of pain in their abdomen. They have swelling and bruising in the abdominal area, and you suspect internal bleeding.
a) What should you do as a first aider to manage the situation?
b) Why should you avoid applying direct pressure to the abdomen?
c) What signs of shock should you look for, and how should you respond?
a. As a first responder, the first step is to ensure the safety of yourself and the victim, then immediately call for medical help. Do not move the victim unnecessarily, as this may worsen the injury. Try to calm the victim and position them in a supine position with their legs slightly raised, if possible. If the victim has difficulty breathing or faints, perform CPR if you are trained.
b. Direct pressure on the abdomen should be avoided as it can worsen the injury, especially if there is an internal registration. Pressing on the stomach can increase damage to internal organs and exacerbate invisible bleeding, which risks endangering the victim's life.
c. Signs of shock to pay attention to include pale skin, cold sweat, rapid and shallow breathing, weak pulse and confusion or loss of consciousness. If signs of shock appear, ensure the victim remains in a supine position, keep them warm and seek medical attention immediately.
Q5 Create an Infographic on Stopping Bleeding
Design a simple infographic that explains the basic steps to stop bleeding. Include how to apply pressure to the wound, when to use a bandage, and when to seek medical help. Your infographic should be easy to understand and show simple instructions for controlling bleeding from cuts or scrapes.
Infographics, stop bleeding, should include basic steps that are clear and easy to follow. First, make sure you maintain calm and assess the wound. The first step is to apply direct pressure to the wound with a clean cloth or bandage to stop the blood flow. Apply constant pressure for several minutes without releasing to ensure bleeding decreases. If the bleeding does not stop, continue to wrap the wound with a clean bandage or cloth, making sure the bandage is tight enough but not too tight to stop further damage to the tissue. If the wound is large or bleeding continues despite applying pressure, immediately contact medical personnel or take the victim to the hospital. These infographics can also show easily recognizable symbols, such as an image of a hand applying pressure to a wound, or an image of an ambulance to indicate when to seek medical help. The main purpose of this information is to provide simple and direct instructions for treating bleeding.
 Click Here
 Salam @aril.hatake


Student Name: @aril.hatake
Overall grade: 4
Plagiarism Check: Pass
AI Use: No
General Feedback: The student needs to focus more on the details of the questions separately and come up with detailed answers which would be beneficial for him in the future as well. The student demonstrates an understanding of managing bleeding and procedures of controlling internal and external bleeding but needs more explanation and practical approach in certain areas.
Thank you.
Regards,
@huzaifanaveed1
Terimakasih banyak atas undangannya saudaraku, semoga sukses