How to mine Monero on you Macbook and tweak the source code (although you shouldn't!)
Last week Monero had its 4th birthday and it was a good time to remember the early days when I was mining it with anything available. Of course also my old Macbook did his part, so I thought it would be nice, four years later, to see how a new one is faring. Needless to say: do at your own risk, Macbooks are quite thin and susceptible to over-heating. As a bonus for the non-faint of heart, we’ll modify the source code of the miner! Delving inside these kind of programs in 10 years will be like delving inside financial products, so cultivating the skill is, in my humble opinion, a safe bet.
Fire up your terminal!
We will need git, brew and a text editor so go ahed and get them if needed. Once ready here are the commands:
git clone https://github.com/xmrig/xmrig-amd.git
First things first: get the source code. That github repository holds the miner for AMD cards. You may need the NVIDIA one if you have some sort of external GPU or an old Macbook. Git clone will just create a folder and copy all the miner files in it.
brew install libuv hwloc libmicrohttpd gcc openssl cmake
Now it’s time for the dependencies, you may have some of those already, for me, I was missing libuv:
libuv is a C library that handles asynch operations on many fields, it also comes with a refined thread pool. This will be used to make parallel operations on your machine. hwloc is a library to abstract various OS features, in particular I believe this is used to easily detect PCI devices. libmicrohttpd is an HTTP server written in C, super light. openssl is a general purpose cryptography library, it has a bunch of basic features like creating message digests, signing and verifying in a variety of algorithms (sha256, blake, etc..). gcc and cmake are a compiler and a software package solution. Dependency injection is totally one of the things to check when you install and compile, so do it!
Enter the directory where you cloned the source code and use cmake
cd xmrig-amd
cmake . -DOPENSSL_ROOT_DIR=/usr/local/opt/openssl -DCUDA_ENABLE=OFF -DOpenCL_ENABLE=ON
cmake will prepare the configuration to build the software on your machine. We’ll put everything into the same directory, which is the meaning of the “.” following cmake. You need to specify the openssl local root directory (the one in the exmaple line is the default position, so itshould be good to go) and which kind of graphics chipset you want to use. OpenCL is for AMD, so you want that ON, Cuda is for Nvidia, so you want that OFF.
During the cmake step you will see errors if you miss libraries, in case you do, 99% of the time the solution is to:
brew install nameofmissingthing.
Once there are no more pesky errors you can finally:
make
make will actually compile the source code on your machine and create the executables.
..now try to run the miner! It will fail because you need to provide a configuration file. We will check what the parameters -o -u -p are later on.
./xmrig-amd -o pool.minexmr.com:4444 -u 463tWEBn5XZJSxLU6uLQnQ2iY9xuNcDbjLSjkn3XAXHCbLrTTErJrBWYgHJQyrCwkNgYvyV3z8zctJLPCZy24jvb3NiTcTJ.e7c49cc0ce384dfb84c2c67a4804e95bb6438590d1e04bacb0ac5296dc563c52 -p x
You will need to know the id of the graphic card you want to use in order to put it into the configuration file, to do so run:
./xmrig-amd --print-platforms
the output for me was:
#0: Apple
Now create a text file called config.json in the directory of the miner by compiling the tutorial form at https://config.xmrig.com/amd or with the following:
{
 “algo”: “cryptonight”,
 “background”: false,
 “colors”: true,
 “donate-level”: 5,
 “log-file”: null,
 “print-time”: 60,
 “retries”: 5,
 “retry-pause”: 5,
 “syslog”: false,
“opencl-platform”: 0,
 “threads”: [
 {
 “index”: 0,
 “intensity”: 100,
 “worksize”: 8,
 “affine_to_cpu”: false
 }
 ],
 “pools”: [
 {
 “url”: “pool.minexmr.com:4444”,
 “user”: “463tWEBn5XZJSxLU6uLQnQ2iY9xuNcDbjLSjkn3XAXHCbLrTTErJrBWYgHJQyrCwkNgYvyV3z8zctJLPCZy24jvb3NiTcTJ.e7c49cc0ce384dfb84c2c67a4804e95bb6438590d1e04bacb0ac5296dc563c52”,
 “pass”: “x”,
 “keepalive”: true,
 “nicehash”: false
 }
 ]
}
- opencl-platform is the parameter where you have to put the number coming form the previous command (for me it was “#0: Apple”, so 0)
- url is the url of you mining pool, mining alone is a bit longer story so we’ll skip that, pool.minexmr.com has ok ping for european users.
- user and pass are typical of the mining pool, in pool.minexmr.com you have to use “Monero address” + “.” + “Monero payment id” as user and anything as password. If you don’t change those you’ll be mining for me, so please change them!
donate-level is a parameter saying how many hashing power you are giving for the author of the miner. Can be set to 1 (meanint 1 minute out of 100 minutes of mining). - intensity and worksize are describing the batch of hashing jobs that are sent for work at the GPU, we don’t go into details here since anyway you should not mine on a Macbook. For the curious here there’s a couple of recent threads with a concise explanation and some tuning: https://github.com/xmrig/xmrig-amd/issues/8 https://github.com/MultiPoolMiner/MultiPoolMiner/issues/580
You can mine XMR!
./xmrig-amd
But you will see that only 1 GPU is active.. It is time to use both your GPUs, so you can be sure to melt down your Macbook. To do so, you need to add a thread configuration for it in the config.json. This new thread will need to specify the index of the device, which for now we have to guess. The first thread used device 0 of platform 0, the second thread will use device 1 of platform 0.
{
 “algo”: “cryptonight”,
 “background”: false,
 “colors”: true,
 “donate-level”: 5,
 “log-file”: null,
 “print-time”: 60,
 “retries”: 5,
 “retry-pause”: 5,
 “syslog”: false,
“opencl-platform”: 0,
 “threads”: [
 {
 “index”: 0,
 “intensity”: 100,
 “worksize”: 8,
 “affine_to_cpu”: false
 },
 {
 “index”: 1,
 “intensity”: 100,
 “worksize”: 8,
 “affine_to_cpu”: false
 }
 ],
 “pools”: [
 {
 “url”: “pool.minexmr.com:4444”,
 “user”: “463tWEBn5XZJSxLU6uLQnQ2iY9xuNcDbjLSjkn3XAXHCbLrTTErJrBWYgHJQyrCwkNgYvyV3z8zctJLPCZy24jvb3NiTcTJ.e7c49cc0ce384dfb84c2c67a4804e95bb6438590d1e04bacb0ac5296dc563c52”,
 “pass”: “x”,
 “keepalive”: true,
 “nicehash”: false
 }
 ]
}
And finally
./xmrig-amd
Edit the source code for more features
As you see the software is using by default the Intel card and we had to guess the other id, I will just show you how to modify the command print-platforms to also show all the available devices. In OpenCL the platform identifies the vendor, for each platform you can have more devices.
./xmrig-amd --print-platforms
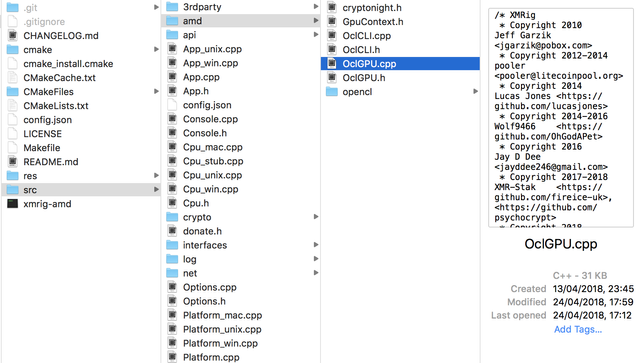
You can follow what happens when you call the print-platforms options by inspecting the Options.cpp file, in the end you’ll see that it calls a function printPlatforms() which is in OclGPU.cpp
Inside the src folder you can find the files we need to modify:

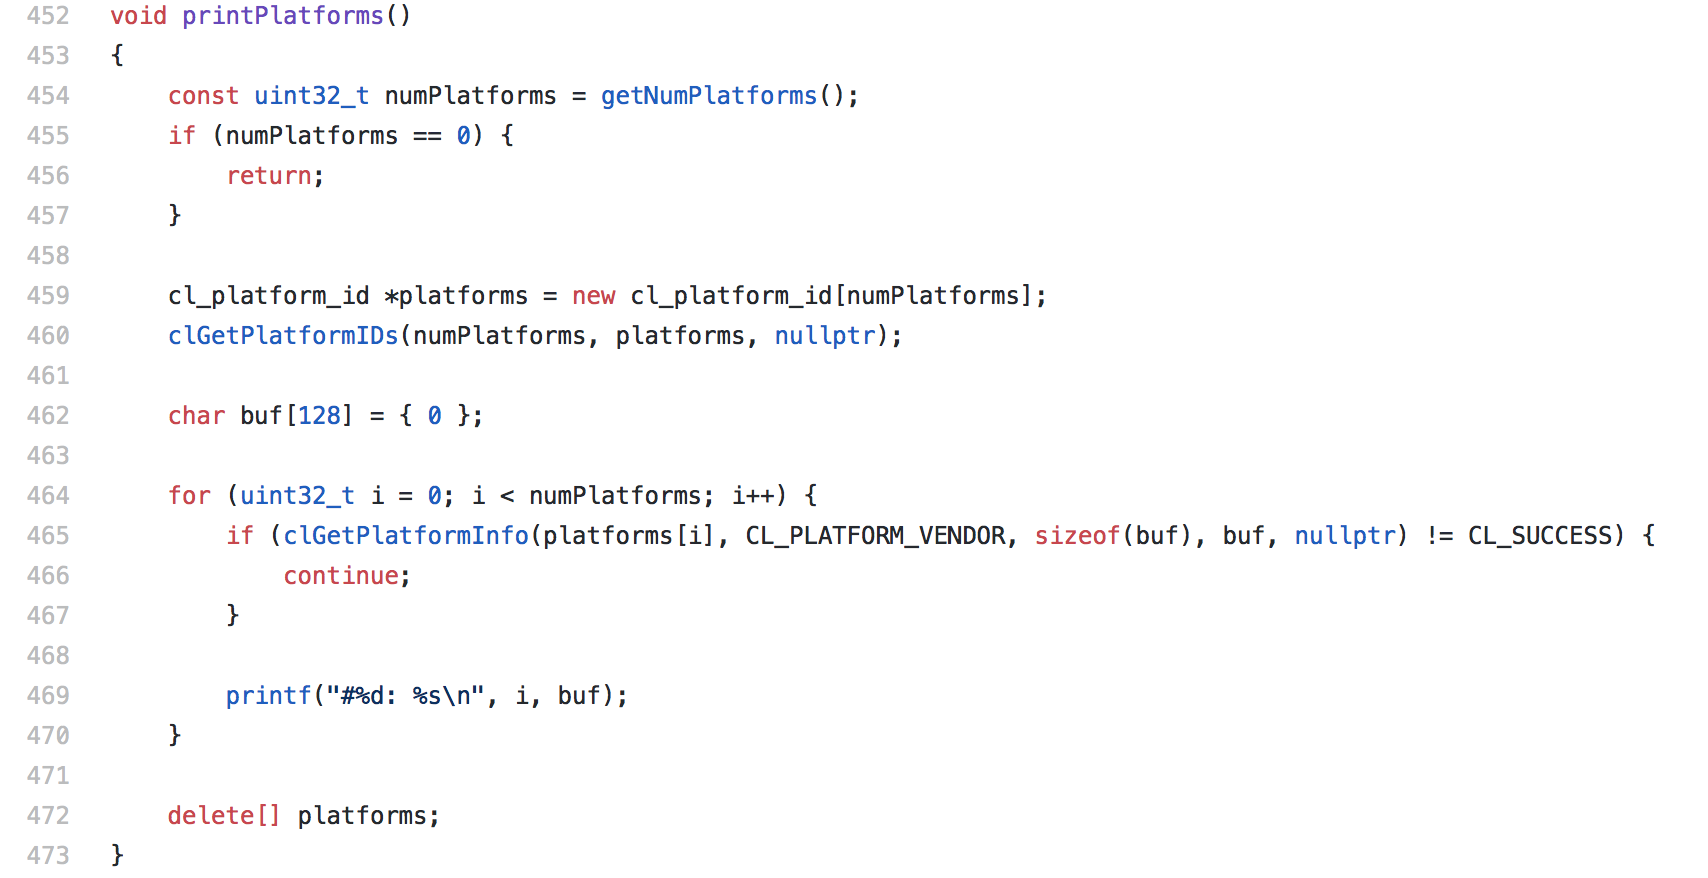
Original version of printPlatforms():

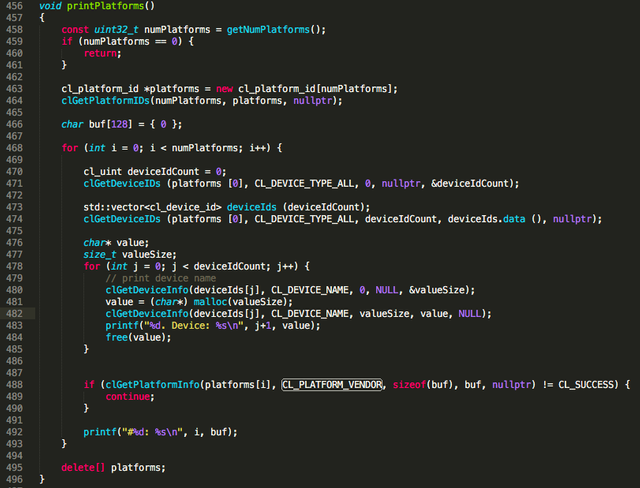
Evil-modified version which also prints all devices for each platform:

So basically you want to add inside the loop at line 464 (468 in my version), which goes through your available platforms, the following code:
cl_uint deviceIdCount = 0;
 clGetDeviceIDs (platforms [0], CL_DEVICE_TYPE_ALL, 0, nullptr, &deviceIdCount);
std::vector<cl_device_id> deviceIds (deviceIdCount);
 clGetDeviceIDs (platforms [0], CL_DEVICE_TYPE_ALL, deviceIdCount, deviceIds.data (), nullptr);
char* value;
 size_t valueSize;
 for (int j = 0; j < deviceIdCount; j++) {
 // print device name
 clGetDeviceInfo(deviceIds[j], CL_DEVICE_NAME, 0, NULL, &valueSize);
 value = (char*) malloc(valueSize);
 clGetDeviceInfo(deviceIds[j], CL_DEVICE_NAME, valueSize, value, NULL);
 printf(“%d. Device: %s\n”, j+1, value);
 free(value);
 }
After you save the file you need to compile again, which means running again:
cmake . -DOPENSSL_ROOT_DIR=/usr/local/opt/openssl -DCUDA_ENABLE=OFF -DOpenCL_ENABLE=ON
make
And now if you call it again
./xmrig-amd --print-platforms
print-platforms is now also displaying the devices.. form here on, dragons may appear.
You can finally see your AMD card! To whoever did it until here, a bright future is waiting for you:)
Fun Facts
- https://github.com/xmrig/xmrig-amd official repository for the miner, many thanks to the Monero community
- There was an interesting time when the official source code of the miner was slower than what it could have been by otpmizing it. Truth be told, I am diggin it to see if the latest change of proof of work introduced some parts that can be optimized. The recap of the event, for historians, is here: https://monero.stackexchange.com/questions/858/monero-origins-optimized-crippled-miner
- Original Medium Article: https://medium.com/@th_s4m0ht/how-to-mine-monero-on-your-macbook-and-tweak-the-source-code-although-you-shouldnt-8d57d966ac26

Congratulations @s4m0ht! You have received a personal award!
Click on the badge to view your own Board of Honor on SteemitBoard.
Congratulations @s4m0ht! You received a personal award!
You can view your badges on your Steem Board and compare to others on the Steem Ranking
Do not miss the last post from @steemitboard:
Vote for @Steemitboard as a witness to get one more award and increased upvotes!