Record Remote Podcast Interviews via Discord + Craig (Step-by-Step Guide)
If you're interested, you can read the motivation for this post here.
Step 1: Download Discord and Sign up for an account
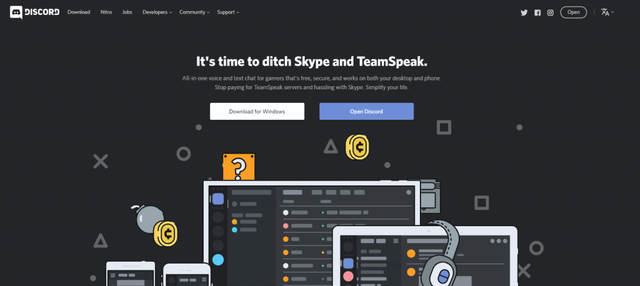
Discord's homepage: discordapp.com
Both of these vital first steps may be accomplished on discordapp.com. Simply click the download button and install the desktop software. There is also a mobile app version for iOS and Android.
Upon launching the program for the first time, you'll be prompted to create an account. Enter your email, select a username and password, and you're off to the races!

Step 2: Create or Join a Server
Servers are like chat rooms. They serve individuals or communities, and Discord members may create and join servers in order to interact with others. If you're looking to host many remote interviews for your show, having your own Discord server to invite guests to could be a valuable tool. Otherwise, you could find a friend who has a server, or join the Life, Experienced server to view or use the setup I've created.
If you want to build your own server, here are the basics (general knowledge about using Discord may be found in the program by following the interactive tutorial. The following instructions will assume you have basic knowledge about how the program works):
During Discord's first run, you may see something like this:

Creating your own server is as simple as clicking "Create a server." You'll need to select a name for the server, but once you've done that, it will appear on the left of the screen (among any other servers you might be a member of, so be sure to update its icon so it may be easily distinguished).

Now that you have your server, you should see one basic text chat channel, and another voice channel. They will appear on the left side as a list, and should have names like "general."
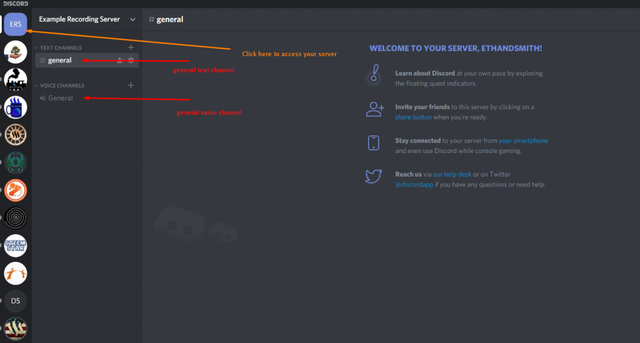
Locations of server icon, text channels, and voice channels in a brand new server.
Text Channels
Text channels are what they sound like. You simply type a message and press enter to send. A list of the latest messages sent by members of the server will appear in the main chat window.
Voice Channels
Voice channels are where the magic of recording interviews will happen. As long as you have a microphone and speakers (preferably headphones, but we'll get to that), you can hop in a voice channel and instantly be talking to other members who also join the channel. Simply click on a voice channel to join. You will see your user icon appear below the channel when you have joined it. You will also see a message that says "Voice Connected" at the bottom above your user icon.

3. Get Prepared to Use a Voice Channel
As I mentioned above, adjusting your microphone and headphone settings is extremely important, as you want to be sure you are recording through your best microphone, and your sound will be routed to your headphones to avoid any feedback.
In Discord, these settings may be found by selecting the small settings wheel icon beside your username in the lower left corner of the application, then selecting "Voice & Video" (I also highly recommend taking a look at the rest of the settings in the entire menu and adjusting them to fit your preferences, especially enabling 2-Factor Authentication for login).
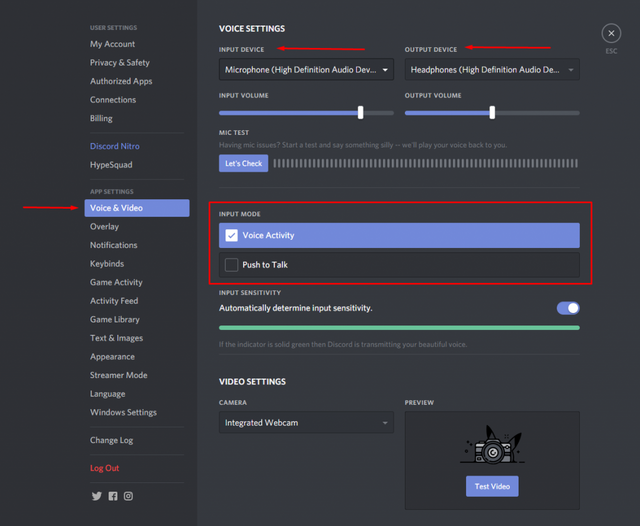
Important Voice & Video settings in Discord
In the image above, you'll see what the Voice & Video settings page looks like. At the very top, be sure to select your desired microphone and output device.
Pay attention to the Input Mode section as well. For the purposes of interviews, you'll probably want to have Voice Activity mode enabled, as it will detect your voice without the need to press a specific key the entire time, which is Push to Talk mode.
These settings are important to communicate to your guest or interviewee, so be sure you are familiar with how to change these settings so you can help troubleshoot if issues arise.
Now that you have one voice channel in your server and you've adjusted your Voice & Video settings, it's time to set up the recording method. That's where Craig comes in.
4. Invite Craig to Your Server
Craig is an open-source Discord bot application developed by YouTuber Yahweasel. It will join your Discord server and jump into a voice channel when called, begin recording, and provide links to download the recording after the interview in multiple formats (FLAC, .wav, etc.). It also records each participant separately, which makes for a smooth editing process for your show.
I encourage you to read about Craig before using it by visiting its home page, craig.chat.
Yahweasel provides simple instructions on how to use Craig, but step 1 is to invite Craig to your server. Simply navigate to Craig's home page using the link above and select the link that says "Invite Craig to Your Discord Server."
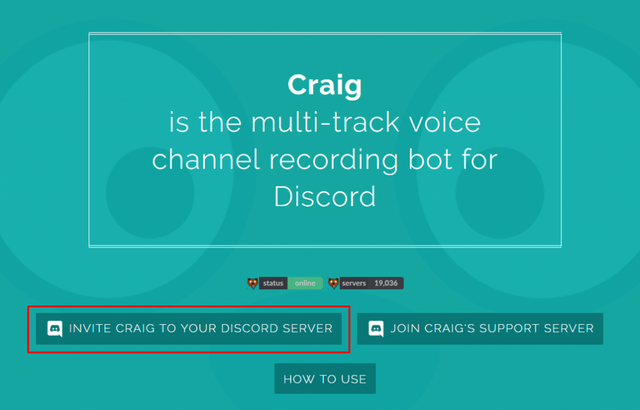
Upon clicking the link, you'll see a window that looks like this:

Select your desired server from the drop down list, leave all of the permissions active, and click "Authorize." Craig should now show up in the users section of your server (on the right-hand side). He's in your server, so all you have to do now is call him!
5. Calling Craig to Record Your Interview
Now that Craig has a home in your server, he's ready to use! Simply join a voice channel and type the following command into any of your server's text channels:
:craig:, join
You'll see Craig jump into the voice channel and hear a voice message saying "Now recording." Craig is now recording all voices that will be present in your voice channel.
You'll also notice a direct message from Craig, which will appear in the top left of Discord. This message will contain all of the relevant links for downloading your recording after the interview is over.
When you're finished, simply type the following into a text channel to end Craig's recording:
:craig:, leave
That's it! Craig will stop recording, and you may download your recording via the link sent in the direct message.
Note: More information on how to use Craig and advanced commands may be found here.
6. Enable EnnuiCastr for Higher-Quality Recording
Craig has another feature, one which is especially useful for podcast interviews. It's a browser-based plugin called EnnuiCastr, which, when activated by your interviewee, will locally record their microphone for the highest possible audio quality version of the interview.
This recording will be available via the same download link Craig provides for the regular recording.
Here's how to enable EnnuiCastr. Simply type the following command into a text channel of your server after you've invited Craig to join:
:craig:, ennuicastr on
That's it! Now, when Craig sends you the direct message with the recording download links, he'll also provide a link that says "EnnuiCastr client link." Share that link with your interviewee once the interview begins, and they can activate the plugin in their browser, enable microphone permissions, and you'll be gathering the highest quality version of the conversation.
This is also useful as there may be slight blips in the Discord server connection during the interview. EnnuiCastr continues to record in these moments, which means you won't lose any precious seconds of your interview!
For more information on EnnuiCastr, visit its information and instruction page.
7. Download Your Recordings and Edit Your Show!
Once you're done with the interview, follow the download link provided by Craig to grab your audio files. The files will be synced automatically, so you won't have to try to align them perfectly in your DAW if an interviewee arrived after the recording or another unforeseen issue occurs.
Here's what the Craig download page looks like:
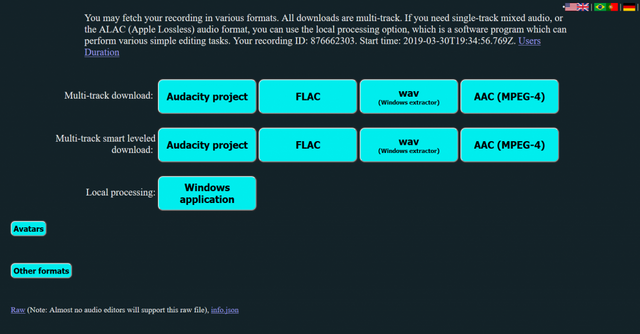
Craig download options
As you can see, there are multiple options. FLAC is the highest quality (no file compression), and will work with most DAWs, so I suggest using those files. The wav option downloads an executable, which may get flagged by your antivirus software, so be aware that it's harmless, the script just converts the FLAC files to .wav files. You may also choose any of the other options to fit your individual needs.
Once you've downloaded the files, you'll find them in a folder, where you'll see individual files for each person present in the interview. If you used EnnuiCastr, you'll see another set of tracks labeled with "_web" after the person's username.
And that's it! You've just recorded a remote interview in high quality! Now it's on to the editing stage.
Example Audio
I used this method to record the interview in Season 2, Episode 8 of Life, Experienced. I had EnnuiCastr enabled, but I neglected to ensure my guest had on headphones, so there were some feedback issues that forced me to use the regular Craig recording instead. Here are some clips so you can get an idea of the differences in the recordings:
Host (Ethan D. Smith) regular Craig recording:
https://lifeexperienced.org/wp-content/uploads/2019/04/ethandsmith-default.mp3Note: I used this track for the final recording, as it had the least amount of issues. You'll notice in the next track, the one from EnnuiCastr, that there are some blips in the audio as well as a slight pitch change near the end. I'm not entirely sure why this occurred, but I'll likely be using a separate tool to record my audio locally next time.
Host (Ethan D. Smith) EnnuiCastr recording:
https://lifeexperienced.org/wp-content/uploads/2019/04/ethandsmith-ennui.mp3
Again, the track has a few issues. I'm planning to reach out to Yahweasel to see if he has any thoughts on the causes.
Guest (David Cook) regular Craig recording:
https://lifeexperienced.org/wp-content/uploads/2019/04/davidcook-default.mp3
Again, this is the track I chose to use for the complete interview. When you listen to the next clip, you'll hear why.
Guest (David Cook) EnnuiCastr recording:
https://lifeexperienced.org/wp-content/uploads/2019/04/davidcook-ennui.mp3
Blips in the audio (soft clicks) are audible throughout, and if you listen to the very end of the clip, you'll hear what happens when you forget to have your guest wear headphones. My voice at the end of the above clip is entirely feedback from David's microphone. This caused major issues where our voices overlapped throughout the interview, hence why I chose to use the default Craig recording, as the effect wasn't as pronounced.
Entire episode (S2E8):
I'm planning to continue using both methods to record my guests in the future. EnnuiCastr clearly records higher quality audio, but it has a few small issues. Overall, the quality and consistency of the recording was excellent (as far as remote interviews go), so I will be using this method again in the future.
Final Thoughts
If you're creating your own Discord server or hosting interviews frequently, consider typing up a short guide for your guests on how to join your server, how to update their microphone settings, always use headphones, etc. You'll see an example set of these instructions in the #guests-start-here channel of the Life, Experienced Discord server.
If you have other methods for recording interviews, I'd love to hear about them. This method was easy for me because I was already familiar with Discord. Have you had success using Zoom, Skype, or the almost dead Google Hangouts? Let me know! Comment on this article or share your thoughts on the show's Twitter or Facebook page.
Does this method sound too complicated? Host your interview on my server!
I've set up a server for Life, Experienced that has Craig ready to go, and I'm offering it to you for your shows! If you're interested in using my server to host your interviews, simply send me an email to [email protected] or join the Life, Experienced Discord server and send a direct message to user ethandsmith#7991. I'm happy to discuss the use of my server for your interviews!
I hope this article helps you record many great interviews for your shows! If you have any further questions, don't hesitate to reach out!
Posted from lifeexperienced.org with SteemPress : https://lifeexperienced.org/record-remote-podcast-interviews-via-discord-craig-step-by-step-guide