Cement pots are Expensive, so make your own!
So as this rona has hit us all in the wallet, not like I had a big wallet to begin with… and having nothing to do with all this free time, I decided to fix up the garden. However, low and behold, typical planters that aren’t plastic are pretty pricey all things considered. Hell even the gaudy and atrocious plastic looking ones are generally not that great either. So, I decided to bite the bullet, haul my ass to the corner to sell myself for some quick money so I can then use it to better my backyard. Here begins my journey into cement and gardening.
We begin by gathering some supplies. Cloth, a mold form, a spray bottle, cement, scissors etc…

.
.
.
For this project I decided to go with the “clothe mache” method. You, instead of using weak sauce paper, use fabric. In this case I used a hideous Lacoste polo? I found. It's good material, but not a shirt I’d ever wear. So first things first is to dissect the shirt into parts we can actually use. That’s where the scissor come in handy.

.
.
.
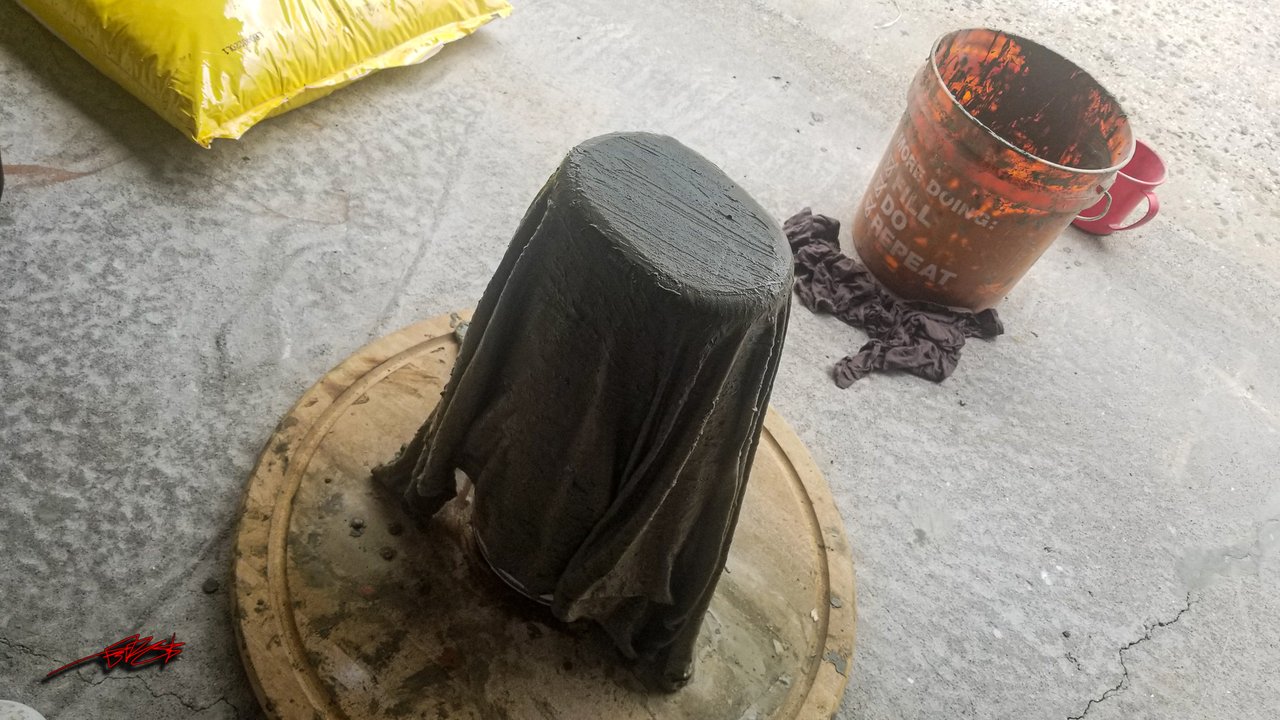
The form I’m using is a dollar tree waste basket. It has an odd curve a the lip in order to imitate bougieness, however it doesn’t work for me cuz it will just roll all over the place so I need to used sumtin to hold it stead, in this case I used a can of paint I found one garbage day. I’d like to take a moment to thank my rich neighbors, without you, I’d have to buy many more things I wouldn’t usually be able to afford. With some oil, any oil will do, you first paint the outside of the form, even though its plastic and cement doesn’t really stick to plastic, it still grabs it pretty tightly as it shrinks while dries, the oil will help to release the mold later.

.
.
.
The next steps are too pre wet the fabric so the cement will stick, you can use throw the fabric in dry but you will be mixing for longer than you need. You want the cement to have a moist mash potato consistency. If it’s too wet it will weight everything down and hang and drip, trust me it’s a disaster. Concurrently, if it’s too dry then it won’t stick to the fabric, but this can be remedy if the fabric is wet to begin with. This is the 20th pot I made so I had 19 mistakes to learn from.

.
.
.
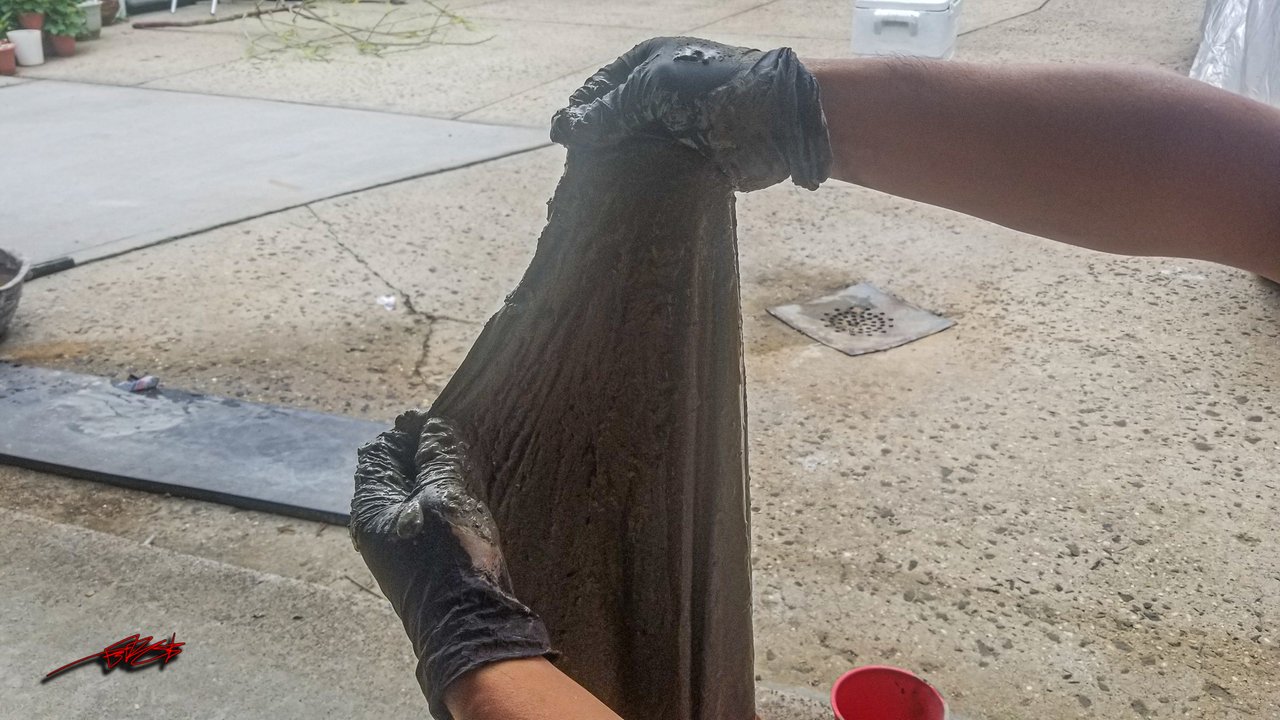
Once everything is ready you start the impregnation process where you have to squeeze and massage the cement into the core of the fabric. This ensures that the cement and the fabric becomes one when it dries, as oppose to the cement drying on top of the fabric. This is where the strength of the pot comes from. We WILL be, or rather, I will be using a few extra pieces of fabric to reinforce areas that need it.
.
.
.
Now we simply drape the cement imbued fabric over the mold form and shape it to any way you desire.
.
.
.
This step is very important, if you’re using the planter outdoors, you need to make a drain hole for excess water to escape, if you’re using it indoors you don’t really need to do that step, but if you do then you need to make sure you have a plate to catch the water. For this I simple pulled up a part of the bottom and simply cut a hole out with the nifty scissors. You’ll have to do this for each layer of cloth you decide to use.

.
.
.
Now, personally I LOVE those planters with side opening to stick little flora in, never fauna, that’s cruel. However those terracotta pots are insanely expensive so, I used the scissors once more to cut holes in the side to act as an additional opening for extra bougieness.

.
.
.
You have to stuff the pockets with sumtin in order for them to keep their shape though, otherwise you have a slit in your pot as oppose to a pocket. As you can see I added additional layers to the bottom (which is the top, you work on the planters upside down, for now). For each layer you use you must also cut a hole out, they don’t need to match up perfectly.

.
.
.
Finally with some string, twin rope, any sort of none adhesive binding agent (please add that to the list of supplies and material at the start of this post), we further refine the shape of the pot. As you will also notice I left the folds in the fabric on purpose. My preferred style of pots is rustic and organic looking, I hate those formed pots that look like cookie cutter products that’s stamped out hundreds at a time. You can call it freeform though.

.
.
.
Now this is important. Cement will shrink a bit when it dries, the wet or dry it is the greater the crack is, so to remedy that we will cover it with a bag to lock in the moisture so as it contracts it remains wet., HOWEVER this is not the curing process only the setting phase I believe it’s called, that’s when the cement sets and hardens but doesn’t yet have its strength cuz the chemical reactions have solidified the bonds yet or sumtin. This is what I believe I understand, from trial and error and research.

.
.
.
Now that it has dried and set for about 24 hours, we can move onto the reinforcement and refinement step. This is the part where you fill in the giant gaps and to really give the pot some meat to the walls for added strength, this is also the part where I further refine the freeform shape to look more smooth and organic and instead of choppy and cementy.

.
.
.
So once again we mix up some more cement, but this time we will apply it with a paint brush for easier application, you’ll notice I made a small little planter for indoors with the left over fabric of the bigger pot, but ignore that one, we will focus only on the larger one for this post.

.
.
.
The first area to reinforce is the interior, as you can see I coated the walls liberally with cement. If you find that the walls are drying out your freshly applied cement too fast, then you can spray it down with water. This will also help the already present chemicals to reactivate and bond with the new cement.

.
.
.
Now as you can see I moved the planter onto a glass base for this. I’ll explain that in a moment. Once you’re done reinforcing the inside AND outside of the pot you can spray it down liberally with water to create a smoother finish, this will help with sanding later. Now once everything is shaped and refined, you can turn your attention to the base of the pot, if you feel that it’s not flat enough, you can use extra cement to “fill in the gaps” on the foot of the pot. This is why I used glass, its “nonstick” and flat. You simply use a spoon or some cheap dollar tree cake spatula things to “stuff” the gaps full of cement and then shape and spray down to make it seamless.

.
.
.
Now once again we cover it with a bag and wait a day.

.
.
.
Once a day has passed this is the step where you sand down the roughness of the pot. It is much easier to do this prior to the curing process since the cement is still “soft”. I highly suggest a good quality drywall sanding block with an angled. Low quality sanding blocks will be destroyed by the sharp jagged surface of the pot. You want to start with light pressure so you don’t snag the sanding block and tear it up. Incidentally, you don’t want to sand too much and remove the cement to expose the fabric scaffold either.

.
.
.
Now that the surface is as you like it you can finally move onto the curing step. This is where the cement gets its strength from. Now, I’m not a cementologist so I’m not sure of the exact science involved, but if I understand it correctly, what’s happening is that when you soak it in water the water reactivates the latent chemicals that finish their job in hardening the cement, I believe its lime or sumtin. And once all the chemical is exhausted the rest just leaches out into the water. I believe at that point the water is highly alkaline cuz when you touch it, it’s “slippery”. But don’t quote me on any of this, all I know is you need to soak the pot in order to give it the strength of cement mache.

.
.
.
Once it’s done curing in water for a whole day, or 2, or 3, really you can leave it as long as you want but at some point you’ll want to finish this project. You’re now ready to paint it. Now you can use fancy paints to your heart’s content, but I have paint I found and I will be using that mostly. For this and most of my pots I like the look of tree tones. Most of the freeform pots I make tend to look like knotted wood to some degree so for now I paint them all wooden colors. You’ll need several coats of varying colors in order to create depth. You can use any color you want obviously and as many layers as you want. But for me, I need to first give it a dark coat in order to fill in those crevices, followed by subsequent layers of brighter and brighter gradients until the finish product looks like, to my best ability, a piece of hollowed out wood. From the earlier pots I made the paint doesn’t run off so thankfully I don’t have to worry about that, but it should age nicely in the sun, who knows, I don’t.

.
.
.
And there we have it folks, poverty planter, probably woulda been easier to just hollow out a tree trunk. But 20 mins with a stranger will give you enuff to buy what you need to start your own planter business, please buy my pots, the corner of the street is a rough and tough way to earn a living, I much prefer doing this instead. I hope this was helpful and informative. These pots I make truly are one of a kind. As you can see I made them with sweat love and tears… you don’t see the tears cuz I mixed them into the first few batches of fuck ups. Enjoy your day folks!

.
.
.
Follow me on instagram if you’re into photography and are looking for a photographer in the NYC area and other artisan crafts I make, please also check out my Etsy and online store, thank you everyone. Until my next fruitless project!
IG: edgecelize
IG: edgewares_llc
Etsy: https://www.etsy.com/shop/EdgeWares
Online: www.Edgewares.net
I guess i put this in to the wrong tag 😭