Tutorial: Making Road Traffic Counting App based on Computer Vision and OpenCV
Today we will learn how to count road traffic based on computer vision and without heavy deep learning algorithms.
For this tutorial, we will use only Python and OpenCV with the pretty simple idea of motion detection with help of background subtraction algorithm.All code you can find here
Here is our plan:
- Understand the main idea of background subtraction algorithms that used for foreground detection.
- OpenCV image filters.
- Object detection by contours.
- Building processing pipeline for further data manipulation.
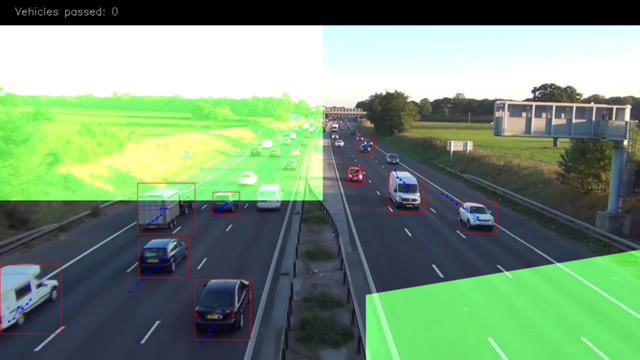
And this is result: https://www.youtube.com/watch?v=_o5iLbRHKao
Background subtraction algorithms
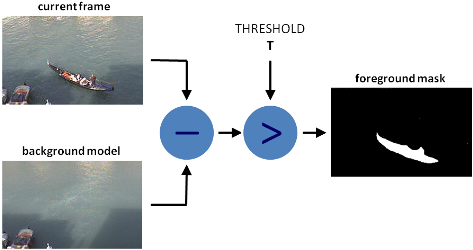
There are many different algorithms for background subtraction, but the main idea of them is very simple.
Let’s assume that you have a video of your room, and on some of the frames of this video there is no humans & pets, so basically it’s static, let’s call it background_layer. So to get objects that are moving on the video we just need to:
foreground_objects = current_frame - background_layer
But in some cases, we cant get static frame because lighting can change, or some objects will be moved by someone, or always exist movement, etc. In such cases we are saving some number of frames and trying to figure out which of the pixels are the same for most of them, then this pixels becoming part of background_layer. Difference generally in how we get this background_layer and additional filtering that we use to make selection more accurate.
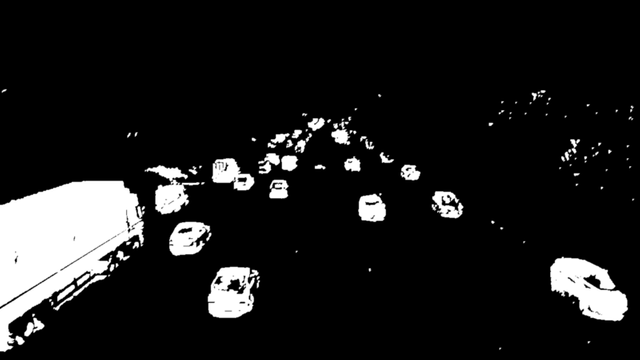
In this lesson, we will use MOG algorithm for background subtraction and after processing, it looks like this:
Original frame on the left, Subtracted foreground with MOG(with shadows detecting) on the right.
As you can see there is some noise on the foreground mask which we will try to remove with some standard filtering technic.
Right now our code looks like this: https://gist.github.com/creotiv/f01ec1a4b7b1d88cad43c36be8fccc96
import os

import logging

import logging.handlers

import random


import numpy as np

import skvideo.io

import cv2

import matplotlib.pyplot as plt


import utils

# without this some strange errors happen

cv2.ocl.setUseOpenCL(False)

random.seed(123)


# ============================================================================

IMAGE_DIR = "./out"

VIDEO_SOURCE = "input.mp4"

SHAPE = (720, 1280)  # HxW

# ============================================================================


def train_bg_subtractor(inst, cap, num=500):

    '''

        BG substractor need process some amount of frames to start giving result

    '''

    print ('Training BG Subtractor...')

    i = 0

    for frame in cap:

        inst.apply(frame, None, 0.001)

        i += 1

        if i >= num:

            return cap


def main():

    log = logging.getLogger("main")


    # creting MOG bg subtractor with 500 frames in cache

    # and shadow detction

    bg_subtractor = cv2.createBackgroundSubtractorMOG2(

        history=500, detectShadows=True)


    # Set up image source

    # You can use also CV2, for some reason it not working for me

    cap = skvideo.io.vreader(VIDEO_SOURCE)


    # skipping 500 frames to train bg subtractor

    train_bg_subtractor(bg_subtractor, cap, num=500)


    frame_number = -1

    for frame in cap:

        if not frame.any():

            log.error("Frame capture failed, stopping...")

            break


        frame_number += 1


        utils.save_frame(frame, "./out/frame_%04d.png" % frame_number)


        fg_mask = bg_subtractor.apply(frame, None, 0.001)


        utils.save_frame(frame, "./out/fg_mask_%04d.png" % frame_number)


# ============================================================================


if __name__ == "__main__":

    log = utils.init_logging()


    if not os.path.exists(IMAGE_DIR):

        log.debug("Creating image directory `%s`...", IMAGE_DIR)

        os.makedirs(IMAGE_DIR)


    main()
Filtering
For our case we will need this filters: Threshold, Erode, Dilate, Opening, Closing. Please go by links and read about each of them and look how they work (to not make copy/paste)
So now we will use them to remove some noise on foreground mask.
First, we will use Closing to remove gaps in areas, then Opening to remove 1–2 px points, and after that dilation to make object bolder.
Code: https://gist.github.com/creotiv/cd0ca7ed33739ac690f5e71ee9383799#file-filter_mask-py
def filter_mask(img):


    kernel = cv2.getStructuringElement(cv2.MORPH_ELLIPSE, (2, 2))


    # Fill any small holes

    closing = cv2.morphologyEx(img, cv2.MORPH_CLOSE, kernel)

    # Remove noise

    opening = cv2.morphologyEx(closing, cv2.MORPH_OPEN, kernel)


    # Dilate to merge adjacent blobs

    dilation = cv2.dilate(opening, kernel, iterations=2)


    # threshold

    th = dilation[dilation < 240] = 0


    return th
And our foreground will look like this:
Object detection by contours
For this purpose we will use the standard cv2.findContours method with params:
cv2.CV_RETR_EXTERNAL — get only outer contours.


cv2.CV_CHAIN_APPROX_TC89_L1 - use Teh-Chin chain approximation algorithm (faster)
Code: https://gist.github.com/creotiv/cf6979d7cb4ae7f78200cc815b9ef38d#file-detect_vehicles-py
def get_centroid(x, y, w, h):

    x1 = int(w / 2)

    y1 = int(h / 2)


    cx = x + x1

    cy = y + y1


    return (cx, cy)


def detect_vehicles(fg_mask, min_contour_width=35, min_contour_height=35):


    matches = []


    # finding external contours

    im, contours, hierarchy = cv2.findContours(

        fg_mask, cv2.RETR_EXTERNAL, cv2.CHAIN_APPROX_TC89_L1)


    # filtering by with, height

    for (i, contour) in enumerate(contours):

        (x, y, w, h) = cv2.boundingRect(contour)

        contour_valid = (w >= min_contour_width) and (

            h >= min_contour_height)


        if not contour_valid:

            continue


        # getting center of the bounding box

        centroid = get_centroid(x, y, w, h)


        matches.append(((x, y, w, h), centroid))


    return matches
On the exit, we add some filtering by height, width and add centroid.
Pretty simple, yeah?
Building processing pipeline
You must understand that in ML and CV there is no one magic algorithm that making altogether, even if we imagine that such algorithm exists, we still wouldn’t use it because it would be not effective at scale. For example a few years ago Netflix created competition with the prize 3 million dollars for the best movie recommendation algorithm. And one of the team created such, problem was that it just couldn’t work at scale and thus was useless for the company. But still, Netflix paid 1 million to them :)
So now we will build simple processing pipeline, it not for scale just for convenient but the idea the same.
Code: https://gist.github.com/creotiv/6db4c523ae7c64554c3d08ff5edb8e79
class PipelineRunner(object):

    '''

        Very simple pipline.


        Just run passed processors in order with passing context from one to

        another.


        You can also set log level for processors.

    '''


    def __init__(self, pipeline=None, log_level=logging.DEBUG):

        self.pipeline = pipeline or []

        self.context = {}

        self.log = logging.getLogger(self.__class__.__name__)

        self.log.setLevel(log_level)

        self.log_level = log_level

        self.set_log_level()


    def set_context(self, data):

        self.context = data


    def add(self, processor):

        if not isinstance(processor, PipelineProcessor):

            raise Exception(

                'Processor should be an isinstance of PipelineProcessor.')

        processor.log.setLevel(self.log_level)

        self.pipeline.append(processor)


    def remove(self, name):

        for i, p in enumerate(self.pipeline):

            if p.__class__.__name__ == name:

                del self.pipeline[i]

                return True

        return False


    def set_log_level(self):

        for p in self.pipeline:

            p.log.setLevel(self.log_level)


    def run(self):

        for p in self.pipeline:

            self.context = p(self.context)


        self.log.debug("Frame #%d processed.", self.context['frame_number'])


        return self.context


class PipelineProcessor(object):

    '''

        Base class for processors.

    '''


    def __init__(self):

        self.log = logging.getLogger(self.__class__.__name__)
As input constructor will take a list of processors that will be run in order. Each processor making part of the job. So let’s create contour detection processor.
Code: https://gist.github.com/creotiv/75a84e9a3f634c0f5c399bc495137075
class ContourDetection(PipelineProcessor):

    '''

        Detecting moving objects.


        Purpose of this processor is to subtrac background, get moving objects

        and detect them with a cv2.findContours method, and then filter off-by

        width and height.


        bg_subtractor - background subtractor isinstance.

        min_contour_width - min bounding rectangle width.

        min_contour_height - min bounding rectangle height.

        save_image - if True will save detected objects mask to file.

        image_dir - where to save images(must exist).

    '''


    def __init__(self, bg_subtractor, min_contour_width=35, min_contour_height=35, save_image=False, image_dir='images'):

        super(ContourDetection, self).__init__()


        self.bg_subtractor = bg_subtractor

        self.min_contour_width = min_contour_width

        self.min_contour_height = min_contour_height

        self.save_image = save_image

        self.image_dir = image_dir


    def filter_mask(self, img, a=None):

        '''

            This filters are hand-picked just based on visual tests

        '''


        kernel = cv2.getStructuringElement(cv2.MORPH_ELLIPSE, (2, 2))


        # Fill any small holes

        closing = cv2.morphologyEx(img, cv2.MORPH_CLOSE, kernel)

        # Remove noise

        opening = cv2.morphologyEx(closing, cv2.MORPH_OPEN, kernel)


        # Dilate to merge adjacent blobs

        dilation = cv2.dilate(opening, kernel, iterations=2)


        return dilation


    def detect_vehicles(self, fg_mask, context):


        matches = []


        # finding external contours

        im2, contours, hierarchy = cv2.findContours(

            fg_mask, cv2.RETR_EXTERNAL, cv2.CHAIN_APPROX_TC89_L1)


        for (i, contour) in enumerate(contours):

            (x, y, w, h) = cv2.boundingRect(contour)

            contour_valid = (w >= self.min_contour_width) and (

                h >= self.min_contour_height)


            if not contour_valid:

                continue


            centroid = utils.get_centroid(x, y, w, h)


            matches.append(((x, y, w, h), centroid))


        return matches


    def __call__(self, context):

        frame = context['frame'].copy()

        frame_number = context['frame_number']


        fg_mask = self.bg_subtractor.apply(frame, None, 0.001)

        # just thresholding values

        fg_mask[fg_mask < 240] = 0

        fg_mask = self.filter_mask(fg_mask, frame_number)


        if self.save_image:

            utils.save_frame(fg_mask, self.image_dir +

                             "/mask_%04d.png" % frame_number, flip=False)


        context['objects'] = self.detect_vehicles(fg_mask, context)

        context['fg_mask'] = fg_mask


        return contex
So just merge together out bg subtraction, filtering and detection parts.
Now let’s create a processor that will link detected objects on different frames and will create paths, and also will count vehicles that got to the exit zone.
Code: https://gist.github.com/creotiv/da7fca1b237619a756133a1fa816350e
   '''

        Counting vehicles that entered in exit zone.


        Purpose of this class based on detected object and local cache create

        objects pathes and count that entered in exit zone defined by exit masks.


        exit_masks - list of the exit masks.

        path_size - max number of points in a path.

        max_dst - max distance between two points.

    '''


    def __init__(self, exit_masks=[], path_size=10, max_dst=30, x_weight=1.0, y_weight=1.0):

        super(VehicleCounter, self).__init__()


        self.exit_masks = exit_masks


        self.vehicle_count = 0

        self.path_size = path_size

        self.pathes = []

        self.max_dst = max_dst

        self.x_weight = x_weight

        self.y_weight = y_weight


    def check_exit(self, point):

        for exit_mask in self.exit_masks:

            try:

                if exit_mask[point[1]][point[0]] == 255:

                    return True

            except:

                return True

        return False


    def __call__(self, context):

        objects = context['objects']

        context['exit_masks'] = self.exit_masks

        context['pathes'] = self.pathes

        context['vehicle_count'] = self.vehicle_count

        if not objects:

            return context


        points = np.array(objects)[:, 0:2]

        points = points.tolist()


        # add new points if pathes is empty

        if not self.pathes:

            for match in points:

                self.pathes.append([match])


        else:

            # link new points with old pathes based on minimum distance between

            # points

            new_pathes = []


            for path in self.pathes:

                _min = 999999

                _match = None

                for p in points:

                    if len(path) == 1:

                        # distance from last point to current

                        d = utils.distance(p[0], path[-1][0])

                    else:

                        # based on 2 prev points predict next point and calculate

                        # distance from predicted next point to current

                        xn = 2 * path[-1][0][0] - path[-2][0][0]

                        yn = 2 * path[-1][0][1] - path[-2][0][1]

                        d = utils.distance(

                            p[0], (xn, yn),

                            x_weight=self.x_weight,

                            y_weight=self.y_weight

                        )


                    if d < _min:

                        _min = d

                        _match = p


                if _match and _min <= self.max_dst:

                    points.remove(_match)

                    path.append(_match)

                    new_pathes.append(path)


                # do not drop path if current frame has no matches

                if _match is None:

                    new_pathes.append(path)


            self.pathes = new_pathes


            # add new pathes

            if len(points):

                for p in points:

                    # do not add points that already should be counted

                    if self.check_exit(p[1]):

                        continue

                    self.pathes.append([p])


        # save only last N points in path

        for i, _ in enumerate(self.pathes):

            self.pathes[i] = self.pathes[i][self.path_size * -1:]


        # count vehicles and drop counted pathes:

        new_pathes = []

        for i, path in enumerate(self.pathes):

            d = path[-2:]


            if (

                # need at list two points to count

                len(d) >= 2 and

                # prev point not in exit zone

                not self.check_exit(d[0][1]) and

                # current point in exit zone

                self.check_exit(d[1][1]) and

                # path len is bigger then min

                self.path_size <= len(path)

            ):

                self.vehicle_count += 1

            else:

                # prevent linking with path that already in exit zone

                add = True

                for p in path:

                    if self.check_exit(p[1]):

                        add = False

                        break

                if add:

                    new_pathes.append(path)


        self.pathes = new_pathes


        context['pathes'] = self.pathes

        context['objects'] = objects

        context['vehicle_count'] = self.vehicle_count


        self.log.debug('#VEHICLES FOUND: %s' % self.vehicle_count)


        return context
This class a bit complicated so let’s walk through it by parts.
This green mask on the image is exit zone, is where we counting our vehicles. For example, we will count only paths that have length more than 3 points(to remove some noise) and the 4th in the green zone.
We use masks cause it’s many operation effective and simpler than using vector algorithms. Just use “binary and” operation to check that point in the area, and that’s all. And here is how we set it:
EXIT_PTS = np.array([    [[732, 720], [732, 590], [1280, 500], [1280, 720]],    [[0, 400], [645, 400], [645, 0], [0, 0]]])


base = np.zeros(SHAPE + (3,), dtype='uint8')

exit_mask = cv2.fillPoly(base, EXIT_PTS, (255, 255, 255))[:, :, 0]
Now let’s link points in paths
new_pathes = []


for path in self.pathes:

    _min = 999999

    _match = None

    for p in points:

        if len(path) == 1:

            # distance from last point to current

            d = utils.distance(p[0], path[-1][0])

        else:

            # based on 2 prev points predict next point and calculate

            # distance from predicted next point to current

            xn = 2 * path[-1][0][0] - path[-2][0][0]

            yn = 2 * path[-1][0][1] - path[-2][0][1]

            d = utils.distance(

                p[0], (xn, yn),

                x_weight=self.x_weight,

                y_weight=self.y_weight

            )


        if d < _min:

            _min = d

            _match = p


    if _match and _min <= self.max_dst:

        points.remove(_match)

        path.append(_match)

        new_pathes.append(path)


    # do not drop path if current frame has no matches

    if _match is None:

        new_pathes.append(path)


self.pathes = new_pathes


# add new pathes

if len(points):

    for p in points:

        # do not add points that already should be counted

        if self.check_exit(p[1]):

            continue

        self.pathes.append([p])


# save only last N points in path

for i, _ in enumerate(self.pathes):

    self.pathes[i] = self.pathes[i][self.path_size * -1:]
On first frame. we just add all points as new paths.
Next if len(path) == 1, for each path in the cache we are trying to find the point(centroid) from newly detected objects which will have the smallest Euclidean distance to the last point of the path.
If len(path) > 1, then with the last two points in the path we are predicting new point on the same line, and finding min distance between it and the current point.
The point with minimal distance added to the end of the current path and removed from the list.
If some points left after this we add them as new paths.
And also we limit the number of points in the path.
# count vehicles and drop counted pathes:

new_pathes = []

for i, path in enumerate(self.pathes):

    d = path[-2:]


    if (

        # need at list two points to count

        len(d) >= 2 and

        # prev point not in exit zone

        not self.check_exit(d[0][1]) and

        # current point in exit zone

        self.check_exit(d[1][1]) and

        # path len is bigger then min

        self.path_size <= len(path)

    ):

        self.vehicle_count += 1

    else:

        # prevent linking with path that already in exit zone

        add = True

        for p in path:

            if self.check_exit(p[1]):

                add = False

                break

        if add:

            new_pathes.append(path)


self.pathes = new_pathes


context['pathes'] = self.pathes

context['objects'] = objects

context['vehicle_count'] = self.vehicle_count


self.log.debug('#VEHICLES FOUND: %s' % self.vehicle_count)


return context
Now we will try to count vehicles that entering in the exit zone. To do this we just take 2 last points in the path and checking that last of them in exit zone, and previous not, and also checking that len(path) should be bigger than limit.
The part after else is preventing of back-linking new points to the points in exit zone.
And the last two processor is CSV writer to create report CSV file, and visualization for debugging and nice pictures.
class CsvWriter(PipelineProcessor):


    def __init__(self, path, name, start_time=0, fps=15):

        super(CsvWriter, self).__init__()


        self.fp = open(os.path.join(path, name), 'w')

        self.writer = csv.DictWriter(self.fp, fieldnames=['time', 'vehicles'])

        self.writer.writeheader()

        self.start_time = start_time

        self.fps = fps

        self.path = path

        self.name = name

        self.prev = None


    def __call__(self, context):

        frame_number = context['frame_number']

        count = _count = context['vehicle_count']


        if self.prev:

            _count = count - self.prev


        time = ((self.start_time + int(frame_number / self.fps)) * 100

                + int(100.0 / self.fps) * (frame_number % self.fps))

        self.writer.writerow({'time': time, 'vehicles': _count})

        self.prev = count


        return context


class Visualizer(PipelineProcessor):


    def __init__(self, save_image=True, image_dir='images'):

        super(Visualizer, self).__init__()


        self.save_image = save_image

        self.image_dir = image_dir


    def check_exit(self, point, exit_masks=[]):

        for exit_mask in exit_masks:

            if exit_mask[point[1]][point[0]] == 255:

                return True

        return False


    def draw_pathes(self, img, pathes):

        if not img.any():

            return


        for i, path in enumerate(pathes):

            path = np.array(path)[:, 1].tolist()

            for point in path:

                cv2.circle(img, point, 2, CAR_COLOURS[0], -1)

                cv2.polylines(img, [np.int32(path)], False, CAR_COLOURS[0], 1)


        return img


    def draw_boxes(self, img, pathes, exit_masks=[]):

        for (i, match) in enumerate(pathes):


            contour, centroid = match[-1][:2]

            if self.check_exit(centroid, exit_masks):

                continue


            x, y, w, h = contour


            cv2.rectangle(img, (x, y), (x + w - 1, y + h - 1),

                          BOUNDING_BOX_COLOUR, 1)

            cv2.circle(img, centroid, 2, CENTROID_COLOUR, -1)


        return img


    def draw_ui(self, img, vehicle_count, exit_masks=[]):


        # this just add green mask with opacity to the image

        for exit_mask in exit_masks:

            _img = np.zeros(img.shape, img.dtype)

            _img[:, :] = EXIT_COLOR

            mask = cv2.bitwise_and(_img, _img, mask=exit_mask)

            cv2.addWeighted(mask, 1, img, 1, 0, img)


        # drawing top block with counts

        cv2.rectangle(img, (0, 0), (img.shape[1], 50), (0, 0, 0), cv2.FILLED)

        cv2.putText(img, ("Vehicles passed: {total} ".format(total=vehicle_count)), (30, 30),

                    cv2.FONT_HERSHEY_SIMPLEX, 0.7, (255, 255, 255), 1)

        return img


    def __call__(self, context):

        frame = context['frame'].copy()

        frame_number = context['frame_number']

        pathes = context['pathes']

        exit_masks = context['exit_masks']

        vehicle_count = context['vehicle_count']


        frame = self.draw_ui(frame, vehicle_count, exit_masks)

        frame = self.draw_pathes(frame, pathes)

        frame = self.draw_boxes(frame, pathes, exit_masks)


        utils.save_frame(frame, self.image_dir +

                         "/processed_%04d.png" % frame_number)


        return context
CSV writer is saving data by time, cause we need it for further analytics. So i use this formula to add additional frame timing to the unixtimestamp:
time = ((self.start_time + int(frame_number / self.fps)) * 100


        + int(100.0 / self.fps) * (frame_number % self.fps))
so with start time=1 000 000 000 and fps=10 i will get results like this
frame 1 = 1 000 000 000 010
frame 1 = 1 000 000 000 020
…Then after you get full csv report you can aggregate this data as you want.
Conclusion
So as you see it was not so hard as many people think.
But if you run the script you will see that this solution is not ideal, and having a problem with foreground objects overlapping, also it doesn’t have vehicles classification by types(that you will definitely need for real analytics). But still, with good camera position(above the road), it gives pretty good accuracy. And that tells us that even small & simple algorithms used in a right way can give good results.
So what we can do to fix current issues?
One way is to try adding some additional filtration trying to separate objects for better detection. Another is to use more complex algorithms like deep convolution networks (about which i will tell in the next article)


Hi! I am a robot. I just upvoted you! I found similar content that readers might be interested in:
https://medium.com/machine-learning-world/tutorial-making-road-traffic-counting-app-based-on-computer-vision-and-opencv-166937911660
Congratulations @andrey.nikishaev! You have completed some achievement on Steemit and have been rewarded with new badge(s) :
Click on any badge to view your own Board of Honor on SteemitBoard.
For more information about SteemitBoard, click here
If you no longer want to receive notifications, reply to this comment with the word
STOPAwesome Tutorial!! If you're interested in how AI works under the hood you are welcome to check out our series. A lot of what you posted works thanks to Neural Networks. Let us know what you think :)
Nice too bad there isn't code syntax highlighting on steemit,
I upvoted this !