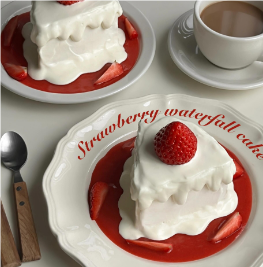
不用去横滨📍还原漫画里的草莓瀑布蛋糕🍓
宝子们,我最近刷到一款在日本超火的草莓瀑布蛋糕,这红与白的经典色彩搭配,看起来就像一个光滑圆润的陶瓷小茶壶摆件,可吃起来却软乎乎的,仿佛在大口朵颐云朵,那口感,绝了!今天就来给大家分享一下这个超赞的草莓瀑布蛋糕的做法。
📄【草莓瀑布蛋糕】制作教程来咯。
🎂首先是戚风蛋糕(八寸)部分:
需要准备低筋面粉 80g、鸡蛋 5 个、纯牛奶 50g 、玉米油 45g、白糖 50g 以及适量柠檬汁。
把玉米油和纯牛奶混合在一起,使劲搅拌,直到呈现乳化状态,接着把低筋面粉筛进去,搅拌均匀后,再加入蛋黄,继续搅拌至顺滑。
在蛋清里滴入几滴柠檬汁,分三次加入白糖,开始打发,一直打到提起打蛋器,蛋白能呈现直立小尖尖的状态就可以啦。
先把 1/3 的蛋白加到蛋黄糊里,用翻拌的手法拌匀,然后再加入 1/3 的蛋白,同样翻拌均匀,最后把蛋黄糊倒回剩下的蛋白中,继续翻拌均匀。从高处把面糊倒入模具中,震几下,把气泡都震出来。
放入预热好的烤箱中下层,150 度烤 55 分钟。烤好后震出热气,然后倒扣晾凉,接着用刀把蛋糕均匀分成 3 片蛋糕坯。
🍓接下来是草莓果酱的制作:
准备草莓 500g、白糖 150g、柠檬汁 25g 。
把草莓的蒂去掉,切成小块,加入白糖,腌制 2 个小时。
开中小火熬煮,煮到果肉变软,加入柠檬汁,继续熬制,直到果酱变得微微浓稠。
用工具把果酱搅打细腻,再过筛一遍,这个果酱是用来做蛋糕打底的哦。
🥛再说说奶油部分:
夹心奶油:准备淡奶油 150g、白糖 12g 。
奶盖(淋面用):准备淡奶油 300g、白糖 25g ,打发到呈现半流动的酸奶状态就好啦。
🍰最后是组装环节:
在蛋糕坯上均匀抹上夹心奶油,再放上切好的草莓片,按照这样的方式,把三层蛋糕坯叠好,这样就得到一个没有抹面的裸蛋糕啦,然后把它切成小块备用。
在盘子底部铺上一层草莓果酱,把切好的蛋糕块放在盘子中央。
重点来啦!想要蛋糕造型美美的,先用抹刀在蛋糕表面抹上一层奶盖,把蛋糕坯都覆盖住。剩下的奶盖装进裱花袋,在蛋糕底部与草莓果酱贴合的地方挤上一圈,蛋糕顶部也挤一圈,让奶盖自然往下流淌,形成美美的淋面。亲测这样操作比直接淋奶盖更能控制形状哦,宝子们一定要试试!


My dears, I recently came across a strawberry waterfall cake that is very popular in Japan. This classic red and white color combination looks like a smooth and round ceramic teapot ornament, but it tastes soft, as if you are eating clouds. The taste is amazing! Today I will share with you how to make this awesome strawberry waterfall cake.
📄【Strawberry Waterfall Cake】making tutorial is here.
🎂First, the chiffon cake (eight inches):
You need to prepare 80g low-gluten flour, 5 eggs, 50g pure milk, 45g corn oil, 50g white sugar and appropriate amount of lemon juice.
Mix the corn oil and pure milk together, stir vigorously until it is emulsified, then sift the low-gluten flour in, stir evenly, then add the egg yolk and continue stirring until it is smooth.
Drop a few drops of lemon juice into the egg white, add the white sugar three times, and start beating. Beat until the egg white can stand upright when the egg beater is lifted.
First, add 1/3 of the egg whites to the egg yolk paste, stir well, then add 1/3 of the egg whites, stir well, and finally pour the egg yolk paste back into the remaining egg whites and continue to stir well. Pour the batter into the mold from a high place, shake it a few times to shake out all the bubbles.
Put it in the middle and lower layer of the preheated oven and bake it at 150 degrees for 55 minutes. After baking, shake out the heat, then turn it upside down to cool, and then use a knife to evenly divide the cake into 3 pieces.
🍓Next is the production of strawberry jam:
Prepare 500g strawberries, 150g white sugar, and 25g lemon juice.
Remove the stems of the strawberries, cut them into small pieces, add white sugar, and marinate for 2 hours.
Simmer over medium-low heat until the flesh becomes soft, add lemon juice, and continue to simmer until the jam becomes slightly thick.
Use a tool to beat the jam until it is smooth, and then sift it again. This jam is used to make the base of the cake.
🥛 Let's talk about the cream part:
Cream filling: prepare 150g whipped cream and 12g white sugar.
Milk cap (for drizzling): prepare 300g whipped cream and 25g white sugar, and beat it until it is in a semi-fluid yogurt state.
🍰Finally, the assembly step:
Spread the cream filling evenly on the cake base, and then put the cut strawberry slices on it. In this way, stack the three layers of cake base, so that you get a naked cake without glazing, and then cut it into small pieces for later use.
Spread a layer of strawberry jam on the bottom of the plate, and put the cut cake pieces in the center of the plate.
Here comes the key point! If you want the cake to look beautiful, first use a spatula to spread a layer of milk cap on the surface of the cake to cover the cake base. Put the remaining milk cap into the piping bag, squeeze a circle on the bottom of the cake where the strawberry jam meets, and squeeze a circle on the top of the cake, so that the milk cap flows down naturally to form a beautiful icing. I personally tested that this operation can better control the shape than directly pouring the milk cap, you must try it!