Steemit Learning Club S23W1 - Building a Real-Time Accessibility Feedback App: Firebase Authentication and Firestore Database
Hello everyone!
I warmly welcome you to the first week of the Steemit Learning Challenge and especially I invite you in the Technology and Development Club where you can share and learn tech.
Today I will share a project with you on which I am working and I will develop it and will show you how you can develop the similar projects to solve the real world problems. It will serve for you as a guide that if you face the similar real world problems and you are finding a solution in the tech then you can take help from this project or you can ask for help where needed.
I am currently working on a Real-Time Accessibility Feedback application where the users can report their issues and the admins can track the issues and they can solve them and the users who have submitted their issues can simply track their reports. This application also includes other features such as language detection, translation to different languages and text to speech. It also includes many other features which play their role to assist the user.
But today We will explore the Firebase authentication of the login and sign up with two specific roles. These roles are:
- User/Student
- Admin
We will test the login and sign up and then we will learn and design the interface of the issue reporting screen.
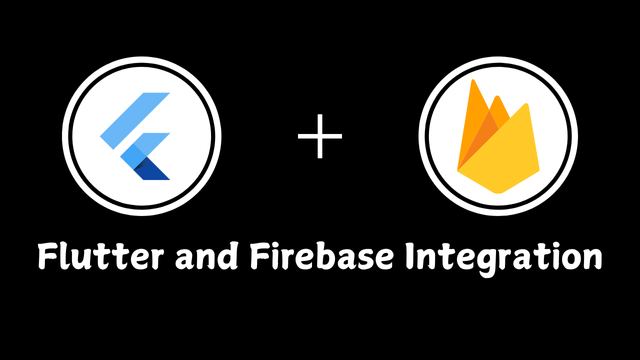
Firebase Integration
Firebase is a service offered by Goggle and it helps the developers to run their mobile and web applications. It allows them to use the services such as authentication, cloud storage, real-time database and more. But these are the services which are commonly used.
We need to integrate firebase with our project to use authentication service for the login and sign up purpose. Here is a complete guide to integrate firebase for your application by using the command line tools of firebase. I have already written this integration post to avoid a lot of mess in this single post.
Integrating Firebase CLI with Android Studio for Flutter Development

After the integration of the project with our working project in the editor the icon of the operating system will appear along with the package name. As I have enabled services for my android application that is the reason an Android icon is visible.

After the integration we need to enable the authentication feature of firebase in our linked project to the editor in my case I am using Android Studio. Click on the project and it will show a new screen where we can see different options to enable for the project. We need to choose Authentication to enable it and use the login and sign up functionality.

Selecting authentication will open this interface and here choose Get Started. It will take a few seconds to be ready.

There are many authentication options which we use and face in our daily life in almost all the websites and applications because today all the functional applications are coming with the login and sign up. I will use Email/Password authentication for my project.
All the users of the application will show under the Users section. We can reset the user, add a user, and delete a user from the authentication.

Now in order to store the data of the users such as their email and password to use it while login we have to setup the Firestore Database. It is very simple to setup firestore database. Click on the Build at the left side and from the drop down options select Firestore Database. After this click on the Create Database as shown in the screen.
Now we have set all for the login and sign up authentication and firestore databse for my application now let us move towards the code to implement the login and sign up and to store the data of the users in the firebase databse such as their email and password because these are the two important things which are used for the authentication.
Development of Login and Sign Up screens and Implementation of Authentication

In our application to use the firebase services we need to intialize the firebase. In the main.dart file I have written the initialization code as shown above in the picture. In the flutter framework we use the flutter widgets binding command and then we initialize the firebase using the asynchronous method.
And to this I have installed these packages from pub.dev firebase_core: ^3.10.1, cloud_firestore: ^5.6.2, and firebase_auth: ^5.4.1. Without importing these packages we cannot use firebase in our project which we are developing by using the flutter framework.
Sign Up Screen Development
In the sign up screen there is usually basic information to collect about the user for the usage in the application and for the distinction between the users. I am going to add these different fields to get the data of the user while signing up:
- First Name
- Second Name
- A drop down for the gender
- Male
- Female
- Other
- Password
- Phone (Optional)
- A drop down to select user role
- Admin
- Student
Then there some buttons:
- Next to go the next step
- Back to come back to the previous step
- Submit button to submit all the details
So let us start designing this screen with the required fields. I will also make it sure that all the fields should be checked if they are filled or empty if they are empty I will show the message to inform the user to enter the data in all the required fields.
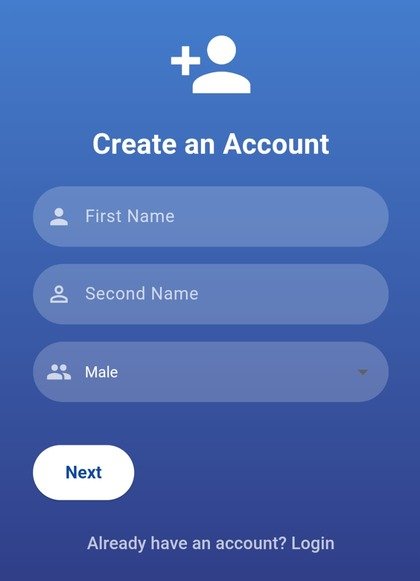
I have developed my sign up screen and it is looking like this. I have used gradient color for the beautiful background colour and then the transparent fields by using the opacity of the color.
There are a total of 7 fields for the user to sign up. And I have divided it into 3 steps for the sign up. After filling all the details the user can move towards the next step and the email entered in the field should also be correct. I have used obscureText property for the password so that others cannot see it while entering and it shows dots instead of the original password characters. At the end there is a link from where you can move from sign up screen to login screen.
Handling Sign Up Form Data with Firebase
It was all about the user interface of the sign up screen. Now let us talk about the firebase integration in this sign up form. Actually I will listen to the values entered in the input fields and then with the help of the controllers I will send these values to the firebase for the storage so that these values can be used in future for the authentication purpose to log in to the application.

Here you can see the FirebaseAuth.instance creates an instance of the for the firebase authentication for the registration or sign up of the user. And FirebaseFirestore.instance also creates an instance but for the firestore. This is the cloud database where the users data such as name, email, password, and gender information is stored.
Then there are the text editing controllers which are given below:
_firstNameControllerstores first name input._secondNameControllerstores second name input._emailControllerstores email address input._passwordControllerstores password input._phoneControllerstores phone number input.
These are the controllers which store and then send the data to the firebase.
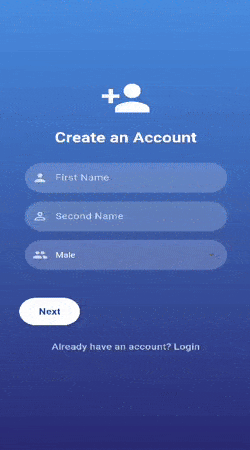
Here in this Gif you can see I have tested the sign up page. I have entered all the details step by step and I have chosen the role as an admin. After entering all the details I have clicked Submit button. There was a CircularProgressIndicator which displays until the data is submited and the user is registered.
You can observe if I click Next without giving details in the fields then it displays the error message to inform enter all the details to continue. When the registration is completed then the user is automatically redirected to the Admin Dashboard as I have logged in as an admin in the application.
In this way if we log in as the student then we will see the homepage.

Here you can in the authentication section of the Firebase the user has been added. It is showing the email as an identifier, date of creation and signed in. Each user has a specific id as shown above to make each user unique and distinct. And it is the id under which all the data of this user has been stored in the firestore database.

This is Firestore Database where we can see a document with the name users is created automatically which will store the data of all the users. This has stored all the data same as provided in the sign up form.
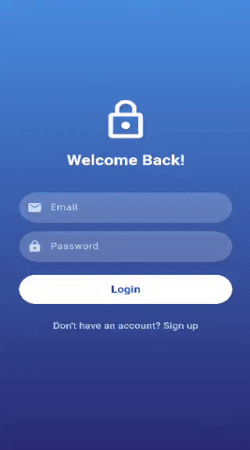
Log In Screen Development
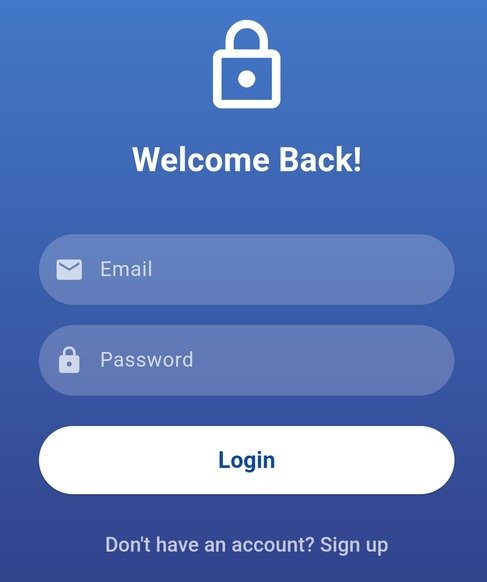
- Password
I have kept the layout design same for the beauty and design consistency of the application. There is a big icon at the top, and a login button. It also displays the text if the user has not any registered account then the user can register to use the application.
Login Authentication with Firebase

This is the complete logic to access the data of the user from the firebase and then matching it with the entered data and allowing access to the user if the credentials are correct. Then it checks whether the user is an admin or the student. If the user is an admin then it redirects the user towards the admin screen but on the other hand if the user is not the admin then it redirects the user towards the home screen. For this functionality it uses try-catch method. In the catch the errors are handled. If the entered credentials do not match with the saved data then it shows the error message while printing the reason.
Here you can see the log in screen. I have practically shown that how this log in screen will work and where it will send the user after the successful log in.
You can observe there are two fields for the log in. I have entered the email which is already registered in the system. I know the email and password as I have registered the user recently.
So I have entered the email of the admin and then I have entered the correct password. The system checked the entered credentials with the Firebase authentication and after verifying the credentials the log in is successful and this successful log in directed me to the Admin Dashboard screen because the credentials which I entered were for the log in has the admin role.

In the main.dart file from where the application starts I have added the code to check if the user is logged in or not and if the admin is logged in then it should directly display the admin screen and on the other hand if the student is logged in then it should show home screen. In exception if there is no any user who is logged in the application then it will display the log in screen.

I have added a splash_screen which displays each time the application is opened. This screen has the above logic which checks the authentication by using the Firebase Authentication data. On the basis of the response received it sends the user to the respective screen. If there is no any user then it redirect the user to the log in screen and if there is a logged in user then it shows the home screen.
Now as I have logged in as an admin and if I open the application after exiting it then it will check the authentication and then it will display the admin dashboard directly.
I am working on this project and It will have a lot of more features but for this week I have shared the login and sign up screens with their user interface as well as with the Firebase Authentication and Firestore Database.
GitHub Repository
In this GitHub repository I have shared login_screen.dart, signup_screen.dart, and splash_screen.dart for the learning purpose only and as I will progress I will share the other files as well.
What I have learnt
I have learnt these things while working on the project:
Firebase authentication and Firestore integration
Handling user inputs and validation
State management in Flutter while managing the user session and controlling the user inputs through controllers.
Enhanced user experience and UI design with the implementation of the multi-step sign up process. The use of the gradient in the layout to make it look more attractive.
Error handling and debugging. I managed the error handling of the duplicate accounts, invalid credentials and empty fields.
What can you share in the club?
Our club is all about technology and development including:
- Web & Mobile Development
- AI & Machine Learning
- DevOps & Cloud Technologies
- Blockchain & Decentralized Applications
- Open-source Contributions
- Graphic Design & UI/UX
Any posts related to technology, reviews, information, tips, and practical experience must include original pictures, real-life reviews of the product, the changes it has brought to you, and a demonstration of practical experience
The club is open to everyone. Even if you're not interested in development, you can still share ideas for projects, and maybe someone will take the initiative to work on them and collaborate with you. Don’t worry if you don’t have much IT knowledge , just share your great ideas with us and provide feedback on the development projects. For example, if I create an extension, you can give your feedback as a user, test the specific project, and that will make you an important part of our club. We encourage people to talk and share posts and ideas related to Steemit.
For more information about the #techclub you can go through A New Era of Learning on Steemit: Join the Technology and Development Club. It has all the details about posting in the #techclub and if you have any doubts or needs clarification you can ask.
Our Club Rules
To ensure a fair and valuable experience, we have a few rules:
- No AI generated content. We want real human creativity and effort.
- Respect each other. This is a learning and collaborative space.
- No simple open source projects. If you submit an open source project, ensure you add significant modifications or improvements and share the source of the open source.
- Project code must be hosted in a Git repository (GitHub/GitLab preferred). If privacy is a concern, provide limited access to our mentors.
- Any post in our club that is published with the main tag #techclub please mention the mentors @kafio @mohammadfaisal @alejos7ven
- Use the tag #techclub, #techclub-s23w1, #country, other specific tags relevant to your post.
- In this first week's #techclub you can participate from Monday, February 17, 2025, 00:00 UTC to Sunday, February 23, 2025, 23:59 UTC.
- Post the link to your entry in the comments section of this contest post. (Must)
- Invite at least 3 friends to participate.
- Try to leave valuable feedback on other people's entries.
- Share your post on Twitter and drop the link as a comment on your post.
Each post will be reviewed according to the working schedule as a major review which will have all the information about the post such as AI, Plagiarism, Creativity, Originality and suggestions for the improvements.
Other team members will also try to provide their suggestions just like a simple user but the major review will be one which will have all the details.
Rewards System
Sc01 and Sc02 will be visiting the posts of the users and participating teaching teams and learning clubs and upvoting outstanding content. Upvote is not guaranteed for all articles. Kindly take note.
Each week we will select Top 4 posts which has outperformed from others while maintaining the quality of their entry, interaction with other users, unique ideas, and creativity. These top 4 posts will receive additional winning rewards from SC01/SC02.
Note: If we find any valuable and outstanding comment than the post then we can select that comment as well instead of the post.
Technology and Development Club Team


https://x.com/stylishtiger3/status/1890988941584515163
Hello plx can we work together
My link
https://steemit.com/techclub/@josepha/steemit-learning-clubs-an-idea-for-multi-vendor-e-commerce-platform
My Participation,
https://steemit.com/clubtech-s23w1/@faran-nabeel/steemit-learning-club-s23w1-building-a-tradingboard-web-to-checking-the-balances-of-bitget-accounts-with-bitget-apis-keys
This is my entry link:
https://steemit.com/hive-170554/@mahadisalim/charts-created-with-microsoft-excel
This is my entry link :
https://steemit.com/hive-170554/@mahadisalim/steemit-learning-club-s23w1-i-will-create-a-mini-project-with-a-c-program-to-convert-currency-temperature-and-measure
Here is my entry:
https://steemit.com/techclub/@ahsansharif/mini-project-implementing-a-search-engine-with-c-plus-plus
This is My entry link:-
https://steemit.com/hive-153970/@mdpolasmia/steemit-learning-club-s23w1-create-basic-salary-sheet-with-microsoft-excel
My Entry link:
https://steemit.com/steem-for-bangladesh/@azit1980/steemit-learning-club-s23w1-special-business-flyer-design