Steps to configure a Wireless Router
At present we have security tools, standard or protocol in encryption systems to protect our data from attacks from users outside our network, as well as security mechanisms to avoid using our link without consent.
WEP (Wired Equivalent Privacy): was the first security standard for Wi-fi networks and in most of the router is selected by default. Its protection is too weak because it can be easily compromised using the appropriate tools, for example Packet sniffers or packet analyzer and the WEP Crackers. In many cases due to lack of knowledge or error, we define WEP as Wireless Encryption Protocol and we think it is the most convenient way to protect our network, but it is not. The WEP system was introduced in 1999, to provide security and confidentiality similar to that of a wired network
WPA (Wi-Fi Protected Access): WPA or Wi-Fi Protected Access, arises from the need to correct the vulnerability of the WEP protocol and was born with the philosophy of user authentication through the use of a server to store the credentials and passwords of the users that use a network. WPA allows authentication through the use of a shared key defined by the router administrator and used by users or equipment and the access point (router), so that all users or computers on the network must enter the same password to authenticate, as used in the WPA-PSK version. WPA uses the TKIP (Temporal Key Integrity Protocol) encryption system. "Temporal Key Integrity Protocol." It was an encryption protocol introduced with WPA to replace the WEP encryption, TKIP is actually very similar to WEP encryption only that has improvements in key construction.
WPA2 (Wi-Fi Protected Access 2 - Wi-Fi Protected Access 2): This standard was approved in 2004 and was created to correct the deficiencies of the 802.11i system (Standard that specifies security mechanisms for wireless networks of IEEE) used with WPA, since it does not include all the features of the IEEE 802.11i, while WPA2 can be said to be the certified version of the 802.11i standard.
WPA2 is compatible with WPA, which means that in your Wi-Fi network you can use computers or any device that supports one or the other system. However, WPA2 is not compatible with WEP systems. You will not be able to connect in the same Wi-Fi network devices that only support WEP with others valid for WPA2. We look for this in the technical specifications of the router or connection device.
WPA2-PSK-AES: AES is synonymous with "Advanced Encryption Standard." Safer encryption system, because it uses a block encryption scheme which makes WPA2 more robust and secure. This encryption standard is widely used today and comes in most devices so we must select it when configuring the equipment.
Steps to configure a Wireless Router:
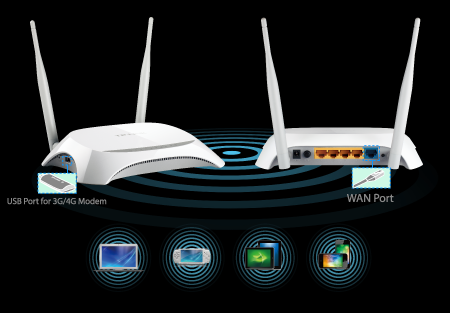
To show how to configure a router we will use my model TP-LINK MR3420, therefore the source of all the images are capture of the installation.
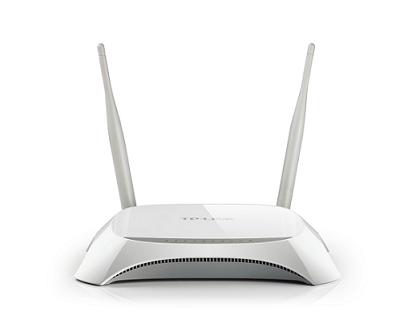 |
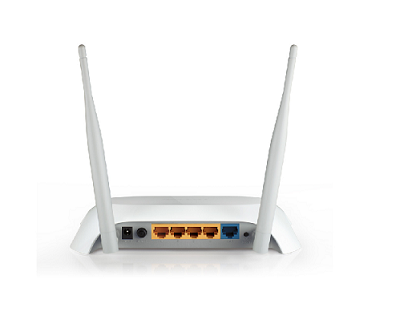 |
1. Connect a laptop or desktop, from now on (PC) on any of the network ports (yellow RJ45).
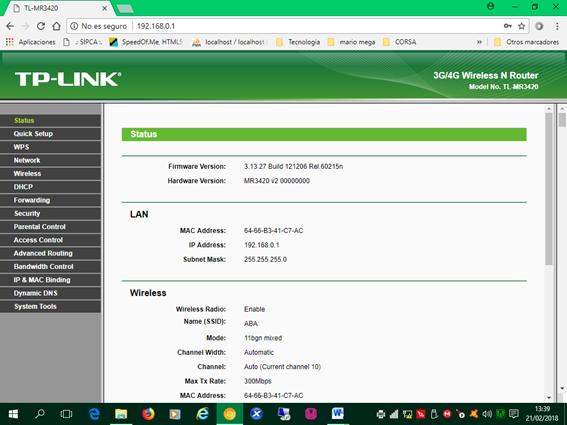
2. Access the configuration using the web browser and entering the IP address of the router in this case 192.168.0.1 in the address bar. This information appears on a label on the computer base together with the user and the authentication key.
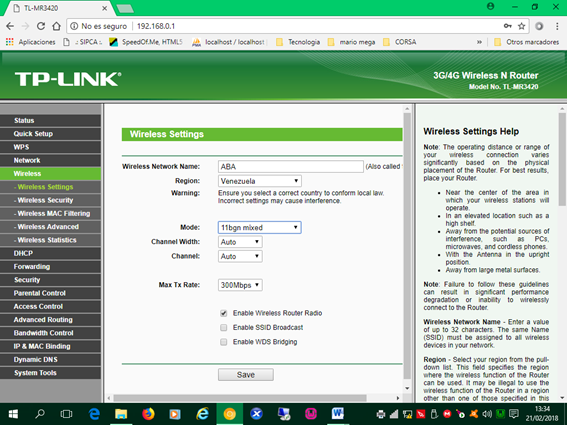
3. Enter the username and password on the login page, in this case username and password by default are admin, admin. When validating the information a series of options will appear as the image shows.
4. Define the name of our network (ABA), the region (Venezuela), the mode or network type IEEE 802. (11 bgn mixed) and the transmission hairs (automatic)
Important parameters:
The transmission speed (Max Tx Rate field): this device supports speeds of up to 300 Mega Bit / seconds (300 Mbps). This parameter is related to Mode 11n (IEEE 802.11n) that supports a maximum theoretical speed of 600 Mbps.
Enabled Wireless Router Radio: selecting this checkbox enables the wireless function of the router (broadcast broadcast).
Enabled SSID broadcast: We can show or not the name of the network to the users with this parameter. In my case I do not select it, that is, the hidden one and I force it to configure it manually. This as a security measure.
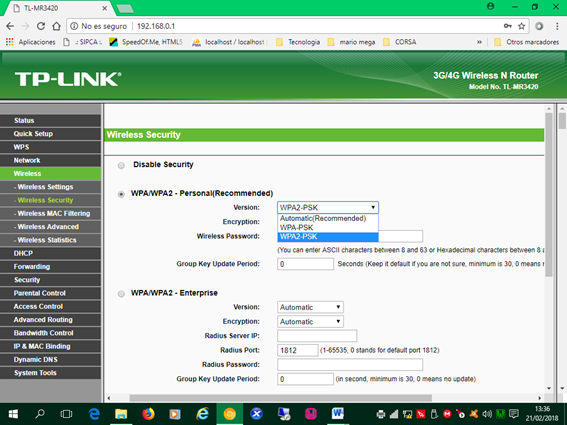
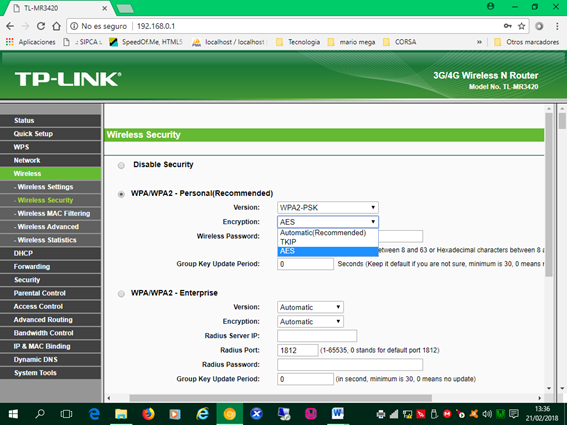
5. We select the security mode of encryption or data encryption: as we already know there are WEP, WPA-PSK-TKIP and WPA2-PSK-AES. The safest to protect our network are WPA2 and AES, if our equipment is not new select at least WPA and TKIP.
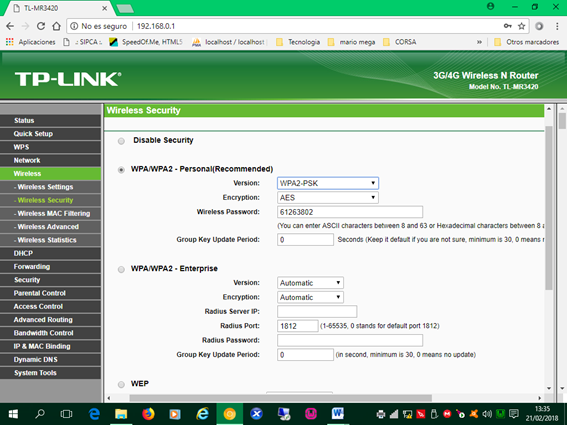
Our device supports the WPA-PSK and WPA2-PSK versions and for the TKIP and AES encryption, we select of course WPA2-PSK and AES as the image shows:
Select WPA2-PSK
Select AES
Finally we put the password or password of the Wi-fi network in the text box Wireless Password value for my network 61263802 and finally we have configured the wireless network.
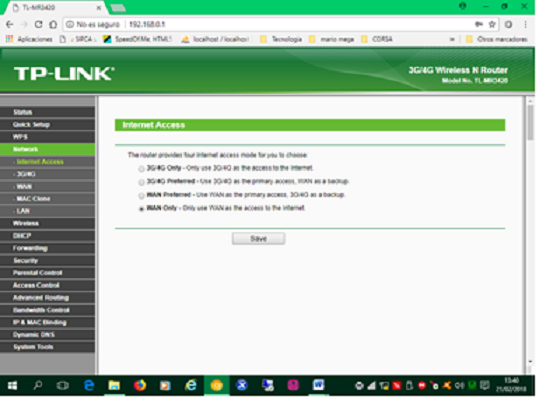
6. In this step we must configure the network of work, that is to say, configure the Access to the Internet network (link of the ISP: Internet service provider). To configure access we must select the type of technology offered by the Internet service provider, there is basically the 3G / 4G mobile broadband connection and the wired broadband connection by pair or telephone line, in this case is done by telephone pair , therefore we select the option WAN Only.
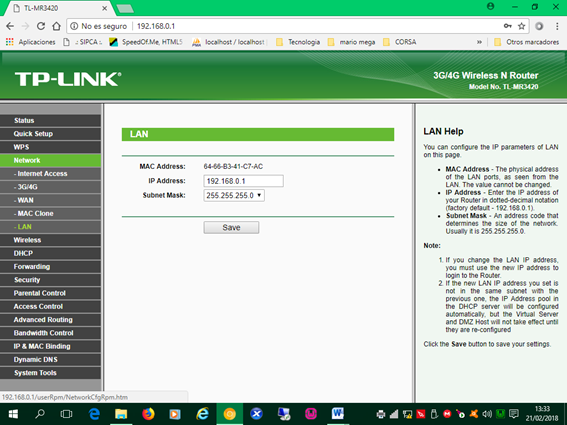
7. Configure the LAN network: The network address is defined by an IP or four numbers between 0 and 255 separated by point (.) By default it is already defined and is usually 192.168.0.1/24, ie a network mask 255.255.255.0, which indicates that we can connect up to 254 computers, of course the connections that the router handles are limited.
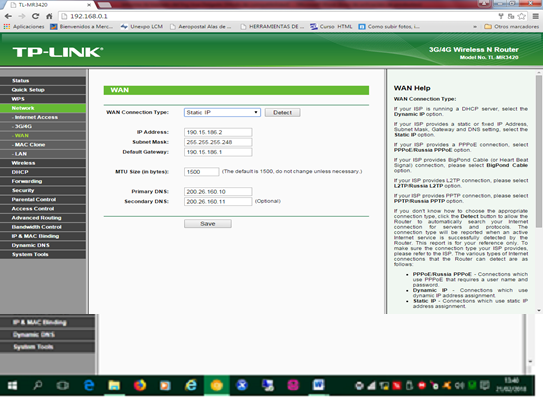
8. Configure the WAN network: the most common WAN configurations are Dynamic IP Address, if the IP is provided by your ISP in a dynamic way, that is, it changes every so often, Static IP Address, if your ISP provided one or more IP valid or public and finally Bridges mode if your ISP uses this mode. The most complex is the static mode since you must know the IP addresses of the Gateway and the domain server of the link provider. These parameters are necessary to use the internet.
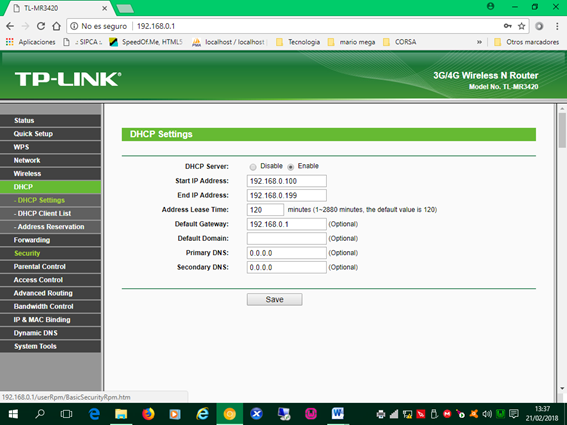
9. Finally we review the DHCP configuration, dynamic IP allocation that represents the IP range that will be distributed to the clients or users of the network. These values are already defined by the manufacturer and we can change it if required. Depending on the configuration, the equipment when connecting to the network acquires IP from 192.168.0.100
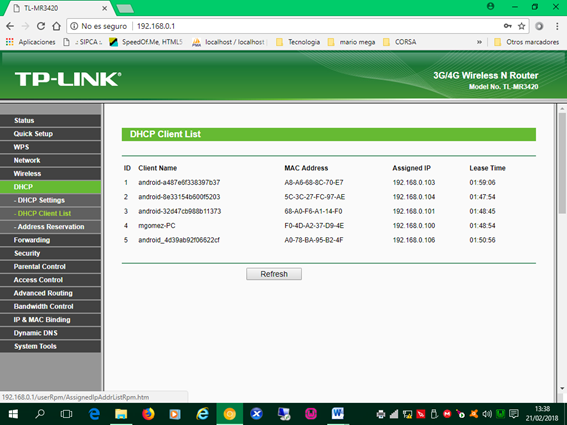
10. In the DHCP Client List option we can see the computers that are connected, as the image shows. Here we can monitor if the connected equipment is known. We can document them by the name of the client and the MAC (Media Access Control) address or physical address of the device or device.
To conclude this publication, we must take into account that there are different models and different manufacturers of routers, so each one offers a different web configuration interface (some similar) but in the end all these devices have the same programming: Network Wireless, Network LAN, WAN network.
Hola @mgomez, upv0t3
Este es un servicio gratuito para nuevos usuarios de steemit, para apoyarlos y motivarlos a seguir generando contenido de valor para la comunidad.
<3 Este es un corazón, o un helado, tu eliges .
: )
N0. R4ND0M:
8393 9970 9674 4145
5037 6716 2927 4511
2613 5485 3216 3298
9415 6651 4050 6390
Congratulations @mgomez! You received a personal award!
Click here to view your Board
Do not miss the last post from @steemitboard:
Congratulations @mgomez! You received a personal award!
You can view your badges on your Steem Board and compare to others on the Steem Ranking
Vote for @Steemitboard as a witness to get one more award and increased upvotes!