How to Create a Smart Contract on Binance Smart Chain (BSC)
Smart contracts are the backbone of decentralized applications (dApps), enabling trustless automation on the blockchain. If you're looking to deploy your own smart contract on Binance Smart Chain (BSC)—whether for tokens, DeFi protocols, or NFTs—this guide will walk you through the process step by step.
Let’s break it down.
Why Build on Binance Smart Chain?
BSC is a popular choice for developers because:
✅ Low transaction fees (compared to Ethereum)
✅ High-speed transactions (3-second block time)
✅ EVM-compatible (works with Ethereum tools like MetaMask & Remix)
Now, let’s get into the steps.
Step 1: Set Up Your Development Environment
Before writing code, you’ll need:
- MetaMask (configured for BSC) – Add BSC Network
- Node.js & npm/yarn (for running scripts)
- A code editor (VS Code recommended)
- Testnet BNB(for deploying) – Get some from the BSC Faucet
Step 2: Write Your Smart Contract
For this example, we’ll create a simple BEP-20 token using OpenZeppelin, a secure smart contract library.
Install Hardhat (for local testing & deployment)
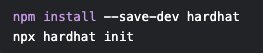
Install OpenZeppelin Contracts

Example: Basic BEP-20 Token Contract

(Source: OpenZeppelin Forum)
Step 3: Deploy to BSC Testnet
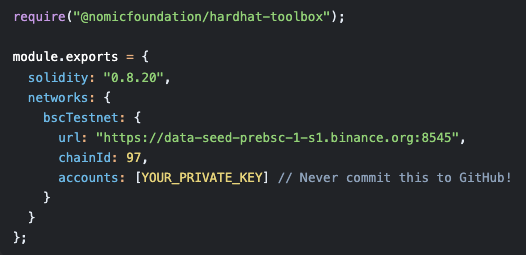
Configure Hardhat for BSC
Edit hardhat.config.js:
Write a Deployment Script
Create scripts/deploy.js:

Run the Deployment

If successful, you’ll see your contract address in the console.
(For troubleshooting, check the OpenZeppelin BSC Deployment Guide)


Step 4: Verify & Interact with Your Contract
Verify on BscScan: Use BscScan’s verification tool to publish your contract source.
Test in a dApp: Connect to it via MetaMask and Web3.js/Ethers.js.
Deploying a smart contract on BSC is straightforward if you follow these steps. The key takeaways:
✔ Use OpenZeppelin for secure, audited contracts
✔ Test thoroughly on BSC Testnet before going live
✔ Always keep your private keys secure
Now that you’ve deployed your first contract—what will you build next? A DeFi protocol? An NFT marketplace? The possibilities are endless in Web3.
Need Help?
If you run into issues, check out: