Turn a Raspberry Pi into a 2TB Shared Hard Drive for Home
“Create a 2TB Network Drive with Raspberry Pi for Your Family”“Raspberry Pi + WD Hard Drive: Easy Network Storage for Kids’ Macs”
“Family File Sharing Made Easy: DIY Raspberry Pi Network Drive”
“Turn a Raspberry Pi into a 2TB Shared Hard Drive for Home”
“Save Space on Your Kids’ Macs with a Raspberry Pi Network Drive”
A couple of years ago, I bought a MacBook Pro for each of my two kids. My younger son’s laptop cost around $600 at the time and had only a 256GB SSD, so the storage often filled up. He constantly had to delete downloaded files and DMG installers. After using it for a while, the MBP’s ~/Caches directory also grew very large. Although you can temporarily clean it, it’s only a temporary fix.
I told my kids that they could move some files to cloud storage, like OneDrive or Google Drive, or I could connect a USB hard drive to their computers. OneDrive has a “files on-demand” mode where data is stored in the cloud without taking local space, which saves a lot of space, but the free storage is only 5GB. Google Drive offers 15GB of free storage shared across Gmail, Photos, and Drive.
My kids didn’t really like using a USB hard drive. First, it requires a power connection, and second, it needs a Type-C to USB adapter, which is inconvenient. They didn’t want to keep it plugged in all the time.
Then I thought of the Raspberry Pi at home. I could connect a portable hard drive to it and use file sharing to make all our home computers access it as a network drive (Map Network Drive). So, I dug through some drawers and found a 2TB Western Digital (WD) 3.5-inch hard drive, which requires an external enclosure. Conveniently, I had bought a hard drive enclosure a few months ago while tinkering with data.
Previously, this hard drive had been used as the D drive on an HP Z800 server.
The West Data Hard Drive that is used to install on the HPZ800 which takes at most 4 hard drives

Adding a Network Drive: Mounting the Portable Hard Drive via SAMBA on Raspberry Pi
To make sure the hard drive had no bad sectors, I checked it with CrystalDiskInfo and also had ChatGPT review its health status — 2.3 years of power-on time, no bad sectors, everything is fine.
The CrystalDiskInfo shows that the Drive is still healthy.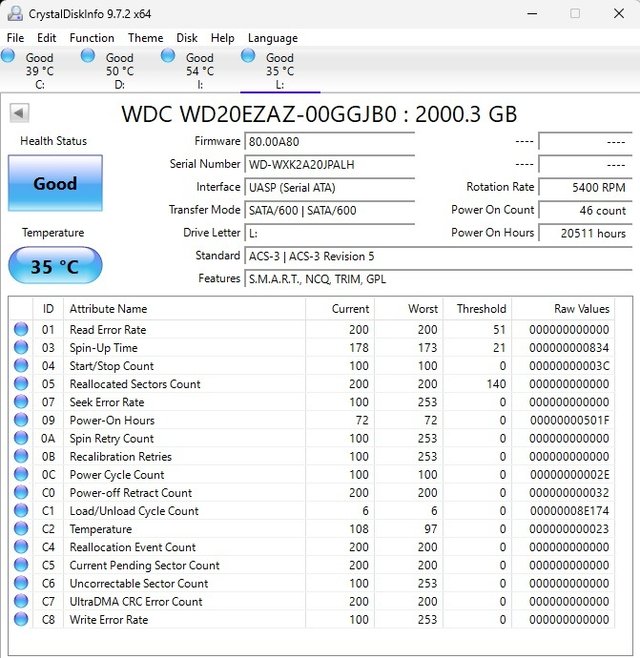
Preparing to Mount the Hard Drive
The first step is to connect the hard drive to the Raspberry Pi via USB. It requires an external power supply. I found a socket that could barely fit two plugs in the small shoe cabinet: one for the 3.5-inch hard drive enclosure and the Raspberry Pi 4B.
The df confirms the USB hard drive has been connected and allocated/mounted.

Then I SSH into the Raspberry Pi and found the hard drive is formatted as NTFS, so it needs to be mounted:
mkdir /mnt/usb
mount -t ntfs-3g /dev/sdb1 /mnt/usb
Here, /mnt/usb is the target mount directory and needs to be created first.
If you want it to auto-mount on boot, just add a line to /etc/fstab:
UUID=<ID> /mnt/usb ntfs-3g defaults,uid=1000,gid=1000,umask=0000,nofail,x-systemd.device-timeout=10 0 0
<ID> is the hard drive’s UUID, which you can find with lsblk -f.
SAMBA Network Drive
The easiest way to share files is to install Samba:
sudo apt install -y samba
After installation, edit /etc/samba/smb.conf and add:
[usb2share]
   path = /mnt/usb
   browseable = yes
   writable = yes
   guest ok = no
   create mask = 0777
   directory mask = 0777
   valid users = pi
Note: valid users can list multiple users separated by spaces or use @ for a group. The user must exist on the Linux system.
Set the SMB password:
sudo smbpasswd -a pi
Restart the Samba service:
sudo systemctl restart smbd
Map the Network Drive
On Windows, right-click “This PC” → “Map network drive” and enter the address:
\\192.168.IP_ADDRESS\usb2share
Enter the username and password, check “Remember my credentials,” and the network drive behaves like a local drive.
On a Mac, open Finder, press Command + K, add the server, and enter the IP Address of the Raspberry Pi, username, and password.
I created a folder for each of my two kids and my wife, so they can put their data in their own directories. The 2TB drive should last a while.
With this network drive, sharing data (movies, photos, etc.) is much easier. No more using WeChat, WhatsApp, or Google Drive — those are inconvenient for finding old files, and photos usually get compressed.
It’s great — the Raspberry Pi now has another use and is no longer just gathering dust.
I could still put another Raspberry Pi Server or another Hard Disk in there.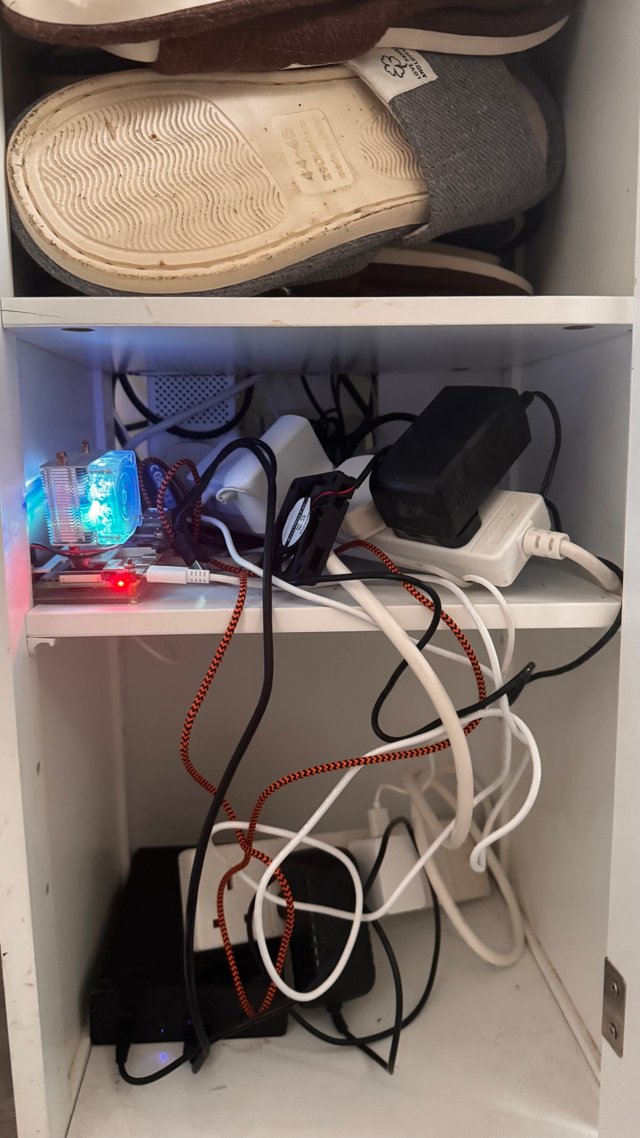
Map Network Drive to Z - the drive letters usually are backwards from Z to A.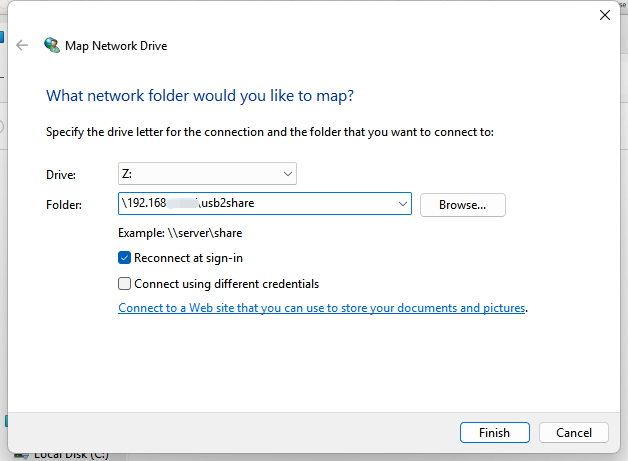
You can view the property of the network drive: used and remaining space.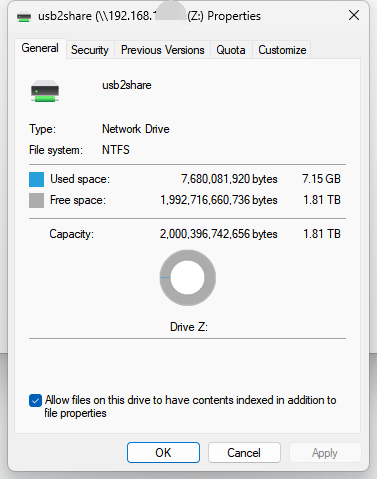
The mapped network drives become one of the system resources. It is just like a local drive.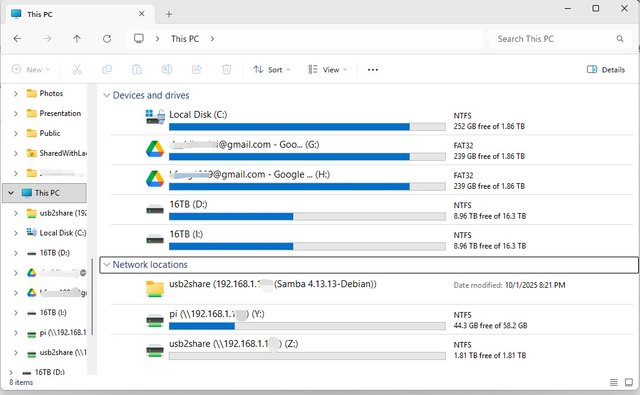
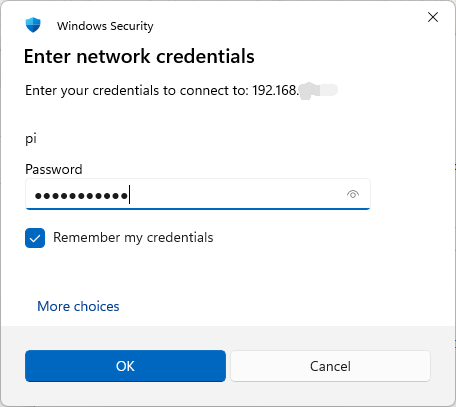
Enter Network Credentials to access the network drive.
I found a nice place to host the USB external 3.5 hard drive in the shoe closet.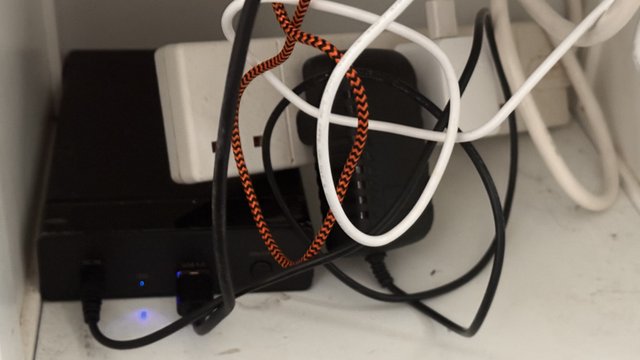
See Also: Found a 2TB Old Hard Drive - Still Young and Healthy
Raspberry Pi
- Turn Your Raspberry Pi into a Family Network Drive: 2TB WD Hard Drive Setup for Kids' Macs
- The Latest Raspberry PI 5 Comes with Up to 16GB of RAM, but It's a Bit Pricey
- Turning a Dusty Raspberry PI into a Home Server for Blockchain Monitoring
- Visiting The Raspberry Shop in Cambridge UK
- Overclocking ARM CPU of Raspberry PI 4 and 400 with Temperature Cooling Measures
- BASH Script to Monitor the CPU Frequency and Temperature on Raspberry PI
- All-In-One Raspberry PI 400 Kit - Personal Computer Kit with Raspbian OS
- How to Monitor the CPU Temperature of Raspberry PI using Python Script?
- Use PHP Script to Monitor Temperature and Uptime for Raspberry PI in the Browser
- Review: Raspberry PI B Plus Model
- Different Approaches to Reduce the CPU Temperature of Raspberry PI
- Test SD Card Speed on Raspberry PI
- Remote Desktop Connection for Raspberry PI (xrdp)
- Using a external USB cooler fan to drop temperature of Raspberry PI (Model B) from 51 degrees downto 40 degrees for just ten minutes
- How to Get the CPU Temperature on Raspberry PI using BASH Script?
- Apache Server (PHP + MySQL) on Raspberry PI

Steem to the Moon🚀!
- You can rent Steem Power via rentsp!
- You can swap the TRON:TRX/USDT/USDD to STEEM via tron2steem!
- You can swap the STEEM/SBD to SUI via steem2sui!
- You can swap the STEEM/SBD to SOL Solana via steem2sol!
- You can swap the STEEM/SBD to ETH Ethereum via steem2eth!
- You can swap the STEEM/SBD to Tether USDT (TRC-20) via steem2usdt!
- You can swap the STEEM/SBD to TRX (TRON) via steem2trx!
- You can swap the STEEM/SBD to BTS (BitShares) via steem2bts!
- Register a free STEEM account at SteemYY!
- Steem Block Explorer
- ChatGPT/Steem Integration: You can type !ask command to invoke ChatGPT
- Steem Witness Table and API
- Other Steem Tools

Support me, thank you!
Why you should vote me? My contributions
Please vote me as a witness or set me as a proxy via https://steemitwallet.com/~witnesses

@justyy, this is brilliant! I love seeing practical, real-world applications of tech, especially when it solves a common problem like limited storage. Turning a Raspberry Pi into a network drive for your family is genius. The detailed steps, from prepping the hard drive to configuring Samba, make this a super accessible guide. The screenshots are also a great touch!
This post is more than just a tutorial; it's a testament to resourcefulness. I can't wait to try this out myself. Thanks for sharing such a valuable and well-explained project! Anyone else thinking of giving their Raspberry Pi a new purpose? Let's discuss the possibilities in the comments!