Giving New Life to Old Things
It started just like all of my previous furniture projects. With a problem/need and a vision of how I wanted to solve it. We had just moved and our new rental home did not have a plethora of kitchen cabinets so a pantry for dry food storage was a problem I needed to solve. Of course, the plastic shelving we got from Costco did a perfectly fine job but I wanted something visually appealing since its home was in our dining room and I had worked so hard on the other wood pieces that lived there. I couldn’t be having this plastic shelving unit cramping the style of my dining room set comprised of hodge podge pieces I spent a gazillion years sanding and staining our favorite Minwax Espresso color. The vision was a hutch. Not just any hutch, but the perfect hutch. Not too ornate and not too rustic and definitely not pricey… but just right. I spent a few months keeping my eye on my local craigslist until one day, the hutch that was the mate to my soul’s vision appeared with a wonderful $30 price tag. I rushed over to pick it up and the gentleman told me a story that made me fall even more in love with the piece. His grandfather had built it by hand sometime around the 50’s. Once I got it home and began working on the piece, I saw all the telltale signs of a hobby craftsman. I came across some novice type fumbles and the “well this’ll hafta do” fixes. I was smitten! I began deconstructing and knew some of the shelves on the top and bottom halves had to go.
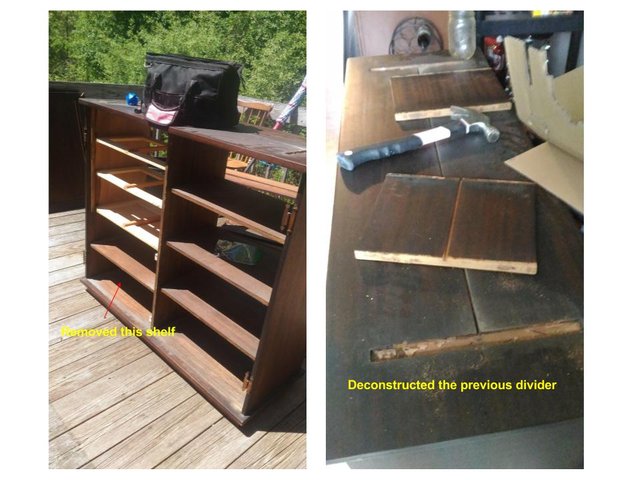
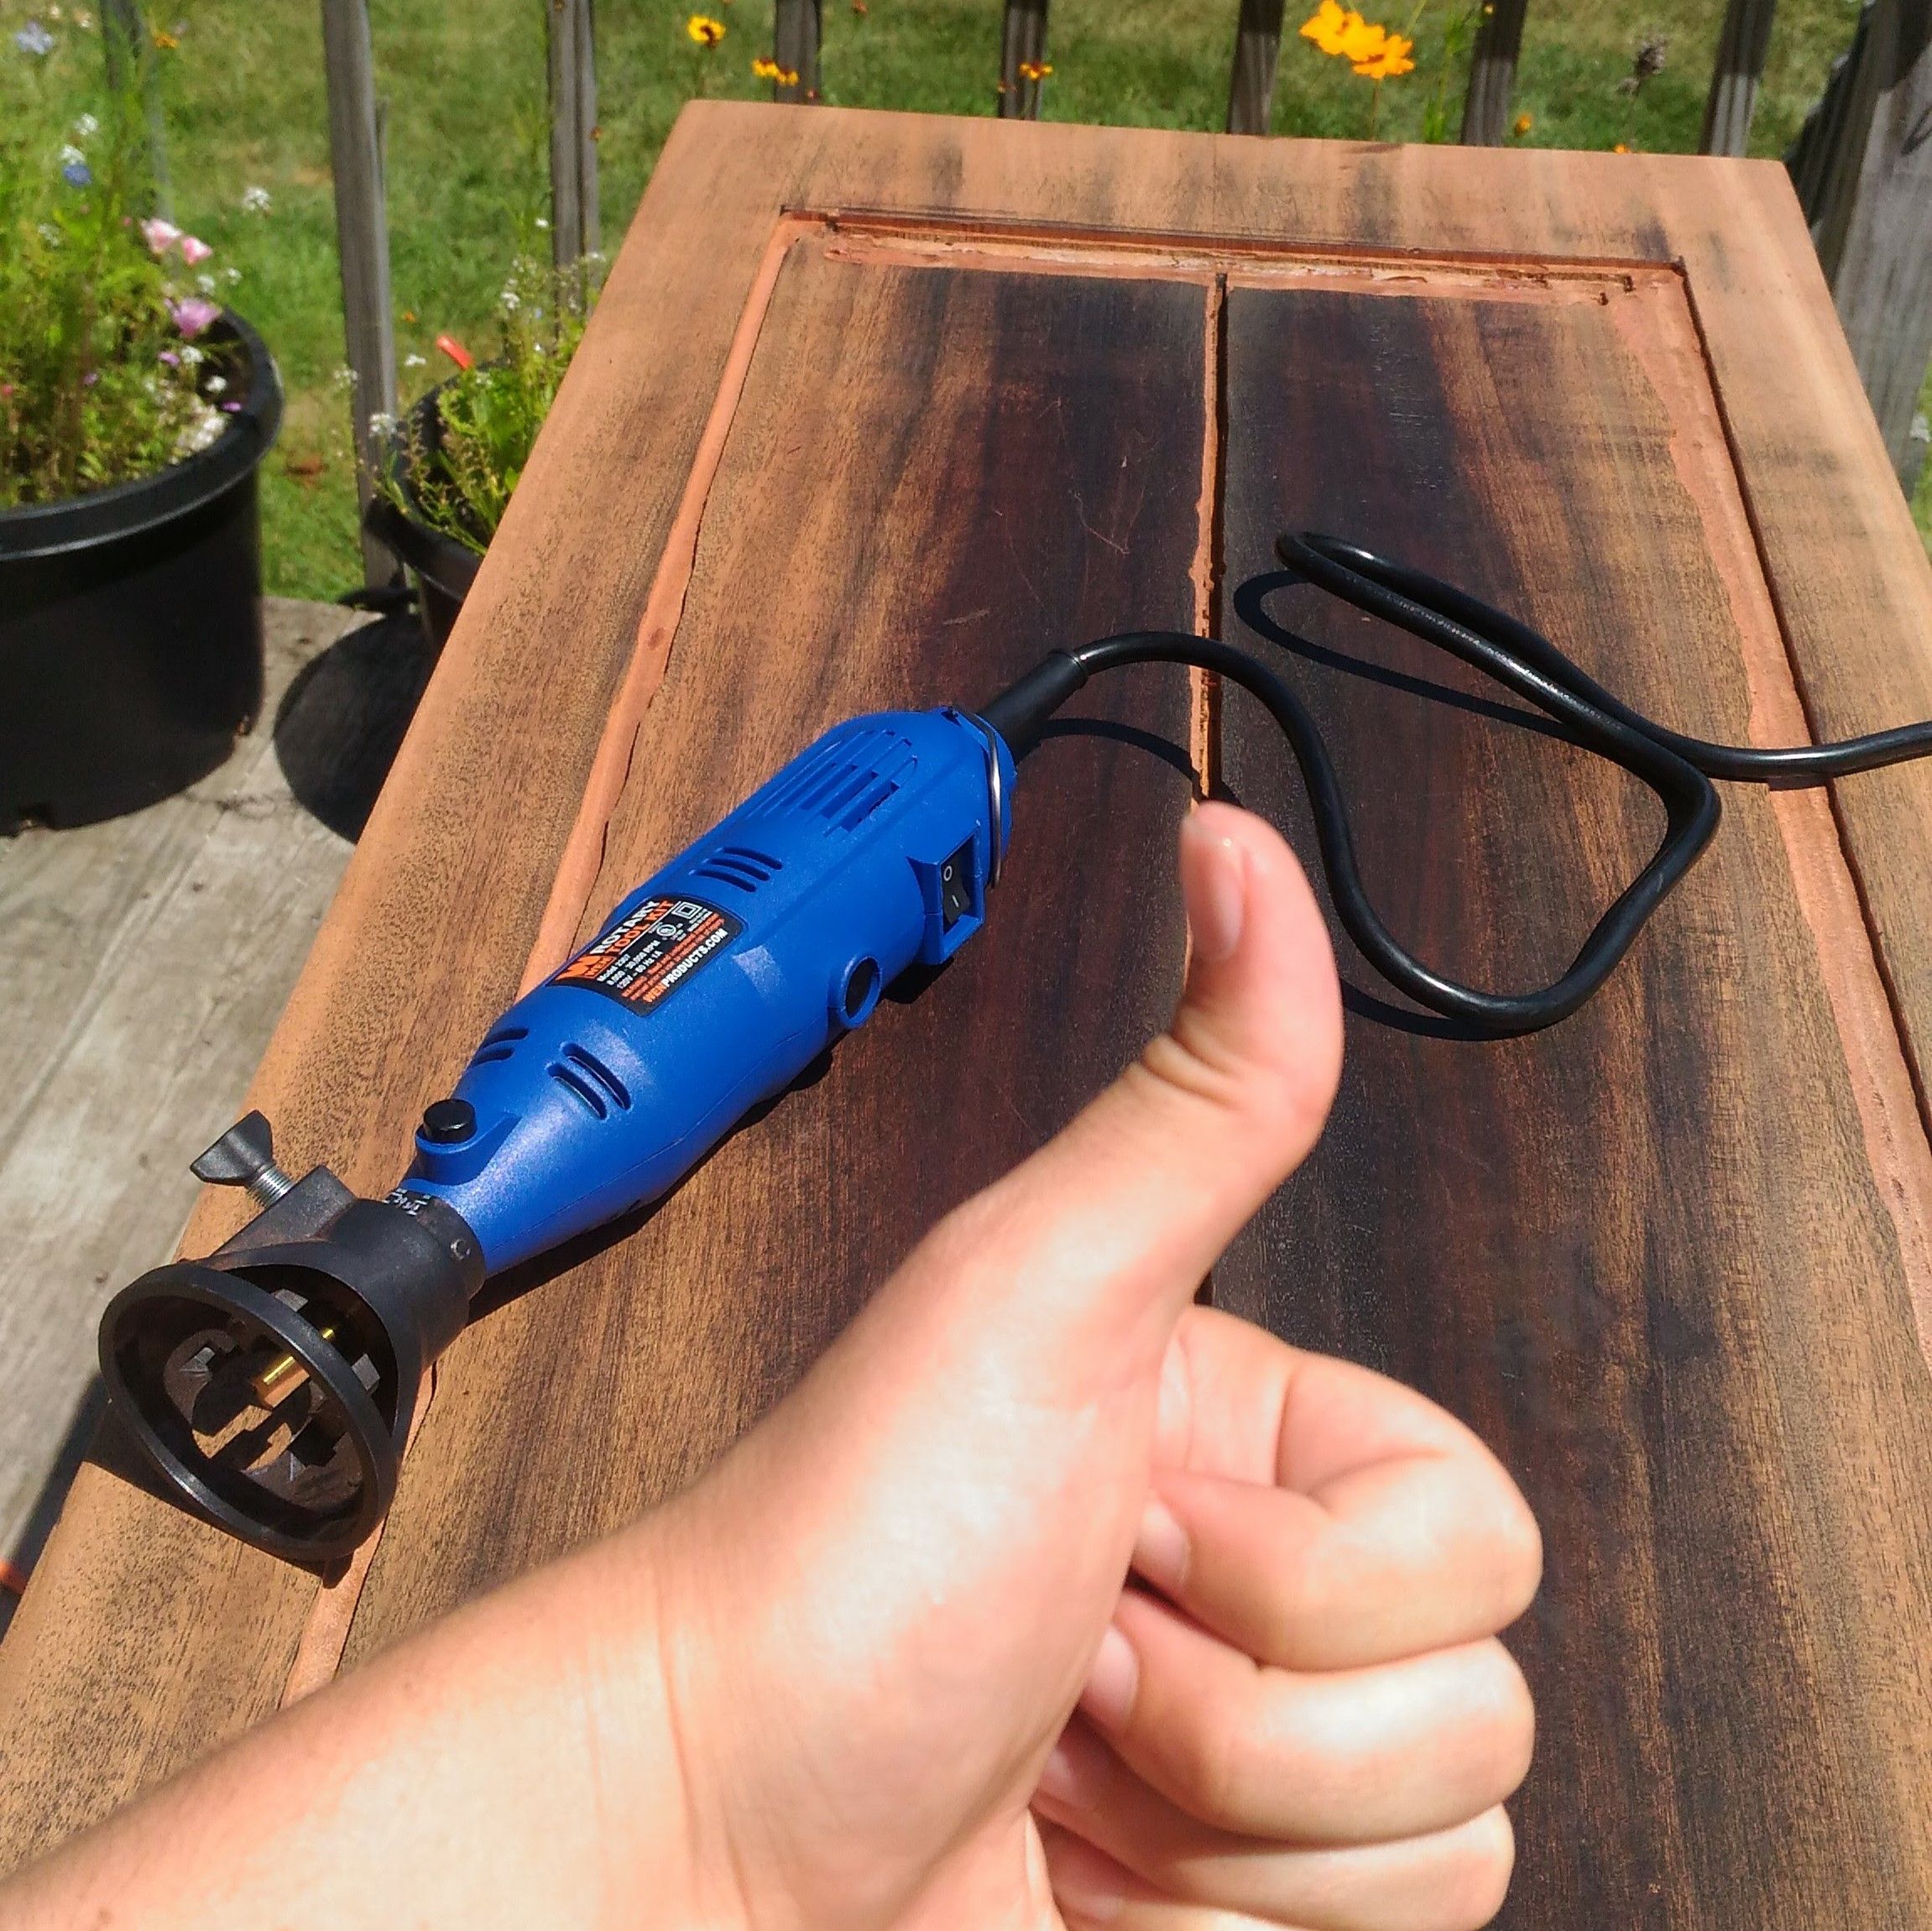
Already knowing what was going to be housed there, I knew I needed a bit more height on some of the shelves. Once that part was done, I had to figure out how I wanted to handle the situation with the top part of the bottom half. The original maker had routered out slots for his divider section but my vision was clear and it had black, industrial style pipes as the divider. My solution was to router out the entire square and inset something into the hollowed out space. I began the routering process and knew I’d figure out what was being placed in that space later. The only tool I had to router was a multipurpose dremel and I ordered some router bits made for dremels. After a few passes into the hardwood, the motor blew on the tool. My lover was kind enough to order me a new dremel style tool, but off brand this time. He’s beginning to see a pattern of dead motors on his tools once they enter my hands. I’m not going to disclose the number of his tools that have been laid to rest in the tool graveyard, but I’ll just say, this was not the first time. When the new dremel style tool began making the same tired sound, I stopped before it died too. Had to figure out another way to remove all of the material. Luckily, the dremels lasted long enough for me to get a nice crisp straight border.
The solution I came up with, when an adultier adult was not around to tell me how unsafe I was being, was to use my circular saw. I set the depth of the blade to my desired depth and went to town in the middle of my rectangle. When I felt like I had removed all I could with the saw before royally f-ing everything up, I finished up the material removal with the handy dandy chisel and hammer method. I don't have any pictures of that whole part of the process because once I have reached that level of frustration, all I want to do is get it DONE!
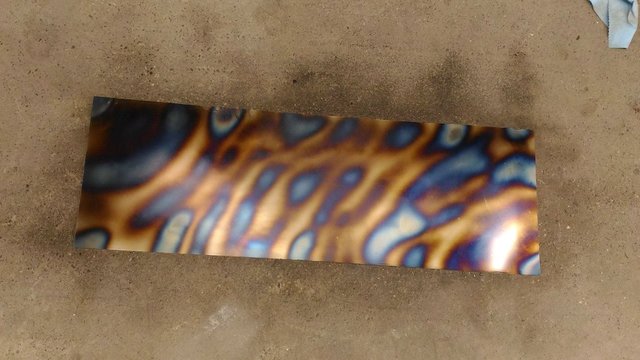
The hard part was over I thought, but nope, in true Betsy fashion, my visions get me into a whole heap of trouble. I had been tossing around the idea of getting some super cool tile to put inside the inset area but was determined for it to have a rainbow iridescent look. I searched high and low and never came across the perfect tile, especially for the crazy price they were wanting for the “well I guess that could kinda work” options. So back to the drawing board. The new plan happened when I was browsing YouTube and came across a woman that welds (instant girl crush moment). She was showing how she uses a torch to color sheet metal. For the price and the way the colors came out, I was sold. This was my solution. So I set out to get me a piece of metal. I cut it to the right size and had a nice piece left over to practice torching to see what motions and amount of time torching would give me the effect I was going for. Once I felt comfortable, I tackled the actual piece that was going in the inset area. I loved it! Once I felt it was perfect, I gave it a good spray of clear coat. I did, however, find out that when heating the sheet metal to that hot of a temperature, it will make it warp, so my flat sheet was no longer flat. Once again, another problem to solve…(doh!).
I figured out the solution was to add an extra step than originally planned. I poured a thin layer of epoxy in the inset and then placed the metal on top of that. I used a multitude of objects and clamps in the garage to evenly clamp the metal down and I left it to cure for a little over a week.
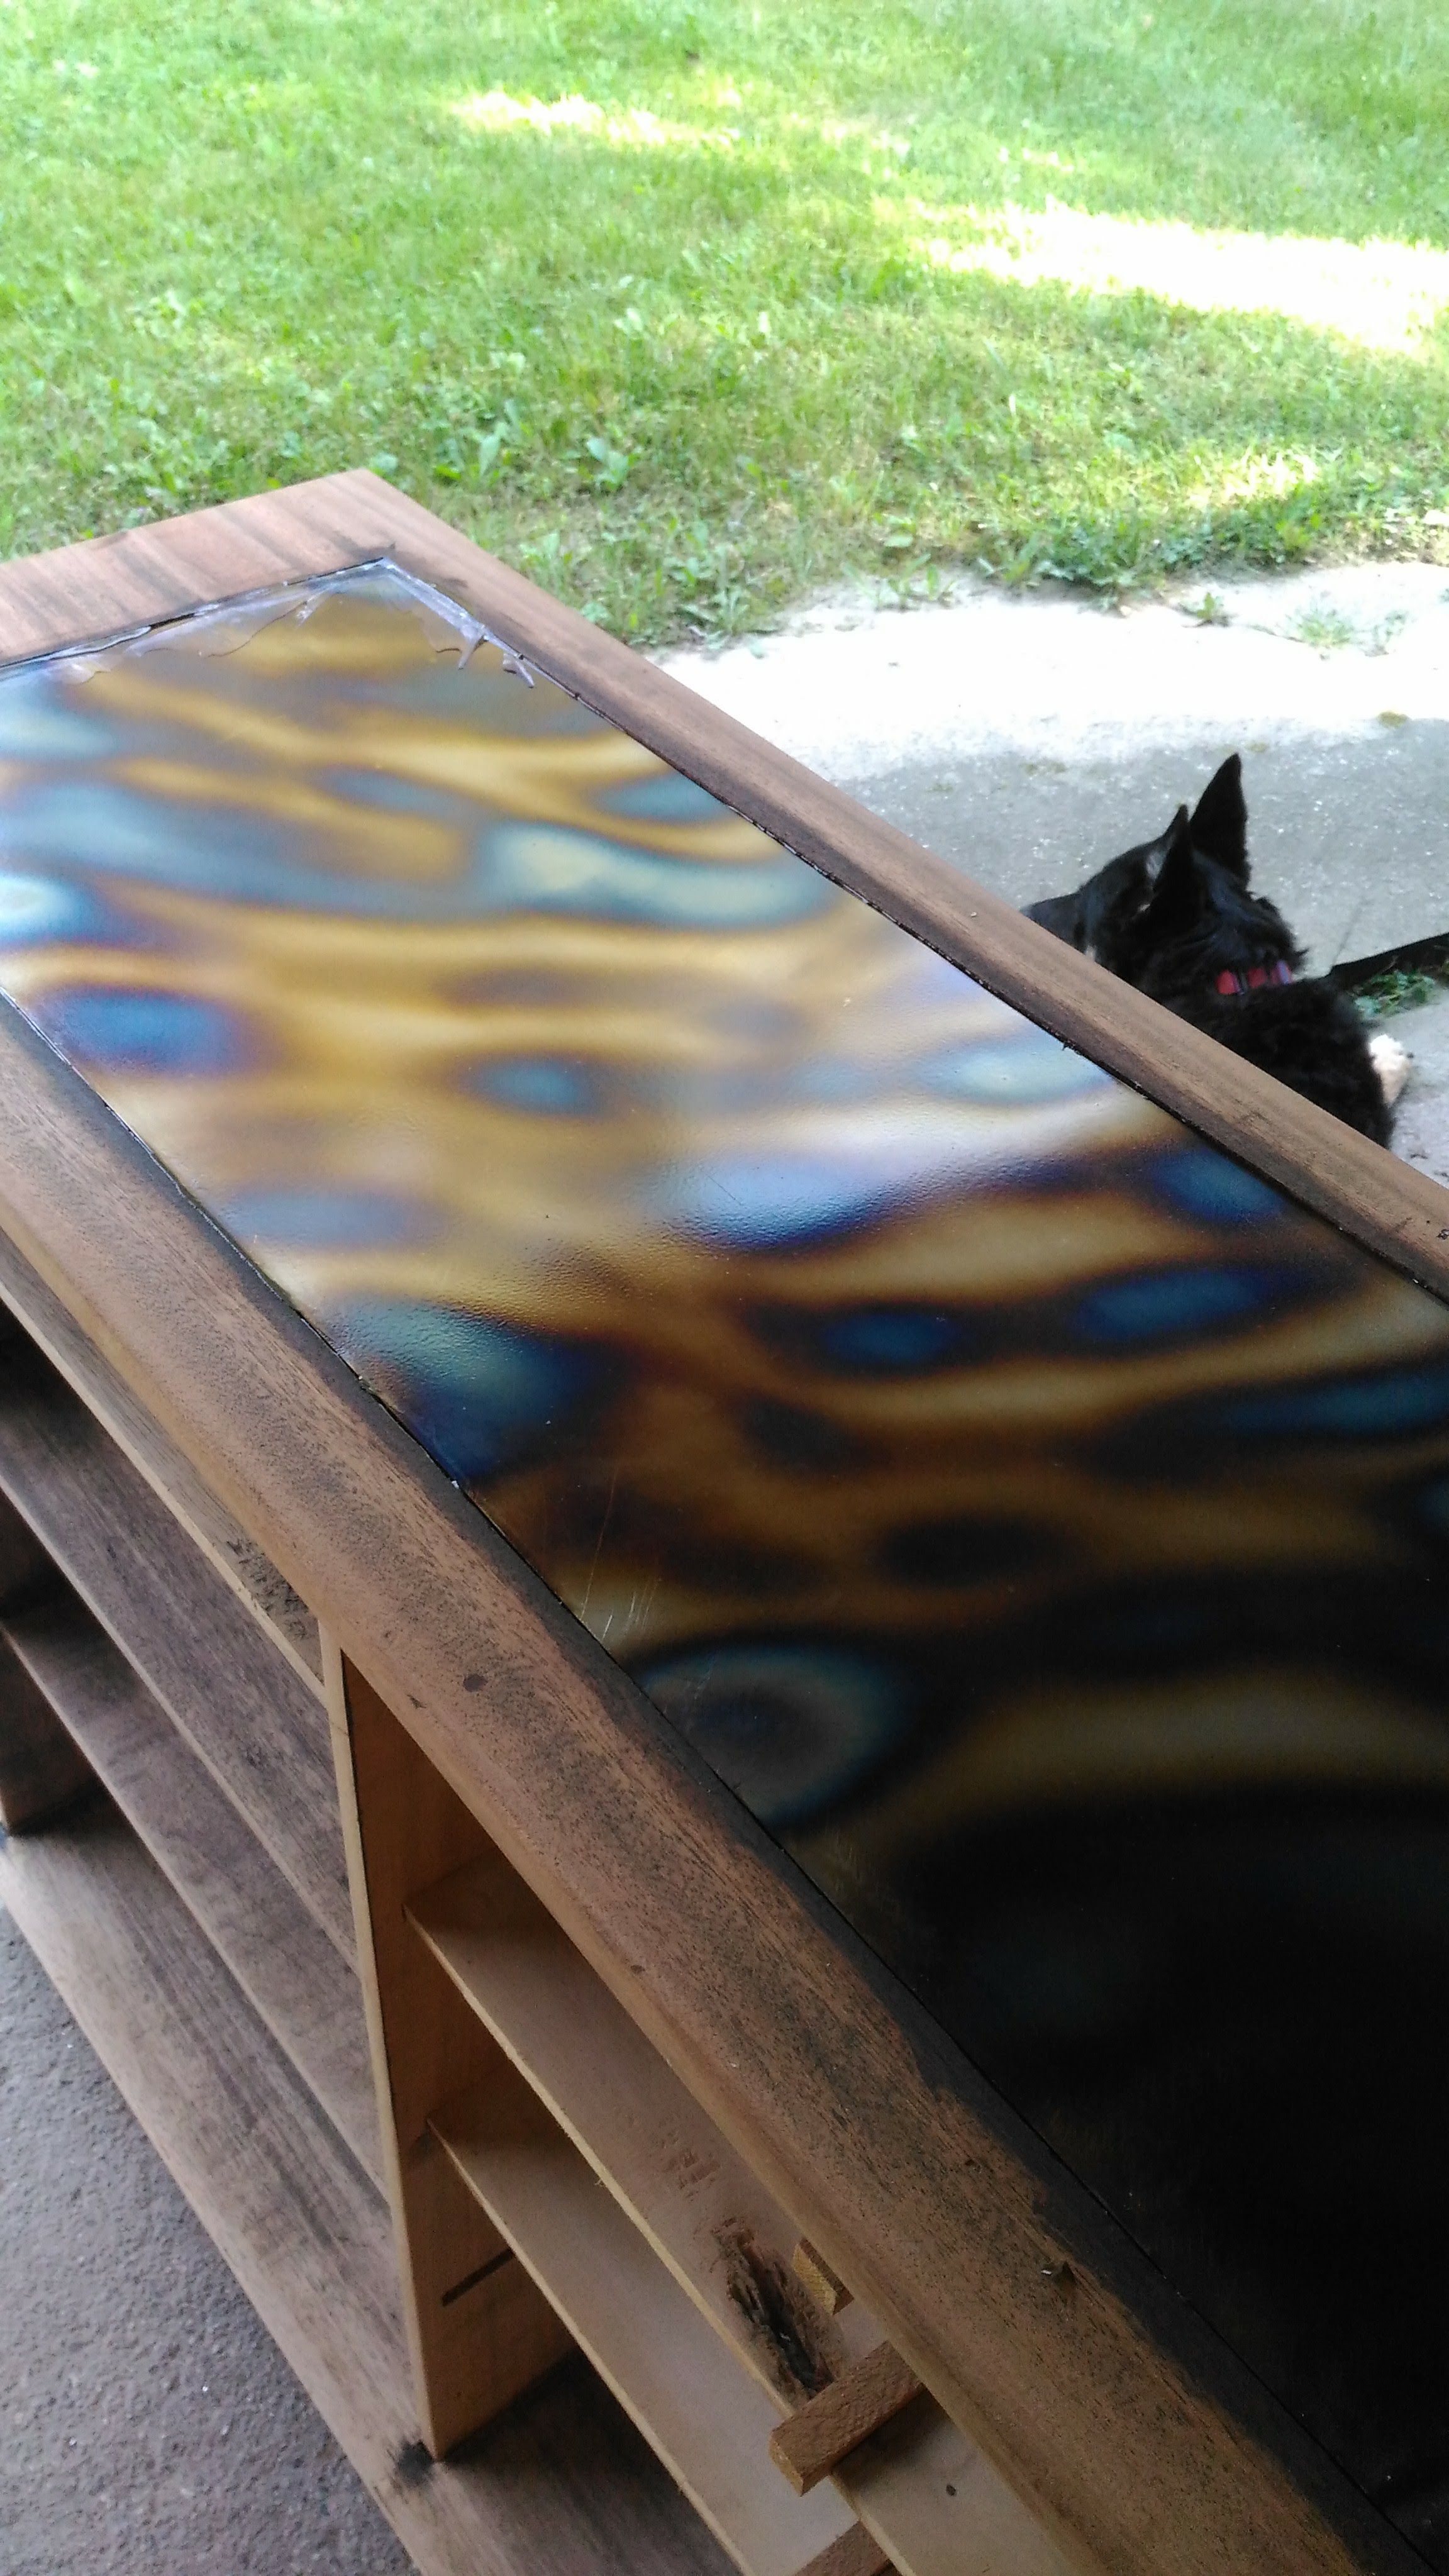
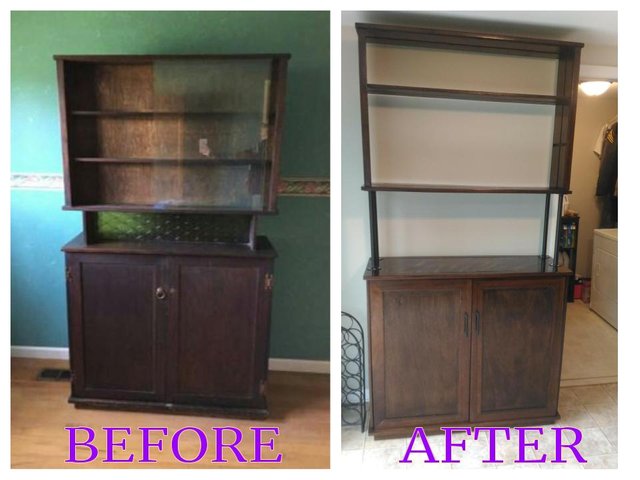
Amazingly, it worked! I then poured the top coat of epoxy and waited some more. I only had a little bit of sanding to do to clean up any epoxy that got on top of the wood. I was surprised at how well it all worked out. Next was my favorite part; stain and poly time! She, of course, got a few coats of Minwax Espresso and I went with a high gloss poly. I attached the pipes I ordered from Amazon and put the puzzle back together. Once I got it inside, I tried to attach the doors but unfortunately, our rental home does not have a plum or level inch to it. No matter what I did, the doors looked wonky when attaching them with the hardware. I decided to let the piece be the way she is for now and plan to really finish her when we get to our next destination. The top half is supposed to have glass sliding doors but I think I befuddled the orientation when sanding and banging on the piece. The glass doors won’t nestle in anymore and came flying into my face when I tried to install them back into the piece. I sort of got to the “over it” moment and decided, she’s good the way she is… for now. Without further ado…. The long awaited, before and after!!!
Thanks for checking out my post!
Hahahahaha, I'm constantly hiding special project moments from adultier adults... that was hilarious!
Is the tile inset on the top of the bottom piece? It's not super clear from the After photo. This is brilliant though, you did so much work on it, it looks great!
The thumbs up made me laugh so much.
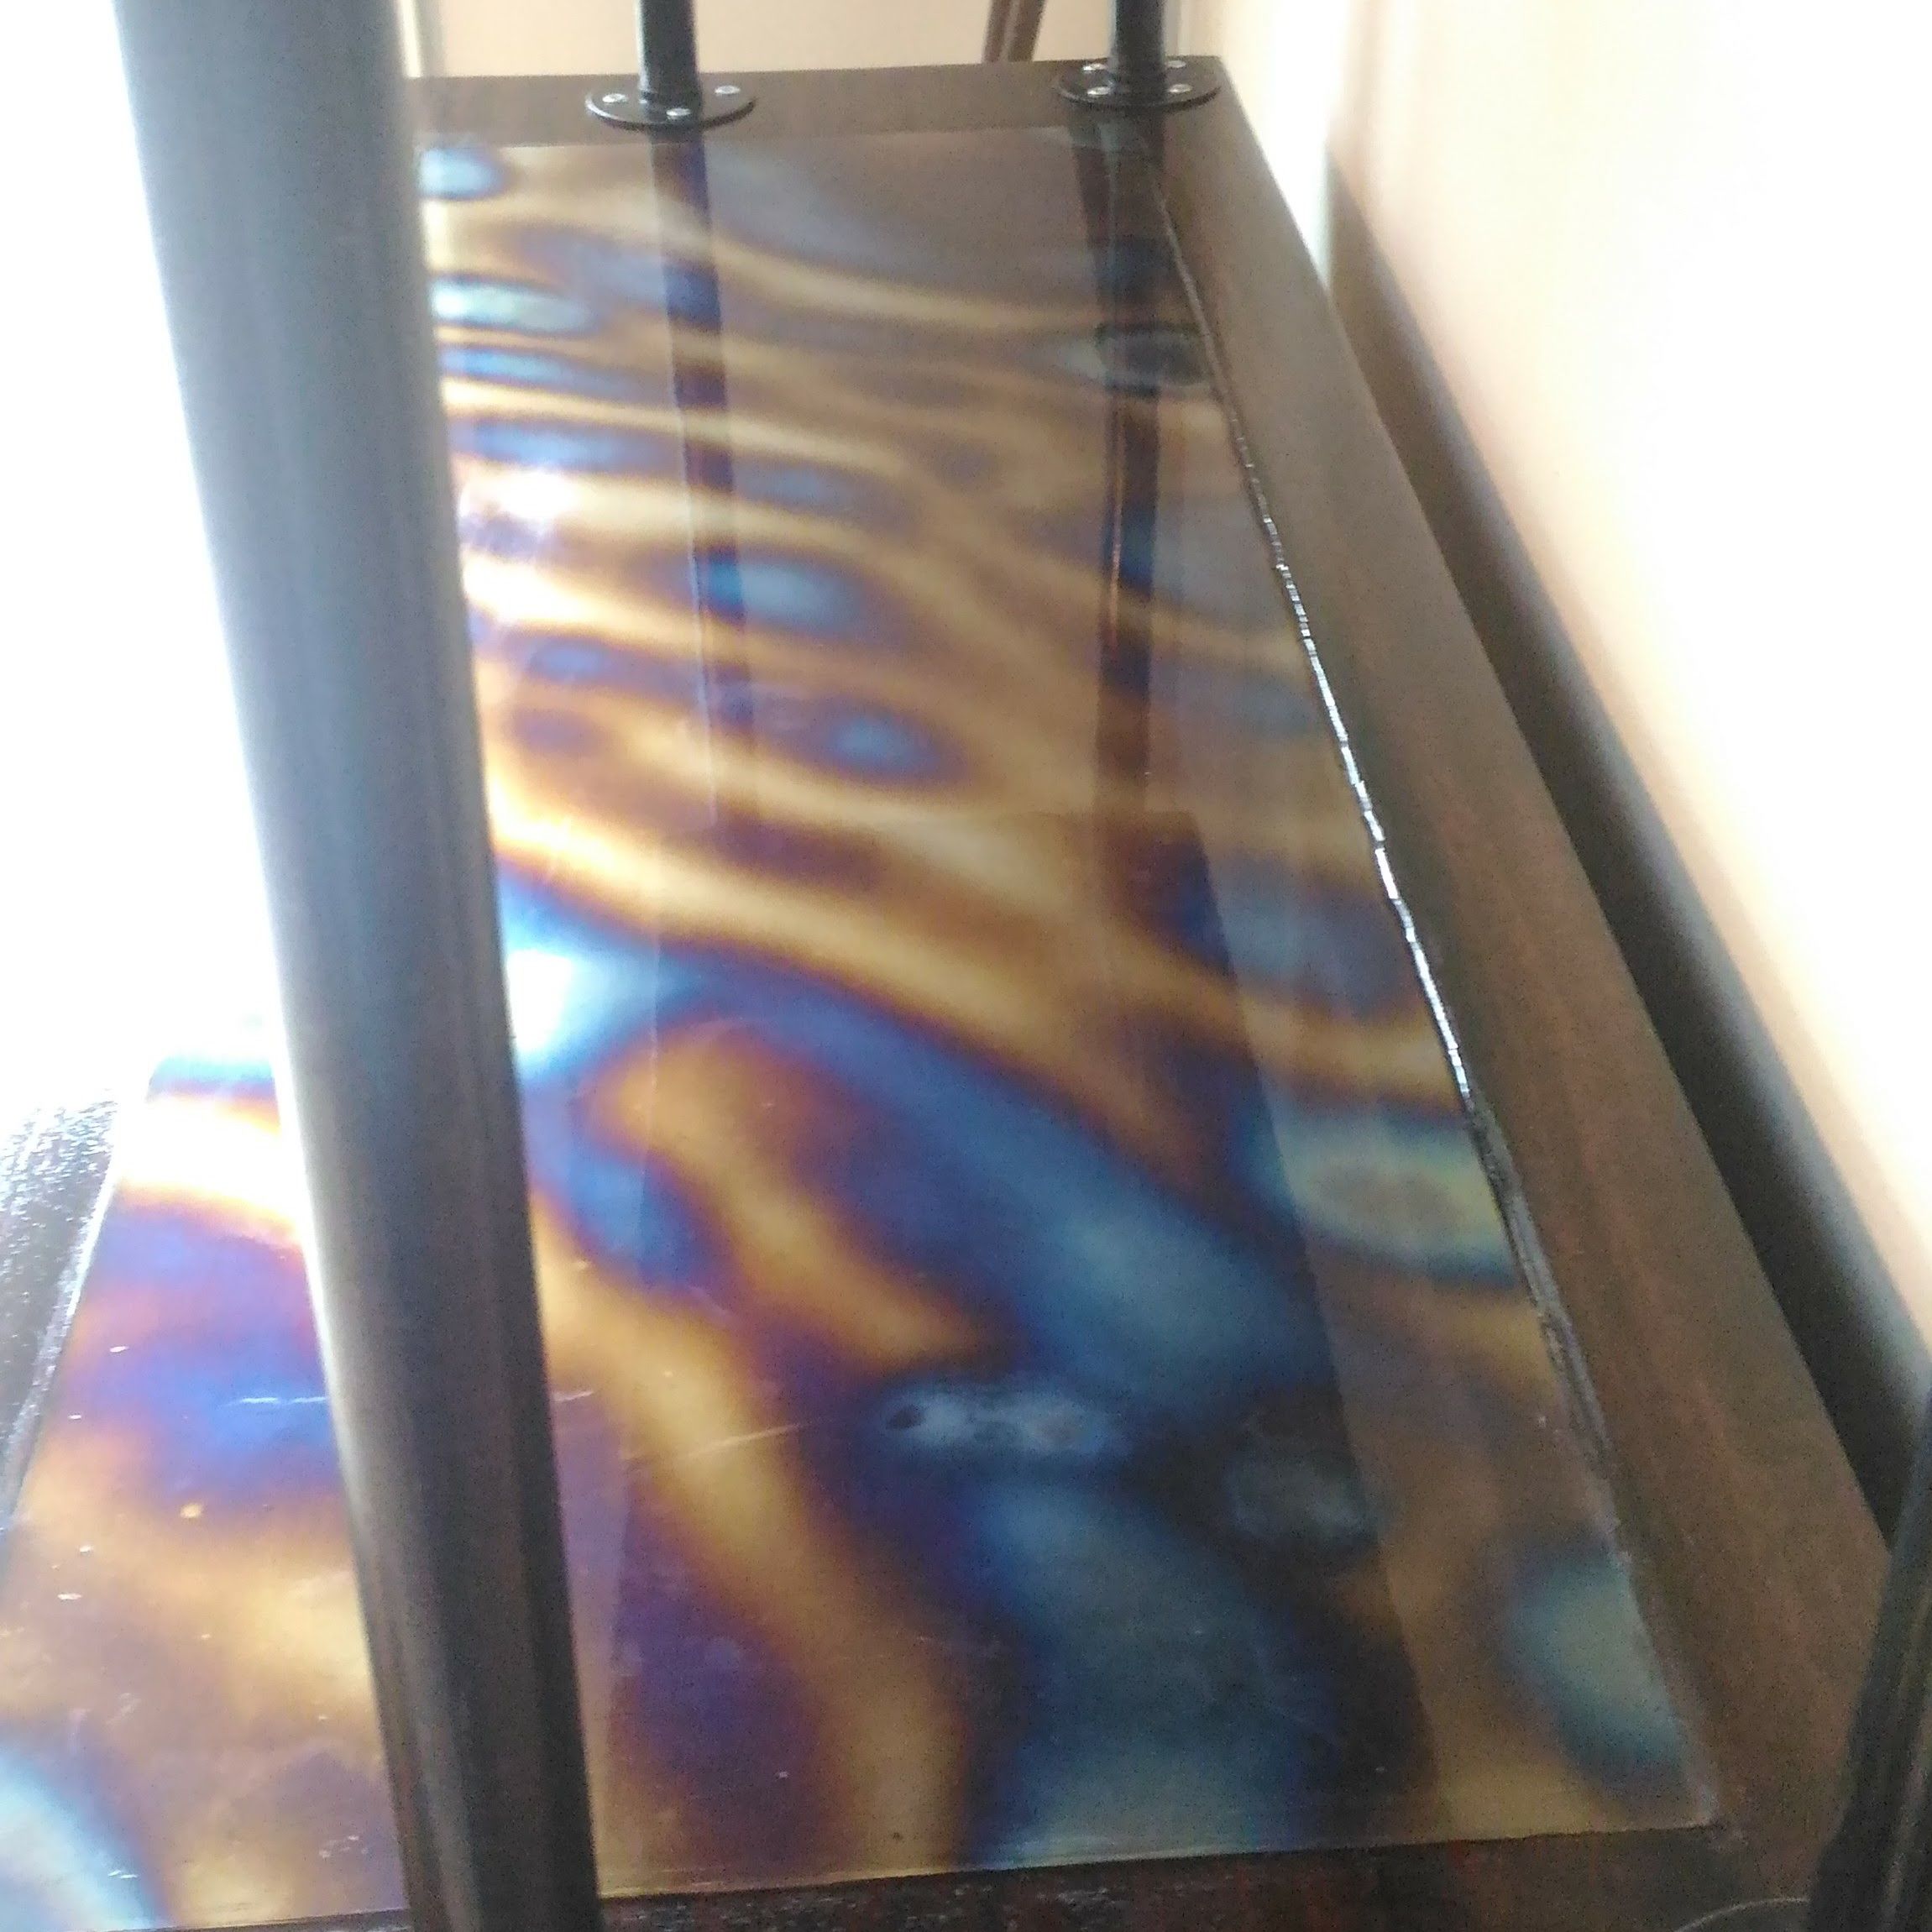
Yep, its on the top of the bottom piece.... its meant to be a "bar" space. A place to put liquor bottles and such and make your drinkies. Its a heat colored, sheet metal inset now (with epoxy sealing the metal) because tile manufacturers need to step up their game! (see first pic for a close up of the inset's final look)
I'm so glad to hear it made you laugh! Makes my heart swell!
Thanks so much for the interest and appreciation!
Oh... so the very first photo is what the top of the bottom piece looks like? It's see-through? That is awesome! This bar cabinet is so cool. All your family and friends will be super jealous but also totally psyched to have their drinkies delivered from such a boss setting. Well done.
I was just talking to my wife today about maybe the two of us building a tiny home to act as an extra guest room... we don't have the skills that you guys have... but maybe after that kind of project...
Ooooo I love tiny houses!!! DO IT!!! And don't let the projects fool you, I don't really have any skills other than the ones I gain once just going for it. I am in YouTube university, LOL. So just go for it and when you hit a spot where you are clueless, just YouTube it or find a resource to ask. I have no idea how people existed before the internet!
And no, the top piece is not see through... my photography skills leave a lot to be desired, sorry LOL -- its a piece of sheet metal, that I took a torch to, then placed in the inset and covered with epoxy resin to seal it. Sorry its so unclear in my post... will have to work on my explanation skills in future posts. Sometimes I just ramble and realize, yep no one knows what you are trying to say haha!
Ahhhhh..... in that first photo it's the reflection of the top piece? Got it, got it, got it. That makes so much more sense.
Your explanation was absolutely totally fine, don't let me put you off, I was just trying to get it all clear in my head, there's no way you could predict what your readers may or may not understand... keep doing what you're doing my furniturely-creative friend!
Hahaha, I think the tiny house might be a long term go... we've got a stable to build it in during winter, and space for it... now it's just the spare time and overall enthusiasm.
This post has been ranked within the top 80 most undervalued posts in the second half of Dec 02. We estimate that this post is undervalued by $13.82 as compared to a scenario in which every voter had an equal say.
See the full rankings and details in The Daily Tribune: Dec 02 - Part II. You can also read about some of our methodology, data analysis and technical details in our initial post.
If you are the author and would prefer not to receive these comments, simply reply "Stop" to this comment.