Getting Started With Aurelia
The Project
In this tutorial we'll be building a very simple todo app using the badass Aurelia frontend framework. All project files are available on Github. Grab the whole project or just the necessary files: web-api.js utils.js styles.css and bootstrap-form-validation-renderer.js
The Finished App
Set Up
We'll need NodeJS version 4.x or higher and a Git client. Also, NPM 3 is recommended for Aurelia; we can run npm -v to check our installed version. If all checks out, we can move on, otherwise update NPM by running npm install npm -g
Once we're set up, we'll want to install the Aurelia CLI. In your terminal run
npm install aurelia-cli -g
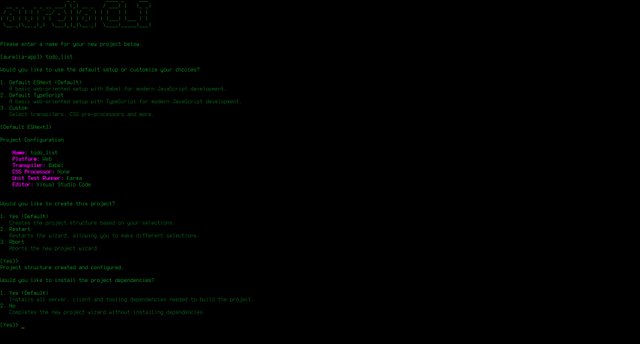
Now, on to creating our project. The Aurelia CLI does a lot of the boilerplate heavy lifting for us. From the terminal run au new The CLI will iterate through a list of questions before it sets up our project.
We'll name the app todo_list ( or whatever you like ). For this project we'll accept the defaults. Feel free to read through the choices and select what you're most comfortable with, but keep in mind this tutorial assumes the defaults were selected.
Next, let's install a few dependencies
npm install bootstrap --save
npm install [email protected] --save
With the addition of the bootstrap and jQuery libraries, we need to tell Aurelia where to bundle them. This is done in the aurelia.json file, inside the aurelia_project directory. We'll put our newly installed dependencies in the vendor-bundle dependency array.
"dependencies": [
  ...
  "jquery",
  {
    "name": "bootstrap",
    "path": "../node_modules/bootstrap/dist",
    "main": "js/bootstrap.min",
    "deps": ["jquery"],
    "exports": "$",
    "resources": [
      "css/bootstrap.css"
    ]
  },
  ...
]
A quick note, I'm using the "Darkly" theme from Bootswatch. To use it, just copy the css from bootswatch and use it to replace the css in bootstrap.css file that's at bootstrap/dist/css
First Steps
Once everything is installed, we're ready to move on. Lets change directory into the project folder by running
cd path_to_project From here we can start our project au run --watch
If we look in our src folder, you'll see some files Aurelia gave us. One of those is app.js To get started we're going to build out the router in this file.
The default app.js should look something like the following
export class App {
  constructor() {
    this.message = 'Hello World!';
  }
}
Get rid of that and build it out like this
export class App {

    configureRouter(config, router) {
        config.title = 'Todo';
        config.map([
            {route: '',          moduleId: 'home',        title: 'Home'},
            {route: 'tasks/:id', moduleId: 'task-detail',  name: 'tasks'}
        ]);

        this.router = router;
    }
}
Aurelia's routing is pretty straight forward. The configureRouter method definition tells us it takes a config object and router object, which Aurelia provides for us. We'll use the config object to define our routes. Using the map method, we can map routes to the modules that handle them. Each route requires at least a route and moduleID
Here we are registering two routes for our application.
config.map([
            {route: '',          moduleId: 'home',        title: 'Home'},
            {route: 'tasks/:id', moduleId: 'task-detail',  name: 'tasks'}
        ]);
Because the first route is an empty string, Aurelia will make it our default route. If you wanted a fancy landing page or something you want the user to see first, this might be the route you want. The second route shows a route that takes a parameter, which we'll name id
In addition to config.title (which sets the base document title) above the map method, the routes can also have a title property. When set, the router's title will be joined with the route's title to form the final title.
The moduleID property is the name of module that will be loaded when a user hits our route. Modules in Aurelia consist of a view and view-model pair.
Next replace the markup in app .html with the following
<template>
  <require from="bootstrap/css/bootstrap.css"></require>
  <require from="./styles.css"></require>

  <nav class="navbar navbar-default navbar-fixed-top" role="navigation">
    <div class="navbar-header">
      <a class="navbar-brand" href="#">
        <i class="fa fa-user"></i>
        <span>Tasks</span>
      </a>
    </div>
  </nav>

  <div class="container">
    <div class="row">
      <div class="col-md-4">Task List Placeholder</div>
      <router-view class="col-md-8"></router-view>
    </div>
  </div>
</template>
Looking at our markup, you'll immediately notice the <require></require> tags. Think of these as the import syntax you use in JavaScript. Next, you may have noticed <router-view></router-view> custom element (we can also create custom elements, which I'll cover later in this tut). This is given to us by the framework and tells the router where to render the view. All template markup is nested withing the template element.
Building Out Our Default Route
Let's begin by creating home.js
export class Home {
    constructor() {
        this.welcomeMessage = 'Have something to do today?'
    }
    // the constructor isn't necessary at this point
    // welcomeMessage = 'Have something to do today?' works just as well.
}
Next we'll need to create the view for our view/view-model pair. Create home.html with the following markup
<template>
  <div class="no-selection text-center">
    <h2>${welcomeMessage}</h2>
  </div>
</template>
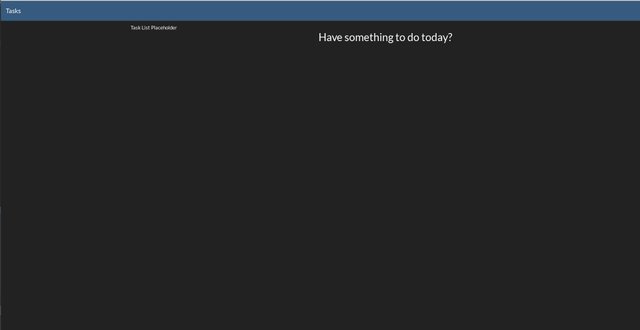
At this point, the app should look something like this
So now that we've some basic functionality, our default route built out -- what's next?
Creating The Task List
We're going to create a <task-list></task-list> custom element which will live right above our <router-view></router-view> element in app.html, replacing the placeholder div.
First, let's build task-list.js
import { WebAPI } from './web-api';
import { inject } from 'aurelia-framework';

@inject(WebAPI)
export class TaskList {

    //static inject() { return [WebAPI] };  can be used in place of the @inject decorator
    // if you don't feel like jumping that far into the future of JavaScript

    constructor(api) {
        this.api = api;
        this.tasks = [];
    }

    created() {
        // get task list as soon as view is created
        this.api.getList().then( x => this.tasks = x);
    }

    select(task) {
        this.selectedId = task.id;
        return true;
    }
}
In our view model, we take advantage of Aurelia's dependency injection and use ESNext decorators to inject the web-api class. Aurelia will inject dependencies into the constructor prior to instantiating the task-list class.
Aurelia aims to stay out of your way, that is, keep the framework from intruding on your code. It is entirely possible to build a basic Aurelia app without imports littering your code.
Now, back to our task list. The created method is part of the component lifecycle and, if present, will be called after the constructor. From the docs
At this point in time, the view has also been created and both the view-model and the view are connected to their controller.
Created can take two parameters, the first will be the owning view -- the view the component was declared inside of, and if the component has a view, that will go to the second param.
Once the view-model is created, we can move on to the mark up. In task-list.html we'll use the following markup
<template>
    <div class="task-list">
        <ul class="list-group">
            <li repeat.for="task of tasks" class="list-group-item ${task.id === $parent.selectedId ? 'active' : ''}">
                <a route-href="route: tasks; params.bind: {id:task.id}" click.delegate="$parent.select(task)">
                    <h4 class="list-group-item-heading"><span class="tomato">Title:</span> ${task.name}</h4>
                    <span class="list-group-item-text "><span class="tomato">Due:</span> ${task.due}</span>
                    <p class="list-group-item-text"><span class="tomato">Completed:</span> ${task.isCompleted}</p>
                    <p class="list-group-item-text"><span class="tomato">Urgency:</span> ${task.urgency}</p>
                </a>
            </li>
        </ul>
    </div>
</template
There are a few things to notice here. Our li is set up to loop through a collection of objects using Aurelia's repeat.for repeater. Aurelia repeaters can be used on any elements, to include custom elements, and even template elements.
If you look at how we determine the class for the li, you'll see that we're accessing $parent The repeater creates a new context and to reach the parent context we use $parent If you've used Knockout JS, this is likely familiar to you. The rest of the values for our h4 and p elements are using string interpolation bindings.
Before moving on, notice the anchor tag's custom attribute (provided by the framework), route-href We're passing in the name from the tasks route, and binding to the task.id as the route parameter. This will allow Aurelia to generate the href we want on each of the anchors being generated by the repeater.
One final thing before moving on -- let's look at the anchors click binding click.delegate="$parent.select(task)
Here we're reaching into our parent class and calling the select method with task as an argument. We want instant user feedback, so we use this method to keep track of the task's id, enabling us to immediately apply the selection style.
A quick word on .trigger and .delegate both of these will prevent the event's default action, but because we're returning true we'll be allowed to continue.
Alright, let's update app.html
<template>
  <require from="bootstrap/css/bootstrap.css"></require>
  <require from="./styles.css"></require>
  <require from="./task-list"></require>

  <nav class="navbar navbar-default navbar-fixed-top" role="navigation">
    <div class="navbar-header">
      <a class="navbar-brand" href="#">
        <i class="fa fa-user"></i>
        <span>Tasks</span>
      </a>
    </div>
  </nav>

  <div class="container">
    <div class="row">
      <task-list class="col-md-4"></task-list>
      <router-view class="col-md-8"></router-view>
    </div>
  </div>
</template>
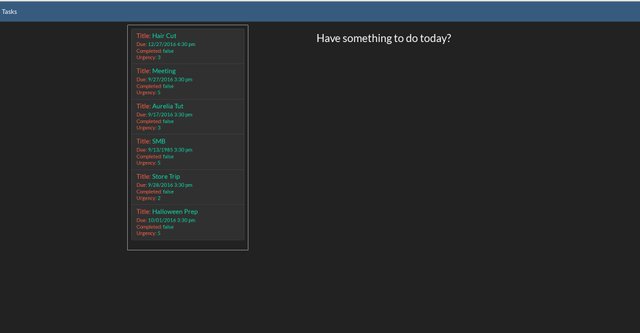
Again, we're using require, this time to bring in our task-list component. Next we add our custom element above router-view. The app should now look like
Value Converters
So that we aren't stuck with the hideous dates 2016-09-28T22:30:00.000Z coming from our mock backend, we're going to to add a value converter to give some friendlier dates.
A value converter is a class whose responsibility is to convert view-model values into values that are appropriate to display in the view and visa-versa.
We'll be using moment.js for our value converter.
npm install moment --save
Add the new dependency to aurelia.json
   "dependencies": [
          "jquery",
          "moment",
           ...
[
In src/resources/value-converters create a new file named dateFormat.js
import moment from 'moment';

export class DateFormatValueConverter {
    toView(value, format) {
        if(!format) format = 'M/DD/YYYY h:mm a';
            return moment(value).format(format);
    }

    fromView(value) {
        return new Date(value);
    }
}
In main.js add .globalResources('resources/value-converters/dateFormat')
The toView and fromView methods hint at the direction of dataflow. In our class, we set up a default format if we don't already have one, then call moment on value with format For more on formatting with moment, check out the docs here.
To use our value converter
find
<p class="list-group-item-text">${task.due_date}</p>
and change it to
<p class="list-group-item-text">${ task.due | dateFormat }</p>
Now we'll have nicely format dates and times in our UI.
Task Detail
Create task-detail.js
import { Utils }  from './utils';
import { inject } from 'aurelia-framework';
import { WebAPI } from './web-api';

@inject(WebAPI, Utils)
export class TaskDetail {

      constructor(api, utils){
            this.api   = api;
            this.utils = utils;
      }

      activate(params, routeConfig) {
            this.routeConfig = routeConfig;

            return this.api.getTaskDetails(params.id).then(task => {
                  this.task = task;
                  this.routeConfig.navModel.setTitle(task.name);
                  this.originalTask = this.utils.copyObj(task);
            });
      }

      get canSave() {
            return this.task.name && !this.api.isRequesting;
      }

      save() {
            this.api.saveTask(this.task).then( task  => {
                  this.task = task;
                  this.routeConfig.navModel.setTitle(task.name);
                  this.originalTask = this.utils.copyObj(task);
            });
      }

      canDeactivate() {
            if (!this.utils.objEq(this.originalTask, this.task)){
                  return confirm('You have unsaved changes. Are you sure you wish to leave?');
            }

            return true;
      }
}
Again we have an activate method. Routed components also have lifecycle methods. activate get's invoked just before the router activates the component, allowing us to handle any business we may need to prior to activation.
From the docs
The first argument passed to activate is the params object. This object will have one property for every route param that was parsed as well as a property for each query string parameter.
The params object has an id that we use to get our task details via our api that we're getting via dependency injection. We'll get a promise in return then store the task in the a task property so we can bind to it later.
routeConfig is the config object we created to configure the router, and as such, we can access all of its properties. Each routeConfig gets a navModel that we can use to set the document title for the route. We do this by calling navModel.setTitle()
this.originalTask = this.utils.copyObj(task); here we are storing a copy of the original task to check for changes later.
canDeactivate is fired just before leaving the current component. This is where we check for changes and give the user a chance to save, or continue with navigation.
save() calls our api's save method and sets originalTask to the updated version. canSave will let us know if our component is in a state that allows saving. Cool, lets bang out some markup task-detail.html
<template>
    <div class="panel panel-primary">
        <div class="panel-heading">
            <h3 class="panel-title">Task Profile</h3>
        </div>
        <div class="panel-body">
            <form role="form" class="form-horizontal">
                <div class="form-group">
                    <label class="col-sm-2 control-label">Name</label>
                    <div class="col-sm-10">
                        <input type="text" placeholder="name" class="form-control" value.bind="task.name">
                    </div>
                </div>

                <div class="form-group">
                    <label class="col-sm-2 control-label">Description</label>
                    <div class="col-sm-10">
                        <input type="text" placeholder="description" class="form-control" value.bind="task.description">
                    </div>
                </div>

                <div class="form-group">
                    <label class="col-sm-2 control-label">Due Date</label>
                    <div class="col-sm-10">
                        <input type="date" placeholder="due date" class="form-control" value.bind="task.dueDate">
                    </div>
                </div>

                <div class="form-group">
                    <label class="col-sm-2 control-label">Urgency</label>
                    <div class="col-sm-10">
                        <div id="slider">
                            <input type="range" min="1" max="10" step="1" class="bar" ref="urgency" id="rangeinput" value.bind="task.urgency">
                            <span class="highlight"></span>
                            <output id="rangevalue">${urgency.value}</output>
                        </div>
                    </div>
                </div>
            </form>
        </div>
    </div>

    <div class="button-bar">
        <button class="btn btn-success" click.delegate="save()" disabled.bind="!canSave">Save</button>
    </div>
</template>
Alright, that's a bunch of pretty basic markup, with a couple exceptions: the inputs have a two-way binding ( similar to knockout's observables), the button has a .delegate calling save() and a disabled attribute bound to canSave This will run our canSave method and determine if we can or cannot save.
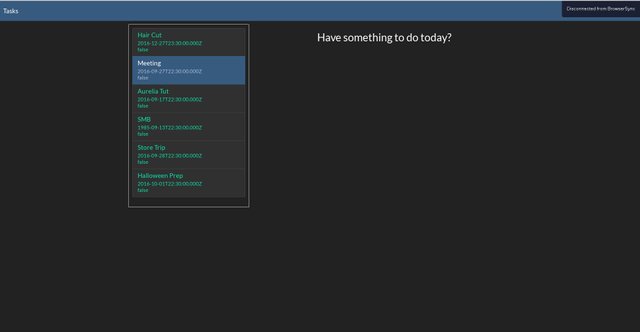
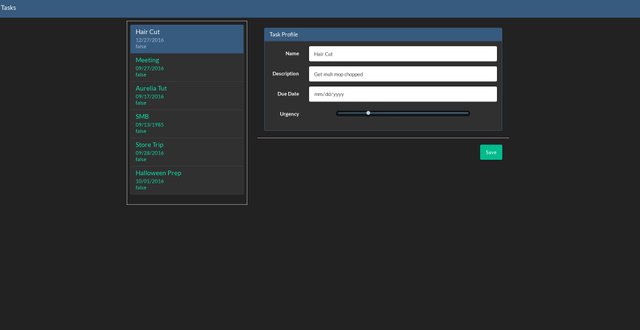
Run the app if it isn't already, and click on a task app thus far
Add A New Task
Alright, what if we want to add a new task? Let's create a custom element for that. I'll be using the aurelia dialog plugin, which we'll need to install npm install aurelia-dialog --save
In main.js add .plugin('aurelia-dialog') to the aurelia.use and in aurelia.jsonadd
{
            "name": "aurelia-dialog",
            "path": "../node_modules/aurelia-dialog/dist/amd",
            "main": "aurelia-dialog"
},
Once that's done, we can create AddDialog.html and AddDialog.js
AddDialog.html
<template>
    <ai-dialog class="panel panel-primary">
        <div class="panel-heading">
            <h3 class="panel-title">Add Task Profile</h3>
        </div>
        <ai-dialog-body class="panel-body">
            <form role="form" class="form-horizontal">
                <div class="form-group">
                    <label class="col-sm-2 control-label">Name</label>
                    <div class="col-sm-10">
                        <input type="text" placeholder="name" class="form-control" value.bind="task.name">
                    </div>
                </div>

                <div class="form-group">
                    <label class="col-sm-2 control-label">Description</label>
                    <div class="col-sm-10">
                        <input type="text" placeholder="description" class="form-control" value.bind="task.description">
                    </div>
                </div>

                <div class="form-group">
                    <label class="col-sm-2 control-label">Due Date</label>
                    <div class="col-sm-10">
                        <div class="input-group date">
                            <input type="text"  class="form-control" value.bind="task.due | dateFormat:'L'"><span class="input-group-addon"><i class="glyphicon glyphicon-th"></i></span>
                        </div>
                    </div>
                </div>

                <div class="form-group">
                    <label class="col-sm-2 control-label">Urgency</label>
                    <div class="col-sm-10">
                        <div id="slider">
                            <input type="range" min="1" max="10" step="1" class="bar" ref="urgency" id="rangeinput" value.bind="task.urgency">
                            <span class="highlight"></span>
                            <output id="rangevalue">${urgency.value}</output>
                        </div>
                    </div>
                </div>
            </form>
        </ai-dialog-body>

        <ai-dialog-footer>
            <button click.delegate="cancel()">Cancel</button>
            <button click.delegate="save(task)">Add</button>
        </ai-dialog-footer>
    </ai-dialog>
</template>
Not much to notice here. We have a bunch of custom elements brought to us by the dialog plugin. Again we see the .bind syntax which gives us two-way binding with our viewmodel. If you want to be explicit as to what kind of binding to use -- from the docs
- one-time: flows data one direction: from the view-model to the view, once.
- one-way: flows data one direction: from the view-model to the view.
- two-way: flows data both ways: from view-model to view and from view to view-model.
- bind: automically chooses the binding mode. Uses two-way binding for form controls and one-way binding for almost everything else.
An explicit two-way binding
<input type="text" placeholder="name" class="form-control" value.two-way="task.name">
And a one-way
<input type="text" placeholder="name" class="form-control" value.one-way="task.name">
Create AddDialog.js if you haven't already done so
import { inject }                                                 from 'aurelia-framework';
import { DialogController }                                       from 'aurelia-dialog';
import { WebAPI }                                                 from 'web-api';


@inject(WebAPI, DialogController)
export class AddTask {

    constructor(api, DialogController) {
        this.task = {name: '', description: '', due: '', isCompleted: false, urgency: ''};

        this.dialogController = DialogController;
        this.api = api;
    }

    save() {
        this.api.saveTask(this.task);
        this.dialogController.ok();
    }

    cancel() {
        this.dialogController.cancel();
    }
}
Add a button to task-detail.html which we'll use to open the add dialog.
    <div class="button-bar">
        <button class="btn btn-info" click.delegate="addTask(task)" >Add New</button>
        <button class="btn btn-success" click.delegate="save()" disabled.bind="!canSave">Save Edit</button>
    </div>
We need to bring the Aurelia DialogServiceinto task-detail.js
import { inject }                        from 'aurelia-framework';
import { DialogService }                 from 'aurelia-dialog';
import { AddTask }                       from './AddDialog';
import { WebAPI }                        from './web-api';
import { Utils }                         from './utils';

@inject(WebAPI,  Utils, DialogService)
export class TaskDetail {

    constructor(api, utils, dialogService) {
        this.api           = api;
        this.utils         = utils;
        this.dialogService = dialogService;
    }

    activate(params, routeConfig) {
        this.routeConfig = routeConfig;

        return this.api.getTaskDetails(params.id).then(task => {
            this.task = task;
            this.routeConfig.navModel.setTitle(task.name);
            this.originalTask = this.utils.copyObj(task);
        });
    }

    get canSave() {
        return this.task.name && !this.api.isRequesting;
    }

    save() {
        this.api.saveTask(this.task).then(task => {
            this.task = task;
            this.routeConfig.navModel.setTitle(task.name);
            this.originalTask = this.utils.copyObj(task);
        });
    }

    canDeactivate() {
        if (!this.utils.objEq(this.originalTask, this.task)) {
            return confirm('You have unsaved changes. Are you sure you wish to leave?');
        }
        return true;
    }

    // opens AddDialog
    addTask(task) {
        var original = this.utils.copyObj(task);
        this.dialogService.open({viewModel: AddTask, model: this.utils.copyObj(this.task)})
            .then(result => {
                if (result.wasCancelled) {
                    this.task.name = original.name;
                    this.task.description = original.description;
                }
            });
    }
}
addTask passes an object to the dialogService open method. We set AddTask as the viewModel property and a copy of the current task as the model property. Nada fancy.
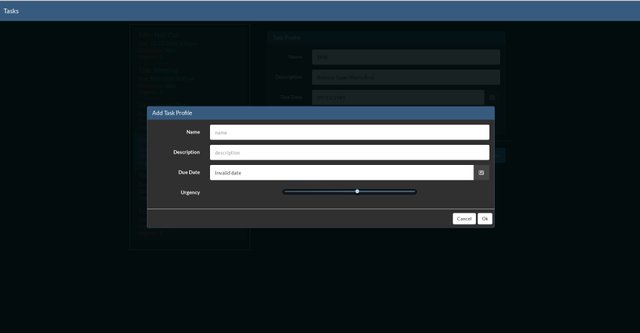
Click Add Task to bring up the dialog
The datepicker might not look like it does in the screenshot -- that's ok, it'll work out in the next few stepsa
Validation
Since we're taking user input, let's use this opportunity to try out some validation with Aurelia. Before we begin, remember that client side validation is NOT A REPLACEMENT for proper sever side validation. Alright then, we need to install aurelia-validation Do that by running npm install aurelia-validation --save
In aurelia.json
{
  "name": "aurelia-validation",
  "path": "../node_modules/aurelia-validation/dist/amd",
  "main": "aurelia-validation"
}
And in main.js add .plugin('aurelia-validation') to aurelia.use in the configuration function. Also, we'll need to register the validation renderer from the project files in index.js
import { BootstrapFormValidationRenderer } from './bootstrap-form-validation-renderer';

export function configure(config) {
 //   config.globalResources([]);
    config.container
        .registerHandler(
            'bootstrap-form',
            container => container.get(BootstrapFormValidationRenderer));
}
Aurelia provides a fluent api for defining validation rules, making things a bit easier for us. Let's add an attached() method to AddDialog.js Make sure to import { ValidationController, ValidationRules } from 'aurelia-validation'; and { NewInstance} from the framework. We'll be changing our save method as well, to leverage validation.
import { ValidationController, ValidationRules }                  from 'aurelia-validation';
import { inject, NewInstance }                                    from 'aurelia-framework';
import { DialogController }                                       from 'aurelia-dialog';
import { WebAPI }                                                 from 'web-api';


@inject(WebAPI, NewInstance.of(ValidationController), DialogController)
export class AddTask {

    constructor(api, validationController, DialogController) {
        this.task = {name: '', description: '', due: '', isCompleted: false, urgency: ''};

        this.validationController = validationController;
        this.dialogController     = DialogController;
        this.api                  = api;
    }

    attached() {
        ValidationRules
            .ensure('name').required()
            .ensure('description').required()
            .ensure('due').required()
            .on(this.task);
    }

    save() {
        let errors = this.validationController.validate();
        errors.then(errors => {
            if (errors.length === 0) {
                this.api.saveTask(this.task);
                this.dialogController.ok();
            }
        });
    }

    cancel() {
        this.dialogController.cancel();
    }
}
A few things to take note of here. We're using the NewInstance.of() resolver for the ValidationController Aurelia's ValidationRules provides a fluent api that we can use to define our rules. I'll cover validation in depth in a later tut. For now, let's update AddDialog.html
<template>
  <require from="resources/elements/validation-summary.html"></require>
      <ai-dialog class="panel panel-primary">
          <div class="panel-heading">
            <h3 class="panel-title">Add Task Profile</h3>
          </div>
          <ai-dialog-body class="panel-body">
              <form role="form" class="form-horizontal" validation-renderer="bootstrap-form" validation-errors.bind="errors">

                <validation-summary errors.bind="errors"
                                    autofocus.bind="validationController.validateTrigger === 'manual'">
                </validation-summary>

                  <div class="form-group">
                      <label class="col-sm-2 control-label">Name</label>
                      <div class="col-sm-10">
                          <input type="text" placeholder="name" class="form-control" value.bind="task.name & validate">
                      </div>
                  </div>

                  <div class="form-group">
                      <label class="col-sm-2 control-label">Description</label>
                      <div class="col-sm-10">
                          <input type="text" placeholder="description" class="form-control" value.bind="task.description & validate">
                      </div>
                  </div>

                  <div class="form-group">
                      <label class="col-sm-2 control-label">Due Date</label>
                      <div class="col-sm-10">
                          <div class="input-group date">
                              <input type="text" datepicker class="form-control" value.bind="task.due | dateFormat:'L'"><span class="input-group-addon"><i class="glyphicon glyphicon-th"></i></span>
                          </div>
                      </div>
                  </div>

                  <div class="form-group">
                      <label class="col-sm-2 control-label">Urgency</label>
                      <div class="col-sm-10">
                          <div id="slider">
                              <input type="range" min="1" max="10" step="1"  class="bar" ref="urgency" id="rangeinput" value.bind="task.urgency & validate">
                              <span class="highlight"></span>
                              <output id="rangevalue">${urgency.value}</output>
                          </div>
                      </div>
                  </div>
              </form>
          </ai-dialog-body>

          <ai-dialog-footer>
              <button click.delegate="cancel()">Cancel</button>
              <button click.delegate="save(task)">Ok</button>
          </ai-dialog-footer>
    </ai-dialog>
</template>
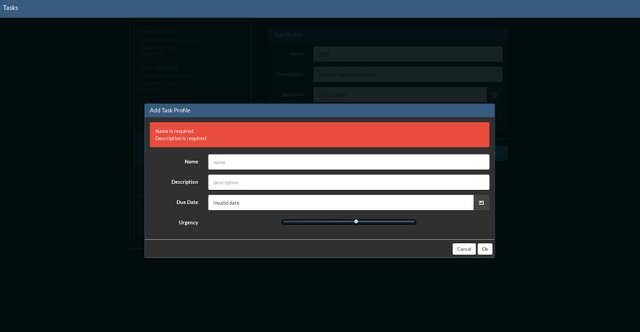
We now have a validation custom element in our view, where errors thrown by the validator will be rendered. Here we set the validation trigger in the view, however it can also be done in the viewmodel.
<validation-summary errors.bind="errors" autofocus.bind="validationController.validateTrigger === 'manual'"></validation-summary>
In src/resources/elements create validation-summary.html
<template bindable="errors">
    <div class="alert alert-danger" tabindex="-1"
         show.bind="errors.length"
         focus.one-way="errors.length > 0">
        <ul class="list-unstyled">
            <li repeat.for="errorInfo of errors">
                <span class="text-danger" style="color:white;">
                    ${errorInfo.error.message}
                  ${JSON.stringify(errorInfo.error)}
                </span>
            </li>
        </ul>
    </div>
</template>
Custom Attributes
We're going to add a custom attribute for our datepicker; a workaround for keeping the input and vm values in sync, courtesy of Jeremy Danyow. Add the datepicker to the global resouces method in main.js
.globalResources('resources/value-converters/dateFormat', 'resources/attributes/DatePicker') Install the bootstrap datepicker npm install bootstrap-datepicker --save
In 'aurelia.json' add "bootstrap-datepicker", I placed it under the bootstrap dependency.
Create DatePicker.js
import { inject, customAttribute, DOM } from 'aurelia-framework';
import                                    'bootstrap-datepicker';

@customAttribute('datepicker')
@inject(DOM.Element)
export class DatePicker {
    constructor(element) {
        this.element = element;
    }

    attached() {
        $(this.element).datepicker({
          orientation: 'bottom'
        })
            .on('change', e => fireEvent(e.target, 'input'));
    }

    detached() {
        $(this.element).datepicker('destroy')
            .off('change');
    }
}

function createEvent(name) {
    var event = document.createEvent('Event');
    event.initEvent(name, true, true);
    return event;
}

function fireEvent(element, name) {
    var event = createEvent(name);
    element.dispatchEvent(event);
}
That's all there is to it. To use it, in task-detail.html and AddDialog.html
<input type="text" datepicker class="form-control" value.bind="task.due | dateFormat:'L'"><span class="input-group-addon"><i class="glyphicon glyphicon-th"></i></span>
We just drop datepicker in the element it will be used on. That's it. That's all there is to it.
Event Aggregator
In order to keep the task list in sync with task detail, we're going to build out some publish/subscribe messaging. Wat? Create a file called messages.js
export class TaskUpdated {
    constructor(task){
        this.task = task;
    }
}

export class TaskViewed {
    constructor(task){
        this.task = task;
    }
}
Complicated, right? When we save a task, TaskUpdated will be published, and when a new task is viewed, we'll publish TaskViewed We're going to update task-detail.js by bringing in the EventAggregator from Aurelia.
import { EventAggregator }               from 'aurelia-event-aggregator';
import { inject }                        from 'aurelia-framework';
import { DialogService }                 from 'aurelia-dialog';
import { AddTask }                       from './AddDialog';
import { TaskUpdated, TaskViewed }       from './messages';
import { WebAPI }                        from './web-api';
import { Utils }                         from './utils';

@inject(WebAPI, EventAggregator, Utils, DialogService)
export class TaskDetail {

    constructor(api, ea, utils, dialogService) {
        this.api           = api;
        this.ea            = ea;
        this.utils         = utils;
        this.dialogService = dialogService;
    }

    activate(params, routeConfig) {
        this.routeConfig = routeConfig;

        return this.api.getTaskDetails(params.id).then(task => {
            this.task = task;
            this.routeConfig.navModel.setTitle(task.name);
            this.originalTask = this.utils.copyObj(task);
            this.ea.publish(new TaskViewed(this.task));

        });
    }

    get canSave() {
        return this.task.name && !this.api.isRequesting;
    }

    save() {
        this.api.saveTask(this.task).then(task => {
           this.task = task;
           this.routeConfig.navModel.setTitle(task.name);
           this.originalTask = this.utils.copyObj(task);
           this.ea.publish(new TaskUpdated(this.task));
        });
    }

    canDeactivate() {
        if (!this.utils.objEq(this.originalTask, this.task)) {
            let result = confirm('You have unsaved changes. Are you sure you wish to leave?');

            if (!result) {
                this.ea.publish(new TaskViewed(this.task));
            }
            return result;
        }
        return true;
    }

    // opens AddDialog
    addTask(task) {
        var original = this.utils.copyObj(task);
        this.dialogService.open({viewModel: AddTask, model: this.utils.copyObj(this.task)})
            .then(result => {
                if (result.wasCancelled) {
                    this.task.name = original.name;
                    this.task.description = original.description;
                }
            });
    }
}
Okay, a few things to notice here. We've brought in EventAggregator via DI, and we'll run it to publish TaskViewed anytime a task is loaded, and TaskUpdated when a task is saved. Canceling navigation will publish TaskViewed (user returning to current task).
We can now leverage our messaging with any of our components. Update task-list.js to take advantage of this
import { EventAggregator }         from 'aurelia-event-aggregator';
import { inject }                  from 'aurelia-framework';
import { TaskUpdated, TaskViewed } from './messages';
import { WebAPI }                  from './web-api';

@inject(WebAPI, EventAggregator)
export class TaskList {

    constructor(api, ea) {
        this.api   = api;
        this.tasks = [];

        ea.subscribe(TaskViewed, msg => this.select(msg.task));
        ea.subscribe(TaskUpdated, msg => {
            let id = msg.task.id;
            let task = this.tasks.find(x => x.id == id);
            Object.assign(task, msg.task);
        });
    }

    created() {
        this.getList();
    }

    select(task) {
        this.selectedId = task.id;
        return true;
    }

    getList() {
        this.api.getList().then( x => this.tasks = x);
    }
}
We use the EventAggregator's subscribe method and pass a message type and callback. On publish, the callback executes with an instance of the message type.
Loading Indicator
Before we wrap up, let's implement a loading indicator to let the user know when a request is being made. We'll be using nprogress
Go ahead and run `npm install nprogress --save
Then in the dependencies array forvendor-bundle in aurelia.json
 {
    "name": "nprogress",
    "path": "../node_modules/nprogress",
    "main": "nprogress",
    "resources": [
      "nprogress.css"
    ]
  }
Next we'll create a loading-indicator element. We'll put it in src/resources/elements
import { bindable, noView, decorators } from 'aurelia-framework';
import * as nprogress                   from 'nprogress';

export let LoadingIndicator = decorators(
    noView(['nprogress/nprogress.css']),
    bindable({name: 'loading', defaultValue: false})
).on( class {
    loadingChanged(newValue){
        newValue ? nprogress.start() : nprogress.done();
    }
});
Using noView() lets aurelia know not to load a .html for loading-indicator.js because rendering will be handled by the NProgress lib. We have a loading property we can bind to, and we do that by using the bindable decorator. From the docs
Whenever you have a bindable, by convention, you can optionally declare a propertyNameChanged method that will be called whenever the binding system updates the property.
Globalizing Resources
In resources/index.js
import {BootstrapFormValidationRenderer} from './bootstrap-form-validation-renderer';

export function configure(config) {
    config.globalResources(['./elements/loading-indicator']);
    config.container
        .registerHandler(
            'bootstrap-form',
            container => container.get(BootstrapFormValidationRenderer));
}
This is an option we have and can be use in place of requiring in the view, like we did in app.html
Now, we need to bring our api into app.js before we can use our loading indicator.
import { validationRenderer } from 'aurelia-validation';
import { inject }             from 'aurelia-framework';
import { WebAPI }             from './web-api';

@inject(WebAPI)
export class App {

    contructor(api) {
        this.api = api;
    }

    configureRouter(config, router) {
        config.title = 'Todo';
        config.map([
            {route: '',         moduleId: 'home',        title: 'Home'},
            {route: 'task/:id', moduleId: 'task-detail', name: 'tasks'}
        ]);

        this.router = router;
    }
}
And finally, in app.html
<template>
  <require from="bootstrap/css/bootstrap.css"></require>
  <require from="./styles.css"></require>
  <require from="./task-list"></require>

  <nav class="navbar navbar-default navbar-fixed-top" role="navigation">
    <div class="navbar-header">
      <a class="navbar-brand" href="#">
        <i class="fa fa-user"></i>
        <span>Tasks</span>
      </a>
    </div>
  </nav>

  <loading-indicator loading.bind="router.isNavigating || api.isRequesting"></loading-indicator>

  <div class="container">
    <div class="row">
      <task-list class="col-md-4"></task-list>
      <router-view class="col-md-8"></router-view>
    </div>
  </div>
</template>
And there you go. We've built a pretty simple app, and hopefully it's given you a look into how Aurelia works. Look out for more Aurelia tuts in the near future.
This tutorial was put together with resources from all over the web. Thanks to the Aurelia team for all their work, especially Rob Eisenberg and Jeremy Danyow, as well as Brian Noyes and Scott Allen at Pluralsight.
Please let me know of any issues. Thanks!
Heh, this is way over my head, but I really appreciate you taking the time to lay it out in so much detail.
Please do an intro post that verifies who you are. It'll help give the community more confidence in upvoting and following.
Congratulations @red-shift! You have received a personal award!
Click on the badge to view your own Board of Honor on SteemitBoard.
For more information about this award, click here
Congratulations @red-shift! You have received a personal award!
Click on the badge to view your Board of Honor.
Congratulations @red-shift! You received a personal award!
You can view your badges on your Steem Board and compare to others on the Steem Ranking
Vote for @Steemitboard as a witness to get one more award and increased upvotes!
Interesting thoughts