Original artwork step by step- my first custom footer for Steemit!
Dear fellow Steemians,
Back to you with some classic Shiny Forest postcard. This time it's a custom footer for my blog. I was inspired by some pro Steemians to start with my own series of blog pictures, that will (hopefully) make my posts more nice to the eye :)
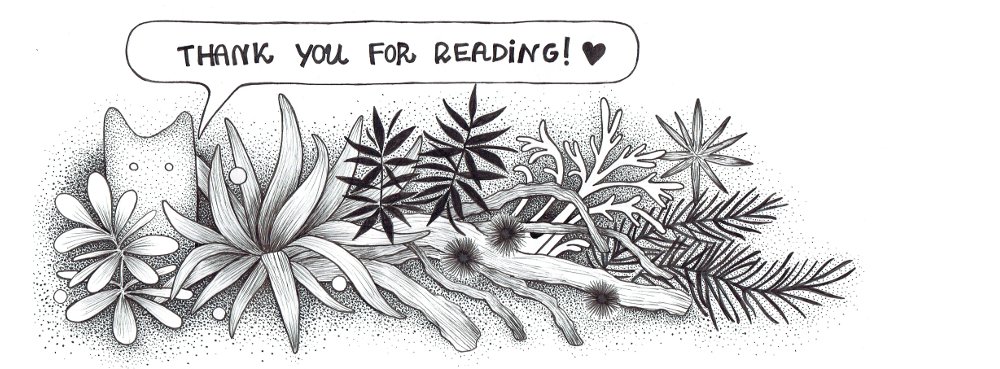
Pen and ink on paper, 42 x 29,7 cm
It isn't a very big nor elaborate drawing, I rather wanted it to be a sample of my drawing style, a kind of artistic preview, especially for more textual posts in which I won't include many pictures. My blog could use some more illustrations like that, so I'm planning on creating a header, a banner, a thank you message and some other custom pics.
PROGRESS STEP BY STEP
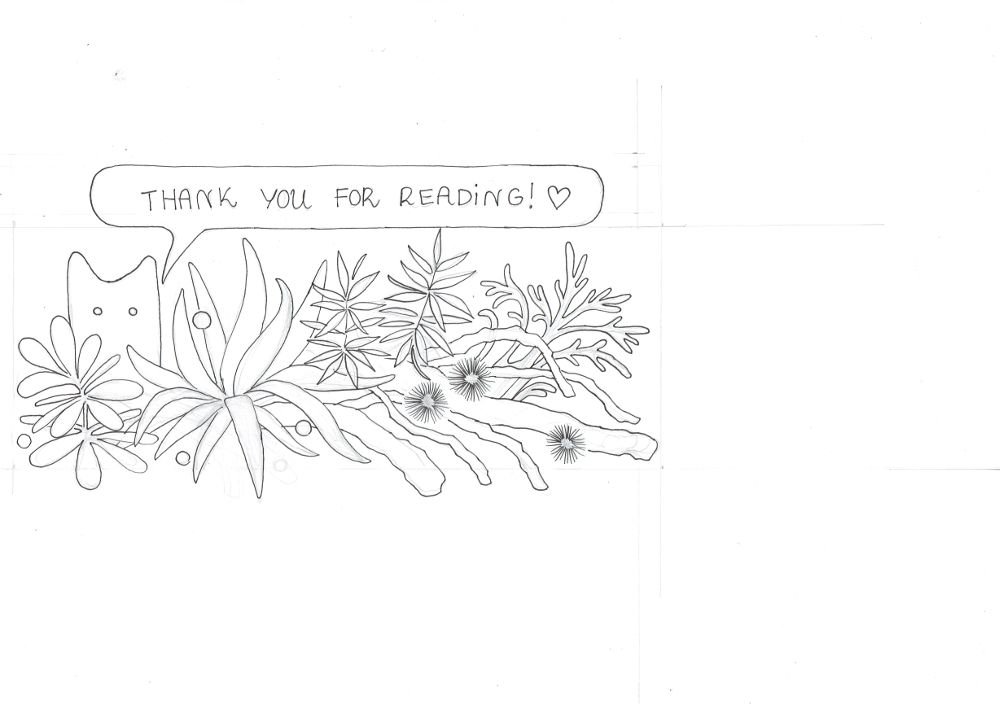
Here we have an initial, delicate pencil sketch (warning: it may not be easily visible on some devices, depending on your screen settings). I always start with composition first. I decide about the sizes and shapes of the objects. This stage tends to take a while.

In this case, my intital concept had to be literally extended. I planned my footer to have a size of about 1000x300 pixels. I set myself some guidelines on paper to maintain that proportion, however! The drawing developed in its own mysterious ways to something that wasn't fitting these parameters at all. I realized that it needs some more objects on the right to have the right shape. I redrew my art with pen and started to wonder what objects could I add.
I decided to go for some plants and a star. I didn't extend my art much, the final size is 1000x367 pixels and I'm quite happy with it. We'll se how it will work out as a footer :)

Next thing, I went on with shading and texture. I aimed for high-contrast, so it wouldn't end up greyish and bland, hence the black plants and fluffy seeds.

My GIF contains much more stages of shading than I include in this tutorial, because it might be difficult to come up with some interesting comment at each small change to the drawing. The most important conclusion I think is that I tend to orchestrate my shading efforts, gradually stippling and texturing my whole art rather than deal with one object at a time. This way I gain more control over the overall direction in which my art will turn, I think.

I add more and more dots and fine details here and there, and constantly assess the results. Haha :) I like to add this small thin shadow under some of the plants and wood, because it looks a bit realistic on one hand, and on the other, it gives an impression to be cut out of paper and placed on the background.

I think that in the future I might want to use a ruler more to create the speech bubbles. For now my footer has a hand-drawn style message :)

Traditionally, I post a GIF showing the progress of my work. It includes more stages than the tutorial above, because I like my GIFs to be longer and more detailed.

I hope that you enjoyed my little tutorial and footer, guys! And you know...
Hey there @shinyforest, I just saw your response on my bookplate post! i LOVE this footer! It's so beautiful and cute, and I personally love how you shaded everything, I haven't tried yet that way of shading, but I am going to experiment with it, maybe even post what I do!. Thanks for sharing ♥
Cool, I would love to check it out. If you want, let me know how it turns out ;)
This is so lovely. Great steps as well. I don't know why I haven't done a custom footer myself you have inspired me. Now, do I have the patience to make it a GIF? We shall see. Lovely pointillism, marvelous!
Thank you Donna, it's so nice of you to take a look at my post! I'm very glad to hear I might inspire you to create your own footer and maybe in the form of a GIF! I do my GIFs using GIMP. I scan every stage of my work, name the jpgs from 1 to n, and after I have them in the right size, I open them all as layers, go to filters- and choose animation, check it out - or I leave out that step and go right to export as and export it as a GIF. The window opens and I have to choose the tempo of animations in miliseconds. I suppose you know how to do a GIF, I just wanted to remind the steps because I would love to see your GIF Donna :P Were you thinking about some animation GIF or a progress GIF like the one I posted above? Maybe I'll create some GIF footer as well!
Love,
Klaudia
Do you select all images together and open them as one layer or you do each one individually? I never did anything like this before :)
Here's a short Yt video showing how to do a GIF like that :)
That's exactly what I do, I select them all with ctrl + a.
Super! Thank you!
Wow, thank you for this step by step, I will try it out. I might use my lil quail as inspiration and have him hop across the bottom or some such :)
Thank you for sharing! This has inspired me to make mine! I will try to create one when I have the time 😄
Cool @elliebong, thanks so much for your support! I would love to see your footer, you are very talented and I'm sure it will look great!
Aww Thanks! I hope I can finish it earlier ;D so many things to do now xD
The final result of your footer is really nice. I love the look of it. Also, I think you're okay not using a ruler for the speech bubble. It looks good having it free hand, seeing as most of the drawing looks like it was done free hand as well.
Cool Chris, thank you so much for taking time to show support! I'm glad you like it! :)
This is so amazingly cool! For such a simple-seeming design, there's an amazing level of detail, and it's awesome how you explain your process. I agree with Chris - the speech bubble being hand-drawn adds to the charm of the artwork. Gorgeous stuff, Klaudia!
@traciyork, thank you so much for your kind words! Cool to hear that the speech bubble looks fine as it is ;)
You're very welcome, and it really does. Every time I see your footer, I love it a little bit more. 😊
Dude, nice. I always see people with cool little footers, and I'm like "Aww man, I want one!"
Thanks for supplying Steemit with flowery footers :D
Thank you @caleblailmusik, it's always so great to hear from you!. I'm heading to your blog now to see what you've been up to! hah :)
Oh my gosh, you're the best! Thanks for being around <3
This kind of makes me want to make myself a footer as well!
So glad to hear that, I'm really happy that I can be some inspiration to others. I'm curious how your footer would look like!
Wow! It's so amazing. Given the detailed steps on how to draw, I'd surely want to try and make one like this. Thank you @shinyforest! :)
Hi @yushaina, thank you so much for your support! I've seen your art for a non-artist contest and I think your footer would be lovely if you decided to create one! I sure would love to see it ;)
Awww, thank you very much @shinyforest! I'll try to make one soon :))
This is super lovely!
I've been thinking of creating a header and footer soon as well ♡
just to "tighten" things up a bit :D
I actually prefer that you did the speech bubble by hand. Your drawings are very organic and soft, full of round shapes and nature. I think it fits that even the straight lines aren't perfect. :D
but that's just me. hehe
Hah, thank you @jillustrations! I'm very curious how will your footer and header look like! Totally cool and pro as your other artworks, I suppose ;) Looking forward to see them :)
nyohmygawd don't make me blush. hee hee
maybe I'll sketch some versions tonight while I'm still inspired by your post. I'm notorious for saying I'M GONNA DO THIS THING! and then... not doing it because I let too much time pass between the initial inspiration and motivation boost and the actual sitting down and doing it. hahaha
Hah, totally know what you mean. I also write endless to-do lists that give me guilt trips :)
ohhh god. don't even get me started on "to-do" lists XD
It looks beautiful. Very good idea to have a footer for a blog like this. :-)
Thank you @ladywoodi, I appreciate your kind support a lot! I will do more custom art like this, I think this adds a nice touch to the blog :)