Watch my Enchantress come to life - with process photos and art tips

Anyone who knows me knows that I have a fascination with anything fantasy related, from mythical creatures and magic to witches and warlocks and especially purple unicorns! (long story), It's something I've always loved and for that reason I wanted to add a piece to my show that represented that in my style of painting.
So I pulled a canvas out of my canvas closet (which at this point was packed and I actually almost fell into it when trying to reach over to grab the one I wanted)
I set the canvas down on my work table and gently sanded it a bit to get some of the gesso off for a smoother finish, picked up a graphite pencil and started on the drawing. I usually always start with the face and eyes because to me they are what captures a persons attention the most so I always try to get those down first and then the rest of the figure.
ART TIP
If the Canvas or surface you are working on has too much of a "tooth" to it, try applying a layer of Gesso. Wait for it to dry and then sand it down. This will give the surface a smoother finish, although you may need more than one layer of gesso and sanding to get it super smooth.

Now that I had her down I pulled out a can of my best friend mister hair spray and gave her a thin coat so that the graphite wouldn't smudge and mix with the paint.
Whenever I paint with acrylics I always start off with a blue under painting. I normally use ultramarine blue in different intensities to set down all of the shadows in the piece. I start by filing in the darkest areas with pure ultramarine blue (BTW I love the name of this colour it sounds like a superhero or something LOL) and then thin it out with flow improver for the lighter areas. I use brushes for laying down the colours but then always smudge the paint with my fingers just because I find I get a really good transition from one tone to another.
Next I pulled out some liquid acrylics and mixed paynes grey and black and a lot of water to make the colour for her cape and hat.
I laid down the watery paint all over her cape and hat and while it was still wet sprinkled coarse salt over it to get that faded effect. In some places I added a more concentrated version of the paint to get the darker areas and added some of the watered down paint over the areas with salt to get a deeper speckled effect (I know sounds delicious)
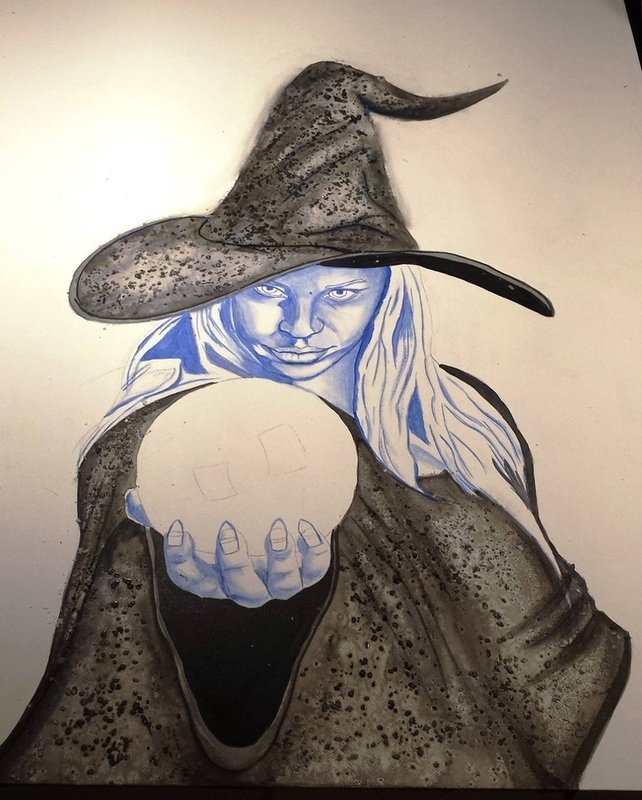
I paint over every part of her skin with this base (yup, right over the blue) so that you can see the blue through the new layer of paint but a more faded version of it. I've found that this really helps give depth and more realism to the skin.

While that's drying, I start working on her lips, now here I had the first argument with myself (which I do a lot) because I wasn't sure if to go with a dark red, blue, turquoise or black and after a long debate I finally agreed with myself to go with dark red.
I used a dark red and a mixture of purple and payne's grey for the darker parts of her lips.

I add another layer of skin tone all over her skin and move on to the eyes and make them a light turquoise colour. This is just the base coat for her eyes and now at this stage she finally starts looking like a person and not a zombie suffering from severe hyperthermia.
This is when I got into the second fight with myself, I couldn't decide on the colour of the hair, I was between blues, violets, greenish aquas and reds. so after a near fist fight between myself and I, we decided to go with the aqua tones.
This part was a lot of fun, I laid down the first coat of aqua and then made different mixtures of the same tone, I picked up my fan brush and started to add in all of the different colour strands of hair and at that point she really starts to come alive and out of the canvas, I start to breath a little easier because its working out the way I had hoped (although part of me is still cursing at myself in the background for not having gone with violet hair, he's a real asshole sometimes) and I can now continue on with her face and hands.
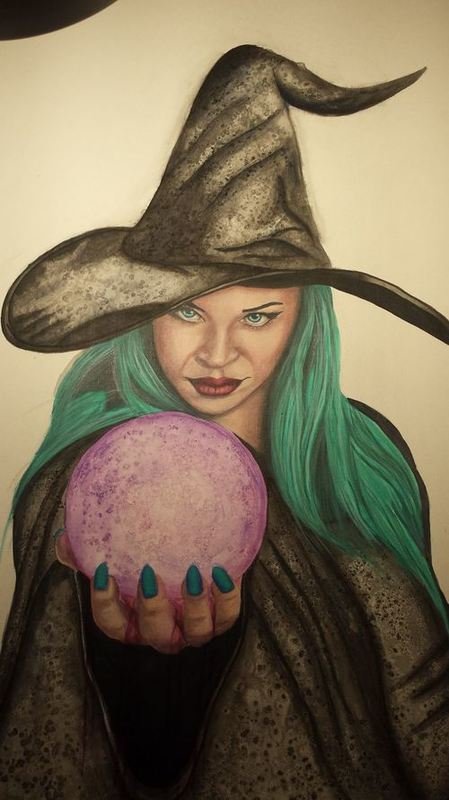
I mix some of the base skin tone with burnt umber and burnt sienna and start darkening the shadow on her face, hands and neck, then I add in a lighter skin tone for some of the highlight parts and blend everything together using a dry brush technique (this really destroys your brushes!!)
I add some highlights to her eyes, do up her eye makeup, paint her nails and add a touch of magenta to her cheeks (cause a girls gotta look good)
Now I can start on the crystal ball and for that I used watered down liquid acrylics and let them mix on the canvas on their own and then some coarse salt while it was still wet for that speckled look.
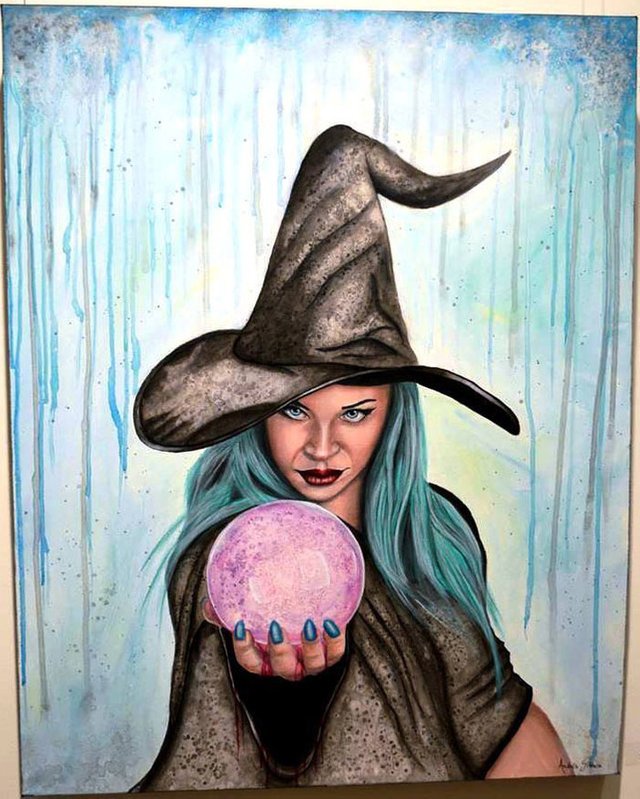
The next day I start off by using a blending medium all over the canvas and then took out different shades of blue and green and just blended them all directly on the canvas, working them in and blending them as I went along the entire piece.
once that was dry I used watered down liquid acrylics for the drip effects and coarse salt in some areas to make everything fit together.
Adding the white highlights is one of my favourite parts because it really makes things pop, especially when it comes to the eyes, so I add the sparkle to her eyes, the highlights on the crystal ball, a little bit of highlights on her nose, lips and cheeks and then finally I add some drips of colour running down her hands, through her fingers and down her cape.
ART TIP
Highlights can really bring a piece to life but you have to use them sparingly! adding too many highlights will give you LESS of a realistic effect. instead add highlights to crucial areas to really make them pop or give the skin a shine or moisture effect, and remember highlights are not always pure white! they are a reflection of the environment, so in this case my highlights were a very faint blue.
Below is the finished piece
“I loved making this piece and I actually used my little sisters eyes as a reference, but shhh, don’t tell her, it might go to her head ;)”
Title: Enchantress
Medium: Acrylic on canvas
Size: 24x30
Hope you like her :)


Another stunning piece of work. I love how you always manage to incorporate you trade mark drips in a way that always works with the theme. Really beautiful.
Thanks so much @thecryptofiend
Wow, great work! -upvoted and followed for future articles
Thank you @future24 really glad you enjoyed it and thanks for the support :)
Really amazing work ! Even the music in your videos are so tastefully done, as is all your work ! Please share your Blind Faith here on steemit, very touching. Actually I would love to see a regular feature of your work ! Very Classy work !
Following ! Sorry my votes don't have much weight ! : (
Thank you so much @jstreetman your comments and positive feedback mean way more to me than your voting power. and I definitely will share blind faith, trying to get the blog post ready in the next day or so :) I plan to post all of my WIPS gallery shows and projects here moving forward, Ive really enjoyed steemit so far :)
Great painting. I love the "dots" you used to add details to her hat and clothes. Also very interesting to see how you put the shadows on her face with blue first. Makes me want to try that with copics.
you totally should! it really helps get good undertone and definition :)
Enchanting painting! Love it!
Thank you @anca3drandom so glad you think so :)
Bewitching work!
Thanks so much @opheliafu I really appreciate it and the perfect description for her :)
Yeah!
Thanks @lennex :)