SLC S23 Week6 || Geometry with GeoGebra: More on Triangles, Quadrilaterals, and Circles

Image taken from Pixabay
A new week and a new challenge from @sergeyk's GeoGebra class. This time we revisit triangles, circles and quadrilaterals. You can also check the full post here and give it a try if you want SLC S23 Week6 || Geometry with GeoGebra: More on Triangles, Quadrilaterals, and Circles.
Let's get started!

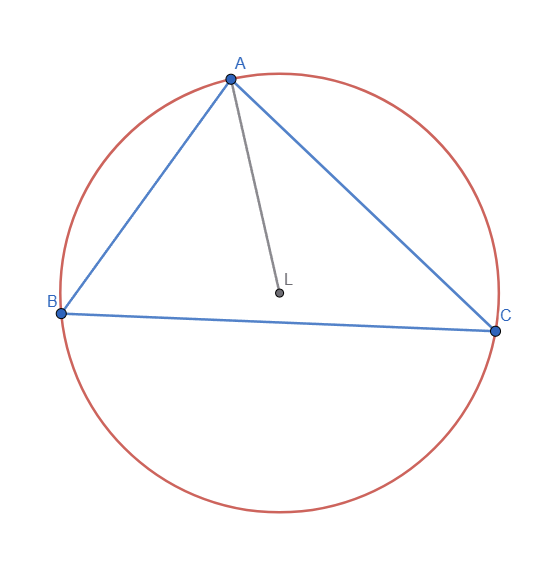
Construct an arbitrary triangle, where all three vertices should be movable. For this triangle, construct its three excircles. Demonstrate how they behave.
Bonus for additionally constructing the incircle and circumcircle.
We already had step-by-step instructions on how to construct the incircle and circumcircle of the triangle. But just as a quick reminder:
- The incircle is made using 2 angle bisectors and a perpendicular line passing through the intersection point of the 2 bisectors. The segment made from the intersection point of the leg of the perpendicular and the intersection point of the bisectors represents the radius of the circle.

Incircle
- The circumcircle is made from the intersection point of 2 perpendicular bisectors and one of the vertex as radius.
Circumcircle
Now, to construct one excircle we need to use the Angle Bisector tool and select 2 sides at a time to create 2 bisectors, we can hide the internal bisectors as we don't need them. I also marked the intersection points of the external bisectors and it looks like this:

I also added lines through the 3 vertices and draw a perpendicular line from one of the intersection point of the external bisector to the side of the triangle, the segment uniting these 2 points is the radius of one of the excircles of the triangle:

After construction the rest of the 2 excircles, here is a live representation:


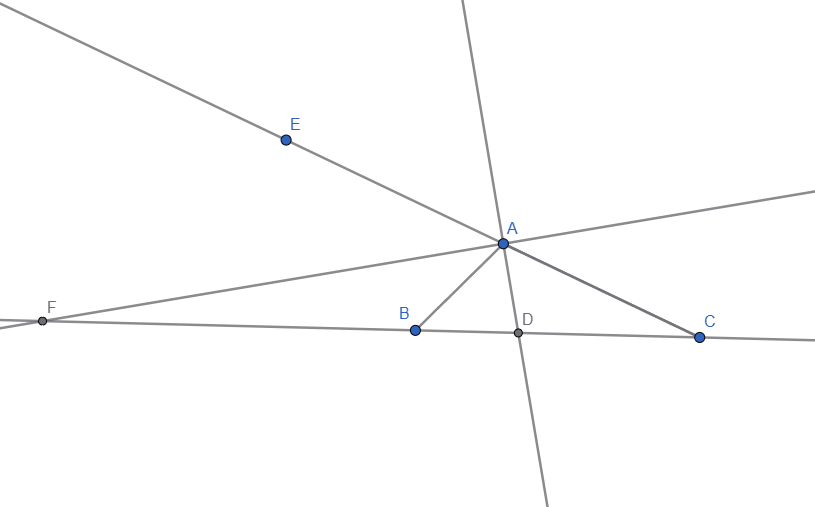
Construct the Euler's circle—but better than I did, as I did not illustrate all its features—do it better than me.
The Euler's circle or the 9 point circle passes through the feet of the altitudes - marked with a red X, the midpoints of the triangle sides (also known as the intersection point of the perpendicular bisector with a side) - marked in green and the midpoints of the segments from the orthocenter to each vertex - marked in purple.
The DE segment with point F (center of the Euler's circle and also the midpoint of DE segment) represents the Euler's line. This line goes through multiple important centers of the circle. Point F is the center of the 9 point circle, point D is the center of the circumcircle and point E is the intersection of the altitudes (orthocenter of the triangle).
Here is the drawing without the circle present:

The Euler's circle can be seen in the GIF below:

I also added the circumcircle to the drawing:

I don't think it necessary to go into detail about how the circle is constructed since we already had drawn altitudes and bisectors in the past.

Besides the Euler's circle, there is also the Euler line, as well as other circles such as the Spieker circle, Taylor circle, Nagel circle, Apollonius circle, Malfatti circles, and Feuerbach circle.
Construct one of the circles I listed, or if you find another circle related to a triangle.
Points will be lower for choosing a simpler circle and higher for a more complex one.
For this task I initially wanted to represent Feuerbach circle but after researching online I found out that it's the same as Euler's Circle but it studies the tangency between the incircle, excircles and the Nine Point Circle. Here is a live view of Feuerbach Circle:

Let's do a breakdown of what we see:
- The 3 red circles represent the Excircles of the Triangle
- The Green circle is the Incircle of the Triangle
- The Orange circle is the Nine-Point Circle or Feuerbach Circle
- The point marked with X is the intersection point between the incircle and the nine point circle
- The 3 light blue points are the intersections of the nine point circle with each of the 3 excircles
This means that the Nine Point Circle is tangent to the incircle and excircles of a triangle. This is also known as Feuerbach's Theorem.
Since we already had to construct the excircles and the Nine Point Circle in the previous tasks, I also constructed Apollonius Circle. Here's how:
- I placed 3 points randomly A, B and C, connected B and C with a line and created the segments AB and AC
- Constructed BAC angle bisector and marked the intersection with BC
- Added the CA ray and placed a point E
 | I placed 3 points randomly A, B and C, connected B and C with a line and created the segments AB and AC |
 | Constructed BAC angle bisector and marked the intersection point with BC |
 | Added the CA ray, placed a point E and constructed EAB angle bisector. Also marked the intersection of bisector with BC line |
 | The FD segment is the diameter of Apollonius Circle. Point G is represents the middle of this segment so I constructed Circle with Center G |
Now that the circle is constructed, let's see why it's important.
- Placing a point H anywhere on the circle, we measure the distance between B and H and C and H (the length of BH and CH segments). I marked the segments with dotted line and added the distance as text
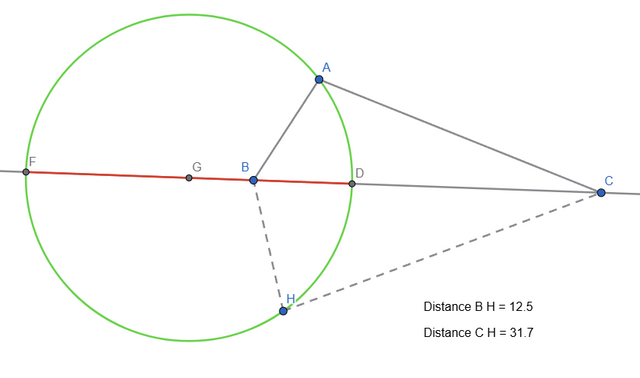
- If we do the ratio between the 2 distances, we can see that no matter where point H is on the circle, the ratio remains the same
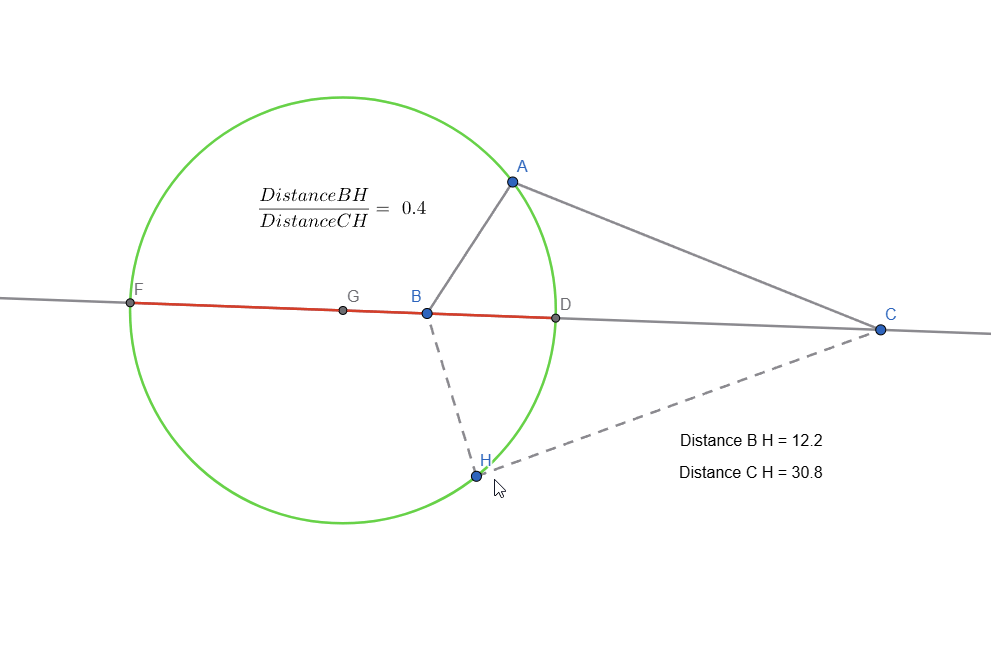
Live representation


Construct a quadrilateral and circumscribe a circle around it. The center of the circumscribed circle (as in a triangle) lies at the intersection of the perpendicular bisectors.
Not much can be said for this task that wasn't already said in the lesson post.

Perpendicular bisectors
We can see in the GIF below, that ∠ F + ∠ D = 180 no matter how we move the points on the circle.

Live representation

Simply illustrate a quadrilateral with an inscribed circle (a picture).
As it was explained, for a quadrilateral to have an inscribed circle, it must satisfy this equality: AB + CD = BC + AD.
I added the measurement of each side just so I can prove the quadrilateral can have an inscribed circle.


Depict a kite and another quadrilateral with perpendicular diagonals (not a rhombus or a kite) as an animation, not just a picture.
For the construction of the kite I used 2 arbitrary circles. I believe this can also be done with Perpendicular Line and Reflect About Line tools. The construction steps can be seen in the GIF below:

Kite construction
After a bit of styling, this is how it looks and behaves:

Kite Animation
And here is the representation of the quadrilateral with perpendicular diagonals:

Quadrilateral with perpendicular diagonals
And with this, another season of Steemit Learning Challenge comes to an end. I would like to invite @ady-was-here to also take part in this week's challenge.
Thanks for reading. See you next time!