GIMP tutorial: Removing Red Eye Effect !
Introduction:
The "red eye effect " in photos is the appearance of reddish pupils in color pictures of human beings and many other animals. It is caused by the lighting up of blood vessels in retina by the camera flash.
It can be avoided by not looking at the camera flash directly while being photographed and staring at the photographer’s shoulders instead.
However, it’s not the end. If you’ve got some messed up images, you can fix the red eye using various tools.
Enter GIMP ( Open Source ):
*GNU Image Manipulation Program (GIMP) is a software which can help you with red eye removal.
GIMP is an open-source, free and a specialized graphics editor.
It’s license is released within GPL v3+ and it is available for various platforms like Linux, Windows and macOS.
Step 1 (Let’s Begin):
- Zoom in to the part of the image which requires red eye removal.
- You can choose how much to zoom as per your comfort. However, 4:1 ratio serves the purpose just fine. It practically allows you to work pixel by pixel.
- Now choose the right brush. Make sure you select a fuzzy brush.
- There are 3 x 3 and 5 x 5 fuzzy brushes available, pick the one which works best at this resolution (for this given image, let’s take a 5x5 fuzzy brush).
- Use the hit and trial method using Edit –> Undo until you find the most suitable one.

Step 2:
- Before burning the red eye area, you need to set up the Layers, Channels and Paths dialog.
- Open the Layers, Channels and Paths dialog box and leave it as is.

- Go to the Channels, click on the eye icon given at right to the Blue and Green options. This should deactivate the Blue and Green Channels.
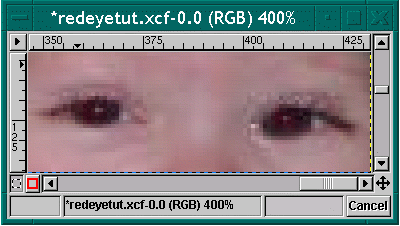
- Leaving this dialog window open is highly recommended. After deactivating Blue and Green Channels, the image should be unaffected and still appear to be the same as shown in first image.
Step 3:
The image used in this tutorial is that of a baby with his father and has been extremely zoomed. * Thus, a 5 x 5 fuzzy brush is suitable for editing. After the brush is selected, open the Dodge and Burn dialog window which should look like this-
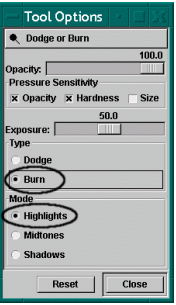
The Dodge and Burn tool can be accessed by double clicking on

icon.Select Burn and Highlights options as shown. Move your cursor over all the red area while Burn tool selected. It can also be used on Midtones, only a little bit. This will remove the red eye.
After completing, you may observe some greenish touch to the white area in the eye. However, it is very insignificant and negligible that the image can be left as such.
If in any case, the Green bothers you, you can remove it using the same process as discussed above for removing the Red.
Try a different combination of brushes this time. Also, decrease the opacity for Green Channel by moving the slider towards a lesser percentage.


Step 4 (Final Touch):
When you’ve successfully removed the Red Channel (Green too, if you wish), the image should appear to be like this-
Zoom out now. Locate any other areas to be corrected. If none spotted, Voila !! You’ve achieved the perfect picture without distorting it’s quality.

Conclusion:
Obviously, the best way to have good pictures is to avoid red eyes naturally which is, by not looking into the lens. But if the pictures have red eyes, do not worry GIMP got you covered. Here’s the final image after editing-

Wouldn’t it be injustice with this picture if the baby was left with the red eye ?! A beautiful picture for a beautiful father-son moment !
Posted on Utopian.io - Rewarding Open Source Contributors
Thanks for the post, I'm using gimp a lot for work. Don't know much about it yet though.
Thank you for the contribution. It has been approved.
You can contact us on Discord.
[utopian-moderator]
Hey @davcps I am @utopian-io. I have just upvoted you!
Achievements
Suggestions
Get Noticed!
Community-Driven Witness!
I am the first and only Steem Community-Driven Witness. Participate on Discord. Lets GROW TOGETHER!
Up-vote this comment to grow my power and help Open Source contributions like this one. Want to chat? Join me on Discord https://discord.gg/Pc8HG9x