Tutorial: How to install, setup and activate Rippex Ripple Cold Wallet in Windows

Hi Anidel here for another simple and useful tutorial. Today I will show you how to install Rippex is an open-source cold wallet client for Ripple. I will try to make this tutorial as detailed and simple as possible so that even newbies will be able to follow.
Introduction
Ripple is a cryptocurrency very much like Bitcoin. It is digital currency used to pay for services and goods. Ripple is was designed with the primary purpose of helping banks and other financial institutions speed up cross-border transactions while Bitcoin was designed to bypass dealing with banks and other traditional financial institutions.

Rippex is an open source cold wallet where you can interact with the RippleNet the network component of Ripple.
Requirements
- Rippex Ripple installation file
- Windows Operating System 64 Bit
- Web browser with internet connection
- 20 Ripple XRP (Optional if you want to activate the cold wallet)
Procedure
First we download the installation file of the Rippex wallet. You can find the download page of Rippex here. Once you are in the download page locate the download button as shown below. We are installing the Windows 64-bit version in this tutorial.

Once you click download it will show you a reminder clause in using the ripple wallet. Just click on the "agree" button.

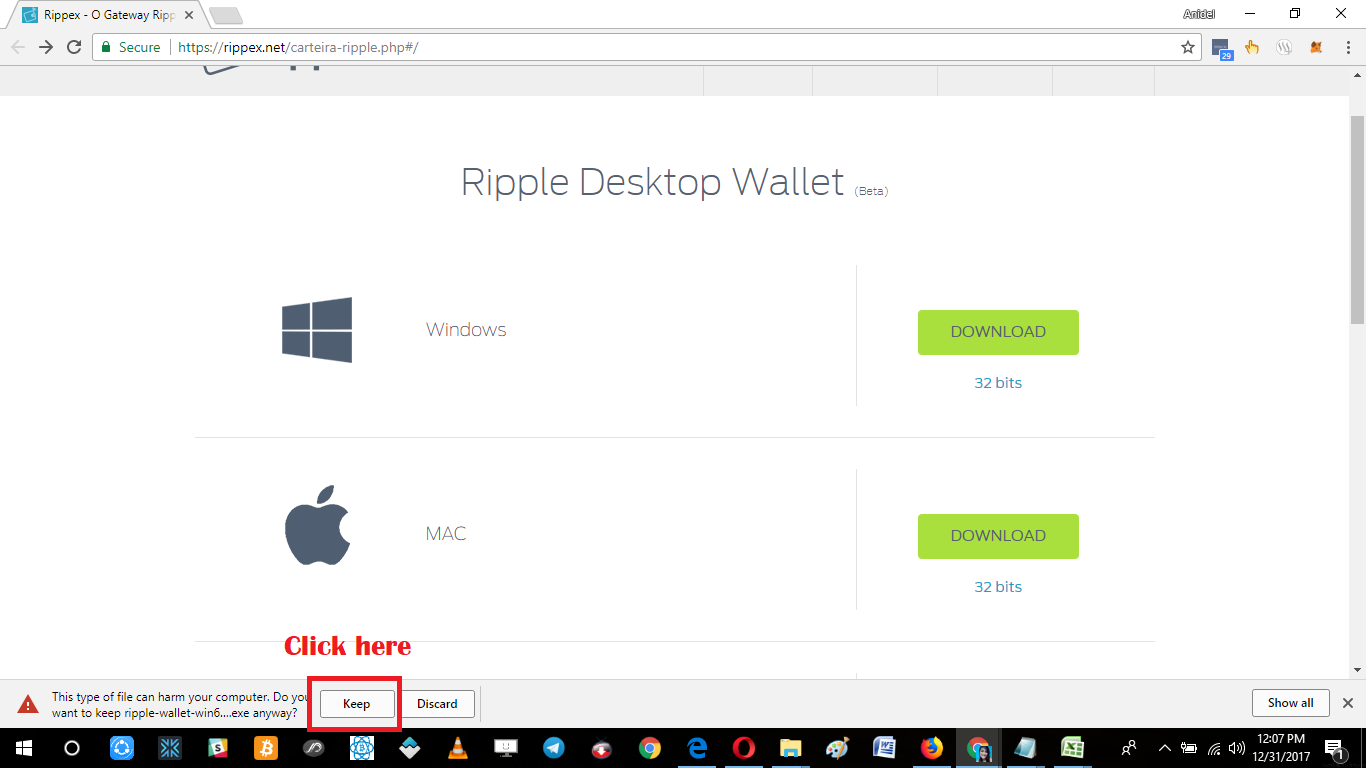
After clicking on the "agree" button download will start in your browser. Your browser may warn you about downloading the file just click on the "keep" button to proceed with the download as shown below.
After downloading the file go to the download folder as shown below and double click on the installation file "ripple-wallet-win64-1.4.1..exe" to start the installation.

Once you double click on the installation file you will be presented by a welcome window. Just click on the "next" button to proceed with the installation.

The next window will ask you to specify to what directory the Ripple wallet will be installed. Just keep the suggested directory and click on "next" button to proceed.

The next window will inform you that the Ripple wallet is ready to install. Just click on the "install" button to start the process.

No further interaction is required. Just let it install until you reach the page shown below. Once you reach this page this means that the installation is done. Click on "Finish" button to exit the installer.

Since the ticker box to run the wallet right after installation was selected the ripple wallet will run right after the installation. Once it runs we will be taken to terms of use agreement window. Just click on the "I agree button" to continue.

The next page is the main dashboard of the Ripple Desktop Wallet. We start to create our account by clicking on the "create new account" link shown below.

At the next page since we are creating a totally new account and we are not importing or recovering any ripple account we click on the "Create an empty account" button as shown below.

Once the "Create an empty account" button is clicked it will immediately create the account file. Select where you want to keep the account file. Make sure that it's location is safe and easily accessible only to you. Please look at the screenshot I have taken below and just follow the instruction there.

The next step will be encrypting the account file. To encrypt the account file we will be asked to input passwords. Make sure the password is strong (combination of words and numbers and with varying capitalization). Click the "Encrypt account" button to continue with the installation process.

Once the account is encrypted it will show you a summary of the passphrase (password), your public key (ripple wallet address) and a computer generated secret key.

We need this information together with the ripple account file to recover our account when needed. So it is mandatory that you keep these files secured and keep a copy that you can easily access. In this tutorial I kept them in a notepad file that I will save in the same directory of the account file.

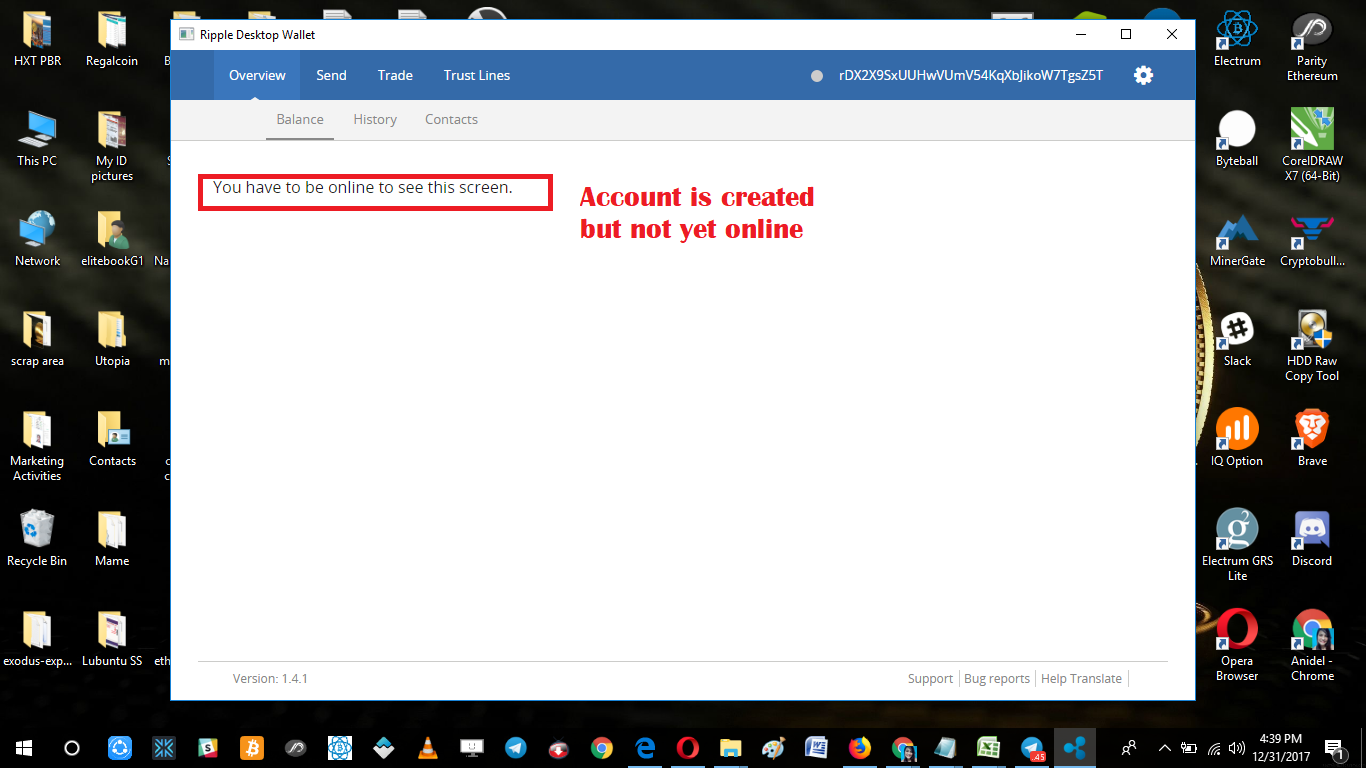
Once we are done copying the passphrase, account ripple address and the secret key we click on the "Yes, I have save my secret key" button to continue and finish the account setup. Once you click this button it will bring us to the main dashboard of the account we have created. Notice that the balance is not showing. It is not yet online.
To connect to the network we click on the settings icon located at the top right of the dashboard. Click on it and select the "settings" selection as shown below.

Once this setting selection is click we will be brought to the settings page. Click on the "Network setting" button.

Upon click the "Network settings" link it will bring us to the Network setting page. Just tick on the tick box to enable online mode.

Once ticked we will be connected to the RippleNet network. There is a minimum of 20 XRP to activate the account.

Just send 20 XRP to your account (your ripple wallet address to activate it). Unfortunately I have no holdings of 20XRP right now and I can't show you what it looks like.

Done! Congratulations you have successfully installed, setup and activated your account (upon sendig 20 XRP to your wallet address).
I hope you enjoyed my tutorial. Until next time bye!
Posted on Utopian.io - Rewarding Open Source Contributors
Thank you for the contribution. It has been approved.
You can contact us on Discord.
[utopian-moderator]
Hey @ankarlie I am @utopian-io. I have just upvoted you!
Achievements
Suggestions
Get Noticed!
Community-Driven Witness!
I am the first and only Steem Community-Driven Witness. Participate on Discord. Lets GROW TOGETHER!
Up-vote this comment to grow my power and help Open Source contributions like this one. Want to chat? Join me on Discord https://discord.gg/Pc8HG9x
Your contribution cannot be approved yet because it is not as informative as other contributions. See the Utopian Rules. Please edit your contribution and add try to improve the length and detail of your contribution (or add more images/mockups/screenshots), to reapply for approval.
You may edit your post here, as shown below:
You can contact us on Discord.
[utopian-moderator]
@shreyasgune hello sir I don't think you can not make it more informative than I what i have contributed. and it is not as trivial you might think as it involves keeping account files, ecrypting the account and securing the account through secret keys. maybe you can reconsider sir
You have a valid point. I'll approve it.
Thank you sir for your reconsideration. keep on being awesome sir!