Flutter Development - Splash Screen, Sign Up and Log In using SharedPrefrences and Displaying Stored Data on Dashboard
Hello everyone!

Today we will learn how to create a splash screen in flutter and SharedPrefrences to store the data in the local storage without a server and then retrieving that data to perform log in and displaying it on the screen to ensure we have stored the data correctly.
Splash Screen
To develop a splash screen firs of all we need to create a new dart file. Then we have to import material library. Then we can use stateless or stateful widget. I am using stateful widget.
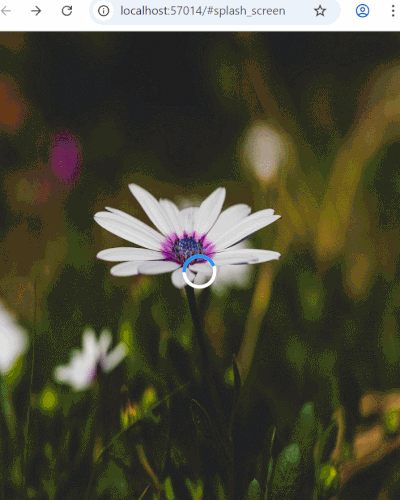
In the splash screen I will use a background image and then I will use a CircularProgressIndicator which will be displayed on the image and for this I will use Stack.

The simplest and basic code to display the screen has been completed. I have used a network image, and a progress indicator. The background colour of the indicator is white and the colour of the indicator is blue.

We have developed this interface so far but it needs improvement and styling. So now I will style the interface.

After styling this is the new look of the screen. Now the development of the splash has been completed. On the splash screen this image and circular progress indicator will appear.
I have given it full height and width using MediaQuery and I have used fit property to fill all the screen with the image. Then I used center wudget to make the indicator in the center of the screen.
Now it is the time to write logic code for the splash screen as we know that splash screens appears for a few moments and then a new screen appears so now I will manage this via using initState function.

Here you can see the function where I have implemented Duration of 3 seconds. Actually init function is called before the build widget. So as soon as the application starts it takes control and direct the application to stay 3 seconds on the splash screen and after that it will redirect the user towards the sign up screen.
Here you can see the working of the splash screen as the development of the splash screen has already completed. I have designed sign up screen as just a user interface to show you. I will use this screen to continue developing next scenario of log in and sign up by storing data in the local storage using SharedPreferences.
So in this way we can simply develop a beautiful splash screen and redirect to the user after a specific time period to the next screen where we want.
SharedPreferences
To use SharedPreferences in flutter we have to use SharedPreferences package from pub.dev.

Here you can see the package. I have installed this package in my project. To install go to terminal and type: flutter pub add shared_preferences. It will take some time and then it will add this package by downloading it directly from pub.dev. In this way it will be added in the pubspec,yaml file.

As we want to store the data of the user obtained from the sign up form so to store the data I have defined 3 String variables with the related name. Then to control the text written in the fields I have defined three controllers and I have passed these controllers to the TextFormFields.

Here you can see I have created a Future function saveUserData() to save the data in the local storage using SharedPreferences. First of all I have created instance of SharedPreferences and then I am storing data.
The data is stored in the key, value pair. So each key must be unique because when you call stored data key is used and without correct key we cannot access data as it is encrypted. Then I have called this function in the sign up button to get data from the TextFormFields and store it in the key value pair form in the local storage.

This is the sign up page where this code will work to register the user and save the data in the local storage.

Next here you can see I have developed a log in screen where we will use the data which we have stored in the SharedPreferences to log in and move to the next screen after successful log in.

Here you can see I have declared two TextEditingControllers for the log in screen to manage the email and password entered by the user. I have decalred two Strings to get the data from the local storage and store in these strings to compare with TextEditingControllers. Then there is a bool variable to check of the log in is true or false.

Here you can see I have created login() function to manage the login functionality. To access data from SharedPreferences we have to initialize the instance of SharedPreferences first so I have done it at the start. Then I am getting data from local storage using sp.getString(key) method.
Then I am using the obtained data to validate the email and password entered by the user, The function checks if the data entered by the user is correct then it allows successful log in and move the user towards the DashboardScreen. If the credentials are incorrect then it shows an error message and for exceptional cases it also manages with else condition.

Here you can see I have tested the functionality of the log in screen. I did not enter anything in the fields and it showed me error via SnackBar.
.gif)
Here you can see I have tested the functionality. You can see I have entered details like email and password which were incorrect so the application showed me an error message. Then I completed the email and entered correct password and the login was successful and the user has directed to the next screen which is dashboard. I will design the dashboard screen now and I will show the data which we have stored in the local storage.

Here you can see the dashboard screen where I have displayed the saved data such as name and email of the user. I have not shown password because showing password f the user is not a good thing. We are here to learn using SharedPreferences to store and share data.

It is simple to get data from the SharedPreferences and then display it. I have simply created 2 String variables. Then by creating instance of SharedPreferences I have retrieved the data from the local data storage and then in the body I have used that data to show to the user on the screen. The logout function sets IsLoggedIn false and send the user to the back screen which is a log in screen.
.gif)
This is the complete overview of the work which we have done and learnt so far. We have created a splash screen which stays for 3 seconds and then sign up screen is opened after entering details in the sign up screen log in screen is opened. If the user enters correct details it is directed to the Dashboard where the data which was stored during sign up is displayed otherwise it throws an error message to the user.
https://x.com/stylishtiger3/status/1950737567772528851
SPOT-LIGHT TEAM: Your post has been voted on from the steemcurator07 account.