Electrical Socket Board Connection And Setup Methods.
Assalamu Alaikum everyone hope you are all well and healthy. By the grace of God I am also well. Every day we are involved with various electronic devices. We need to know these because if we know this work, we will gain a lot of wisdom and save the cost of the work.
So today I will setup a socket box in my room among you. It is something we need very much. Electrical socket board is a very important device used for power supply and connection of various electrical devices. Having multiple sockets allows many devices to be connected at the same time which speeds up work.
Importance of socket board :- Socket board makes power supply easy and secure. It supplies power according to the power input of the device. Besides, the portable socket board can be taken anywhere and used. Hence, electrical socket boards are essential for safe and effective electricity use in daily life. So I will setup the socketboard in my room.
| Equipment Required :- |
|---|
Socket board
Red and black wire (red wire is used for phase and black wire for neutral line)
screwdriver
pliers
Tape (Electrical Insulation Tape)
Tester
screw
hammer
 Fridge Combined Socket Board
 screw
screw
 Gang Switch box
| Method Of Connecting :- |
|---|
Now I will start connecting the socket box. It is very important to follow the correct rules for connecting the electrical socket board as it is essential for safety. Below is the step by step method of connecting socket board with red-black wire,
| Step - 01 :- |
|---|

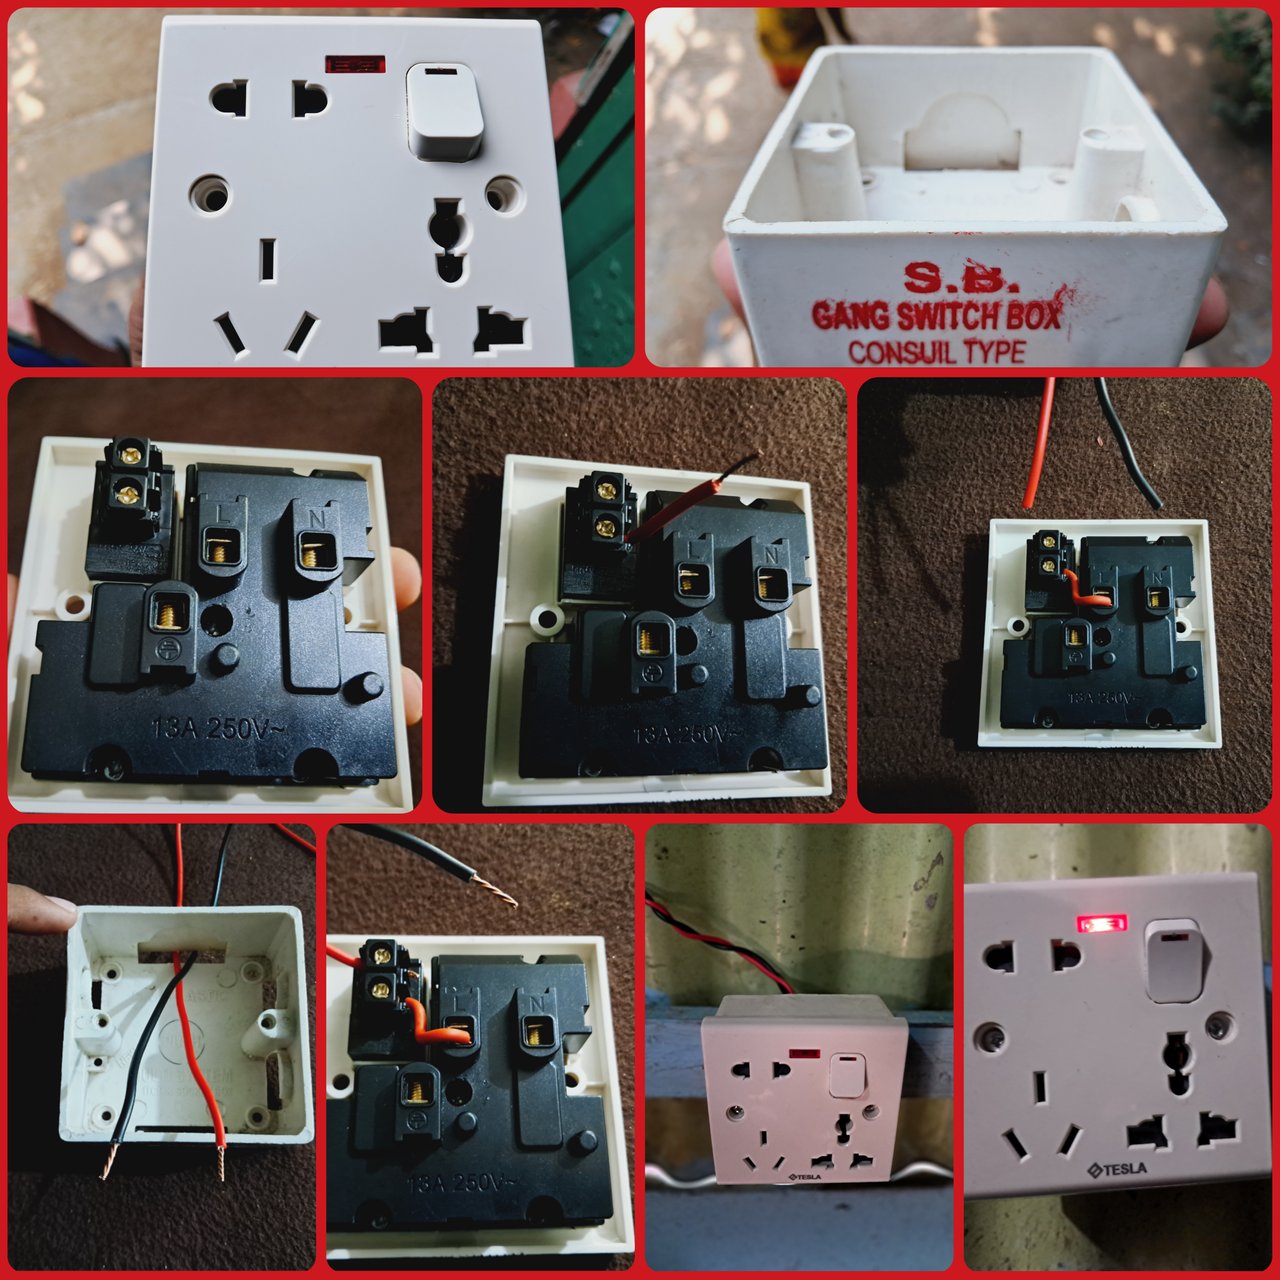
Security must be ensured at the very beginning. Turned off the main switch and checked with a tester if there was any power in the socket. Then I opened the socket board and saw the lines. At the beginning there is a switch to the left. Then where L = phase current and N = neutral current. Below this is the earthing current.(ex.)
L (Live): For red wire.
N (Neutral): For black wire.
E (Earth): For earthing wire.
| Step - 02 :- |
|---|

- Now the switch connection has to be done so I will connect the wire from the phrase line to the switch line. For this I took a red wire and insulated it on both sides.
| Step - 03 :- |
|---|

- Now I opened a screw on one side for the switch connection and inserted the red wire. Then I tightened the screw well so that it does not loosen. Care should be taken that it is not a loose connection.
| Step - 04 :- |
|---|

- Then I unscrewed the other site of the wire connected to the switch and connected it to the L site. It should be fitted properly and tightened well so that there is no loose connection.
| Step - 05 :- |
|---|

- Now connect the red wire as phase and black wire as neutral from the mainboard. That's why I cut two wires equally. The size of these wires is 1×1.3 RM (3W) = 3/22.
| Step - 06 :- |
|---|

- Now check the board below the socket board to see if the wire can enter from the other side. That's why I checked with two wires.
| Step - 07 :- |
|---|

- Now the cable should be corrected. So I unscrewed the red phase wire on the switch and set it. Then I tightened the screw well so that it does not loosen. Since high voltage current will flow through it, it is important to keep it tight.
| Step - 08 :- |
|---|

- Next I will connect the neutral wire. So I unscrewed the nutal black wire to the N junction on the right side. Then tighten it properly so that there is no loose connection.
| Step - 09 :- |
|---|


- Then I drilled a hole in a piece of wood in my room where I would set my socket board. With the iron I drilled holes evenly so that it would be convenient to insert the screws. I used a hammer while inserting the iron.
| Step - 10 :- |
|---|

- Then I tightened the box below the socket box evenly with screws and adjusted it to the wood. It will not move if properly tightened. Any heavy object can be connected to it.
| Step - 11 :- |
|---|
 |  |
|---|---|
 |  |
- Now I set my socket board over it and take out its two wires from the other side. These two cables should be connected directly to the mainboard. After that, I tightened the screws on both sides of the socket board. Then phase and neutral should be taken directly to the board.
| Step - 12 :- |
|---|

- Now I will make phase connection directly from inside the board. For this, by unscrewing the screw at the marked place shown in the picture, I inserted the phase (red) wire there and tightened the screw well.
| Step - 13 :- |
|---|
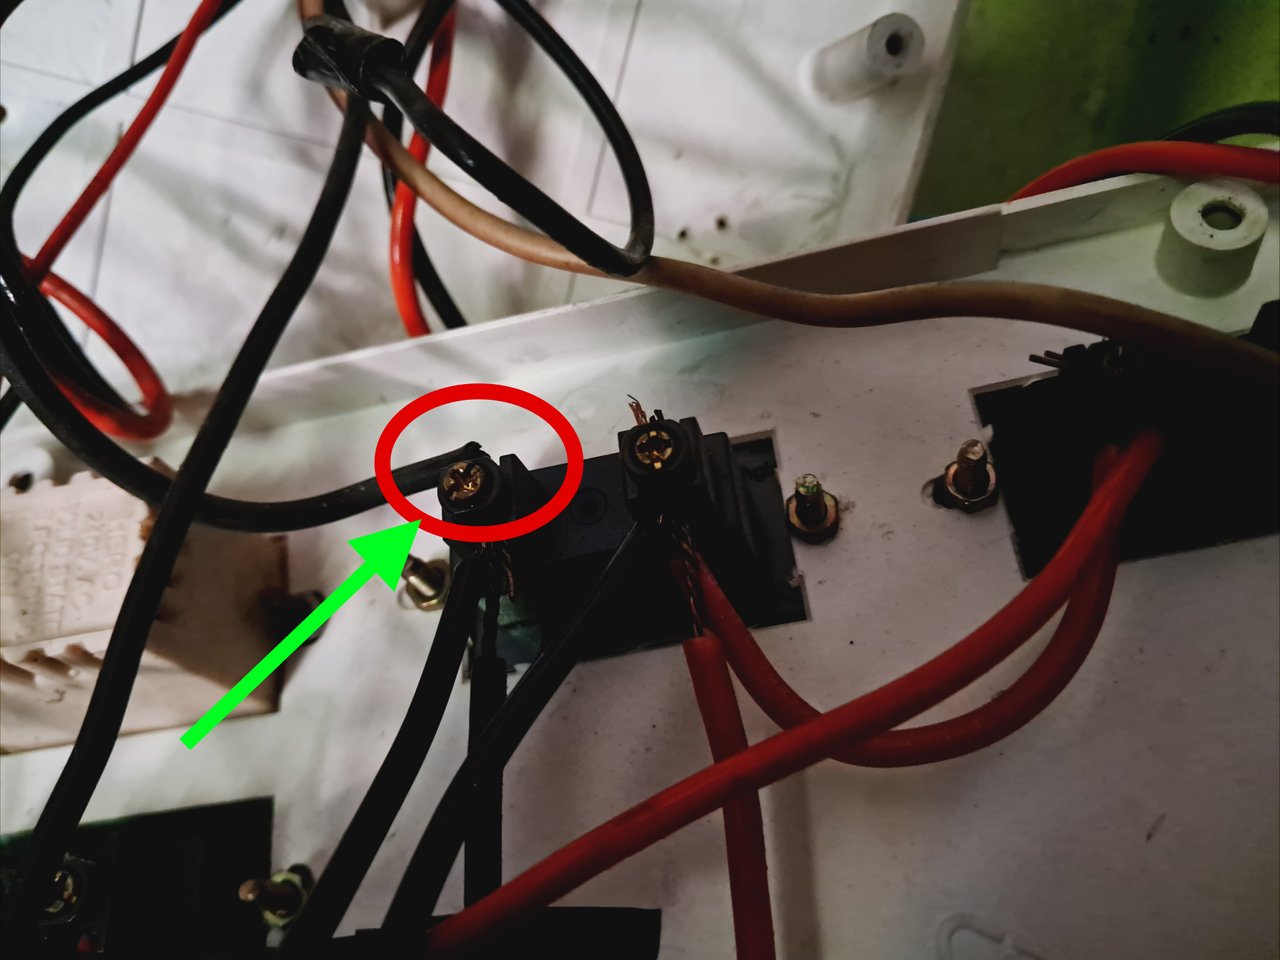
- Once the phase connection is done, now the neutral connection has to be done. That's why I connected the neutral black wire to the neutral line and tightened the screw well. You can clearly see in the picture.
| Final Output :- |
|---|
- Now all the lines are connected. So now it's time to check whether the connection of the socket board I connected is complete or successful. That's why I turned on the mains switch in my room and switched on the socket board. You can see the red signal light on the socket board is flashing, it means I am successful.
 Final output
You need to apply some knowledge to do this. That's why you first get some knowledge from an electrician. In this you can gain a lot of knowledge about electronics. But there are some caveats here.
Never work with wet hands.
It is mandatory to keep the main switch off.
Ensure earthing.
If you have trouble understanding anything, seek the help of a professional electrician.
As an engineer, the above electrical connection instructions appear to be correct and safe as they follow standard electrical practices. It is important to ensure that the L, N, and E points on the socket board are correctly marked. Sometimes the symbol may not be correct on low quality devices.
So understand well before connecting. If these steps are followed correctly, it will be considered a safe and efficient electrical installation. So I attached this line myself from my idea and presented it to you. Hope you will benefit from watching it later.

Hi @max-pro!
You explained in a good way about the circuits of socket connections. Actually I am afraid of electricity and try to restrain from live connections.
But yesterday I had to make the connection of lights on my own as they were not working. When I checked them I came to know one wire was out of the circuit.
Firstly I was not touching it but remembering necessity is the mother of invention I got the wires opened them carefully and then plugged in in the right place. Then I gave it a try and Alhamdulillah it worked well without any loss and problems.
ধন্যবাদ ভাই আপনার চমৎকার মন্তব্যের জন্য, যদি আপনি মন দিয়ে সাবধানতার সাথে ইলেকট্রিক্যাল কাজ করেন তাহলে আপনি সেই কাজের সফল হতে পারবেন তবে আপনার মাথা ঠান্ডা রাখতে হবে এবং সেফটি বজায় রাখতে হবে। ☺️