SLC S23 Week2 || Geometry with GeoGebra: The Triangle and Its Elements
Hello My dear friends, I hope everyone is well? Alhamdulillah! I am also well with your prayers and love.
I am @sheikhtuhin
From #Bangladesh
I am very happy to be participating in the Steemit Learning Challenge Season 23.I am also very happy that all the creative content has been selected here this time.
 |
|---|
Dear friends, I will join SLC S23 Week2 || Geometry with GeoGebra: The △riangle and Its Elements△. right now, where my dear teacher @sergeyk has taught me very beautifully.I will join that challenge and try to show some great activities in the first week, God willing.Without further ado, let me get straight to the solutions to my homework.
Using Geo Zebra I will draw a triangle with three heights, analyze how I drew it, and try to provide you with a video or GIF file.However, I am very sorry that despite my best efforts, I sometimes cannot get the GIF file to work the way I want.
.png) |
|---|
Let me show you the steps to draw a triangle with three altitudes right now.
- First, we will draw a triangle using the "Polygon" tool in the Geo Zebra application.It could be any kind of triangle. Last week I didn't know much about it so I couldn't give anything good as a gift.This week I learned to use this application perfectly.
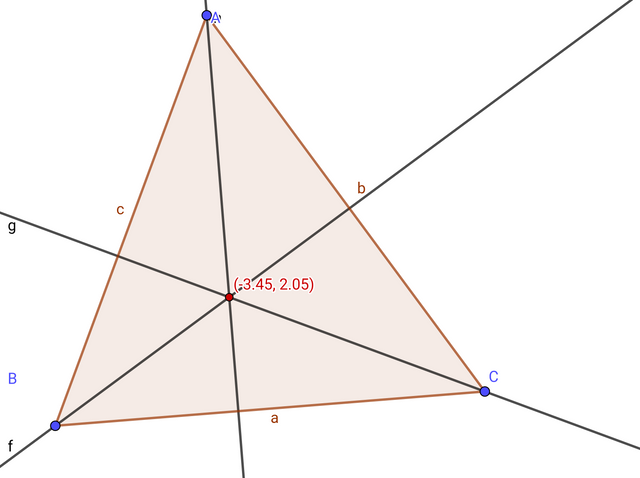
Then, using the "Perpendicular Line", both students will draw a line on the opposite side.The intersection of the heights will also be shown here. This is the main midpoint where the three intersections come together.
The intersection points must be marked using the "Intersect Two Objects" tool. The intersection point of the three altitudes drawn from ∆ABC is D.
Show that the altitude is a perpendicular line.
Show that the median divides the opposite side in half.
GeoGebra I will now mention the various rules for drawing altitudes, angle bisectors, and medians in a triangle.
 |
|---|
| A triangle ∆ABC needs to be drawn.I drew a right triangle using the "Polygon" tool in the GeoGebra application and placed it in a simple image that perfectly formed a right triangle. |
|---|
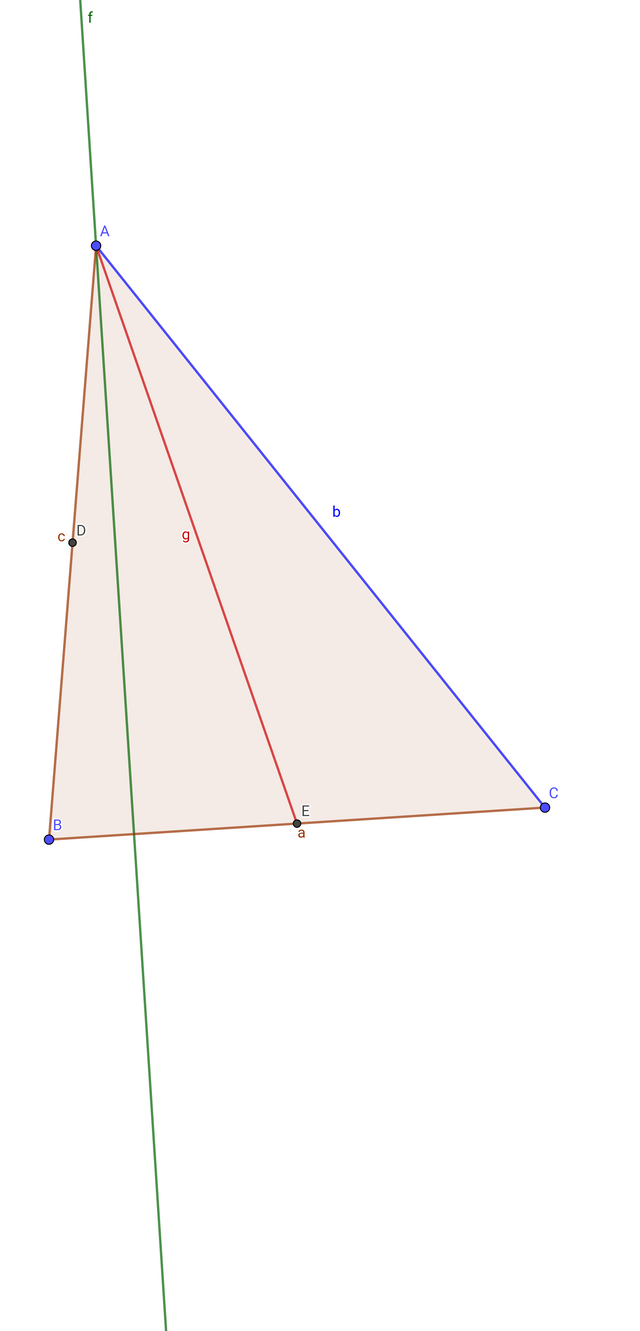
From point A of the triangle, draw any perpendicular to side BC.If you draw this perpendicular line at any size, the "Perpendicular Line" option is used to do this.
Using the "Angle Bisector" tool, a point is placed exactly halfway between the sides BC to bisect BAC, and it must be measured.If you use this option here, it goes straight to the middle, so there is no extra hassle.
Then, using the "Midpoint" option, the middle point of the BC side is determined and using the "Segment" option, a line segment is drawn from point A to point E.
All the drawings are complete. Now it is essential to use different colors to illustrate them all. Only then can it be understood. And I used a GIF file to make it a little more dynamic.
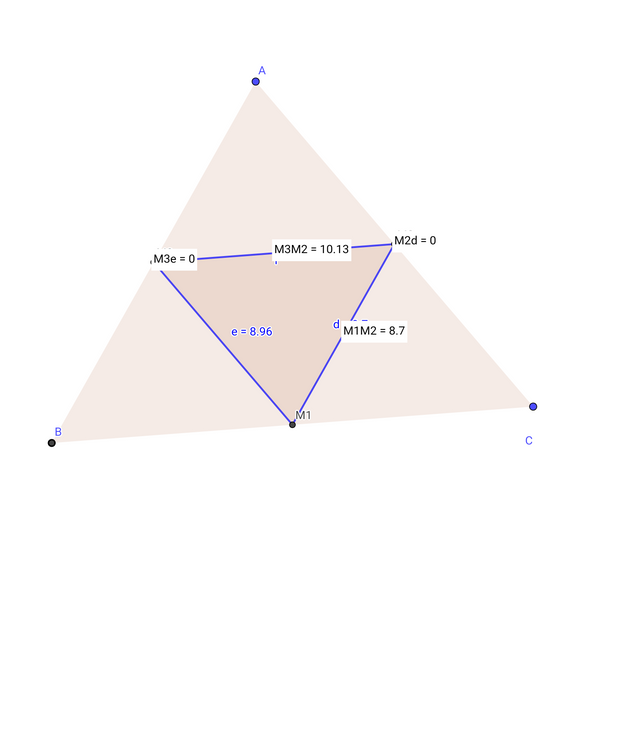
Construct triangle ABC, then build a new triangle M1M2M3 using the midpoints of the medians as the vertices.
.png) |
|---|
First, draw a triangle ABC.
I will use the "Midpoint" tool to mark the midpoints of the sides AB, BC, and CA, which can be a great convenience in my work.
I created a new triangle by connecting the midpoints (M1, M2, M3) with the "Polygon" tool.
The sides of the original triangle need to be hidden so that they are not completely erased and the sides are not visible in any way.
Use the "Distance or Length" tool to measure the sides of the new triangle and check the times and distances evenly to ensure they are understood correctly.I have made a video of the complete parts and put up a GIF file.

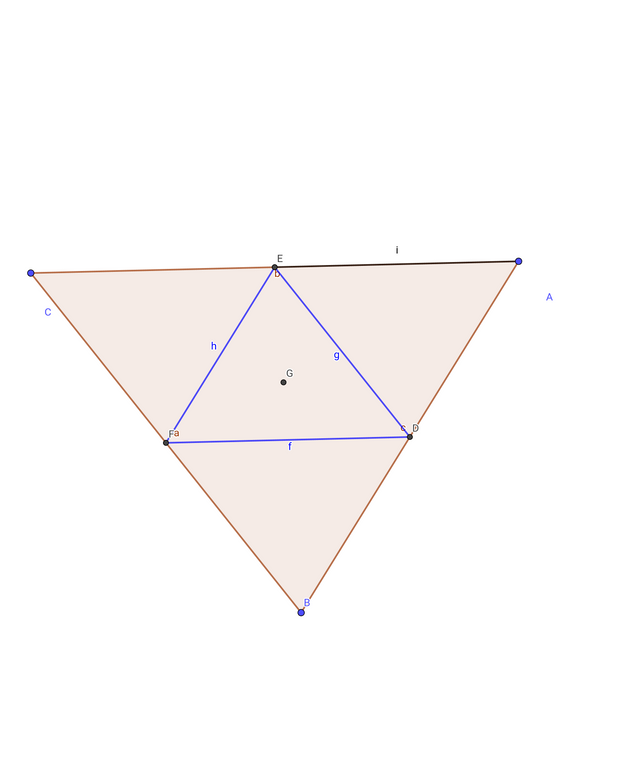
Build triangle ABC, then, using the bases of the altitudes as the vertices, construct another triangle.
First you need to draw a triangle.
.png) |
|---|
Then, they will have to be controlled by a specific group, and they will meet at a place, and a specific point will have to be given at that place.And which ones can be presented very beautifully

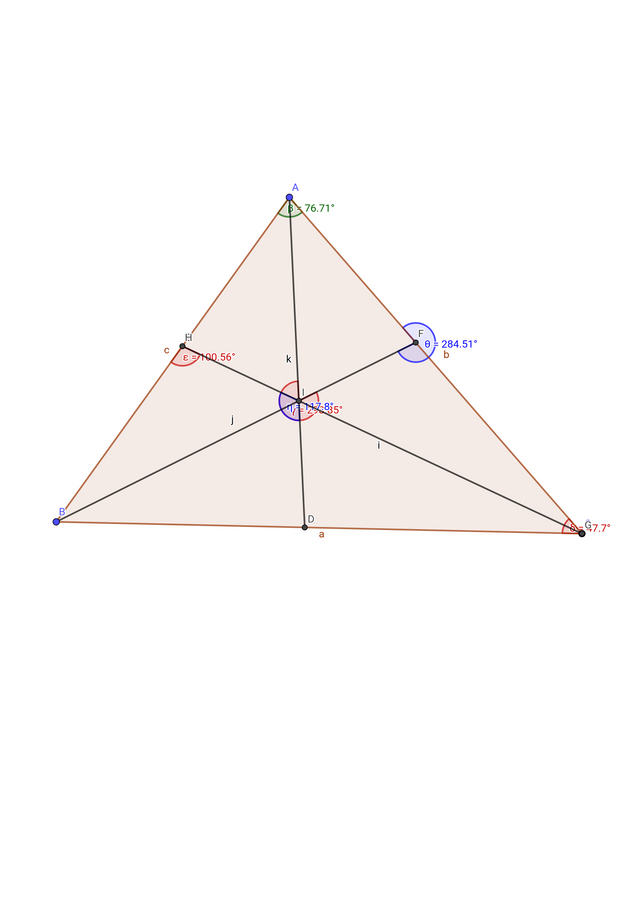
Construct triangle ABC, then, using the bases of the angle bisectors as the vertices, construct another triangle. Show that the angles formed are exactly the angle bisectors.
.png) |
|---|
At first open geozebra application.
Triangle ABC is drawn using the 'Polygon' tools.
Using the "Angle Bisector" tool, you need to mark the midpoint of each point.Then, before bisecting any specific points, a triangle must be drawn by connecting each of these points.After drawing the triangle, from each point, draw a line for the bisector of the angle using segments.

All the double-segments need to be deleted using the "Hide and Show" tools.And where all the lines meet, a point must be drawn using a cross point so that even if the triangle moves, that point remains fixed and does not move.
 |
|---|
I will complete this work step by step, Insha'Allah.And I will also try to explain in detail how to do it using geometric applications.
Below are step-by-step instructions for drawing the main triangle ∆ABC and four sub-triangles within it using the altitude, median, and angle bisectors, using GeoGebra:
First, you need to open the GeoGebra application, then from there, select the "Polygon" or "Triangle" tool and draw a triangle.For that, first click on the first point A, then B and C and a triangle will be drawn directly which is considered as the main triangle.
Second step:
Select the Perpendicular Line Tool and first click on this point, then click on the BC line, then a perpendicular will be created on the Bichi line and which will create a 90° degree angle on both sides with the BC line.
Using the “Intersect” tool, mark the intersection point of this perpendicular line and BC and mark it as D.
Step 3
Select the “Midpoint or Center” tool and then click first on point B and then on point C.And that point should be labeled by M.Then, using the "Segment or Line" tools from the toolbar, draw a perpendicular line AM from A to M.This will be the median of the triangle.
Step 4:
Using the Angle Bisector Tool, first click where it is, that is, first click on point A, then point B, and finally point C.
A point will be formed by the intersection of segment BC with this angle bisector.
And label that point as E.
Step-5:
Now in the drawn triangle ABC, three lines are drawn from A.
- AD Altitude
- AM Median
- AE Angle bisector
And according to the mentioned figure, it can be seen that the main triangle can be divided into four sub-triangles.

| I am inviting these three friends of mine to join this learning challenge. @memamun @mostofajaman @khursheedanwar |
|---|
X promotion
https://x.com/sheikhtuhin24/status/1895041774550425748?t=s3V2lb_TYNN1cz3TCs5JRw&s=19
👋 @sheikhtuhin - wonderful work as always! 🌈 🌟
Hey friend! 🎉 Come check out your awesome post on my shiny new front-end! It's still a work in progress but I'd love to hear what you think! View your post here ✨
Bro please how did you make your images