Steem Atlas Post from Kacchi Bhai, Banasree | Plus Code Tutorial.
Assalamualaikum Everyone. I am @imranhassan From #Bangladesh
.png)
This experience is not just about food, but also about how to post with location on Steam Atlas using Plus Code - I will show you step by step. And I learned this entire tutorial very nicely from @mohammadfaisal Brother's. So let's start with how I got the job done.
| Step 1: How did I start? |
|---|

First, I opened Steemit's post editor and first fixed the title and format of the post. Then I put the coding part with location info, Google Map link, and SteemAtlas tag.
| Step 2: Go to Google Plus Code site |
|---|
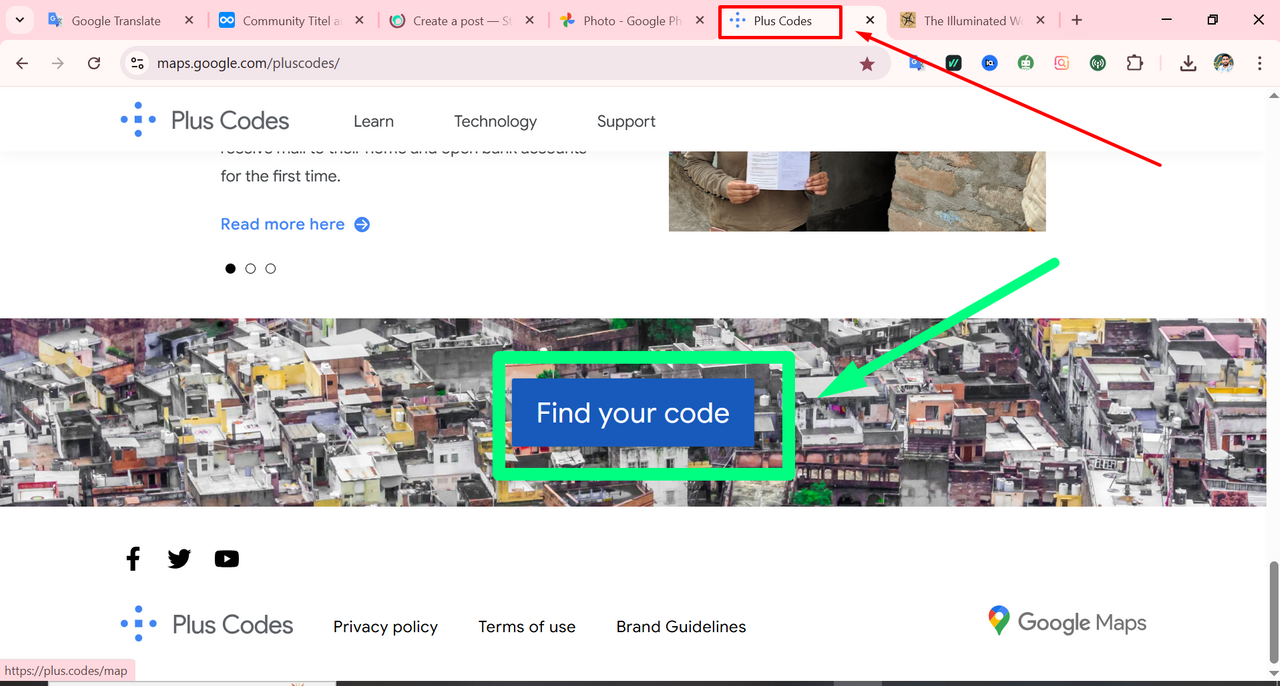
Then I opened a new tab maps.google.com/pluscodes on this site. By going here and clicking on the Find your code button, you will get the Plus Code of your location.
| Step 3: Search for the location |
|---|

Then I type Kacchi Bhai Restaurant Banasree Branch Dhaka in the search box of that page. Then I press Enter. The location is immediately shown on the map. Below it shows as Plus Code PGG8+MG, Borabo, Bangladesh; anyone can check that address on Google Maps if they want.
| Step 4: Zoom in on the location and copy the Plus Code |
|---|
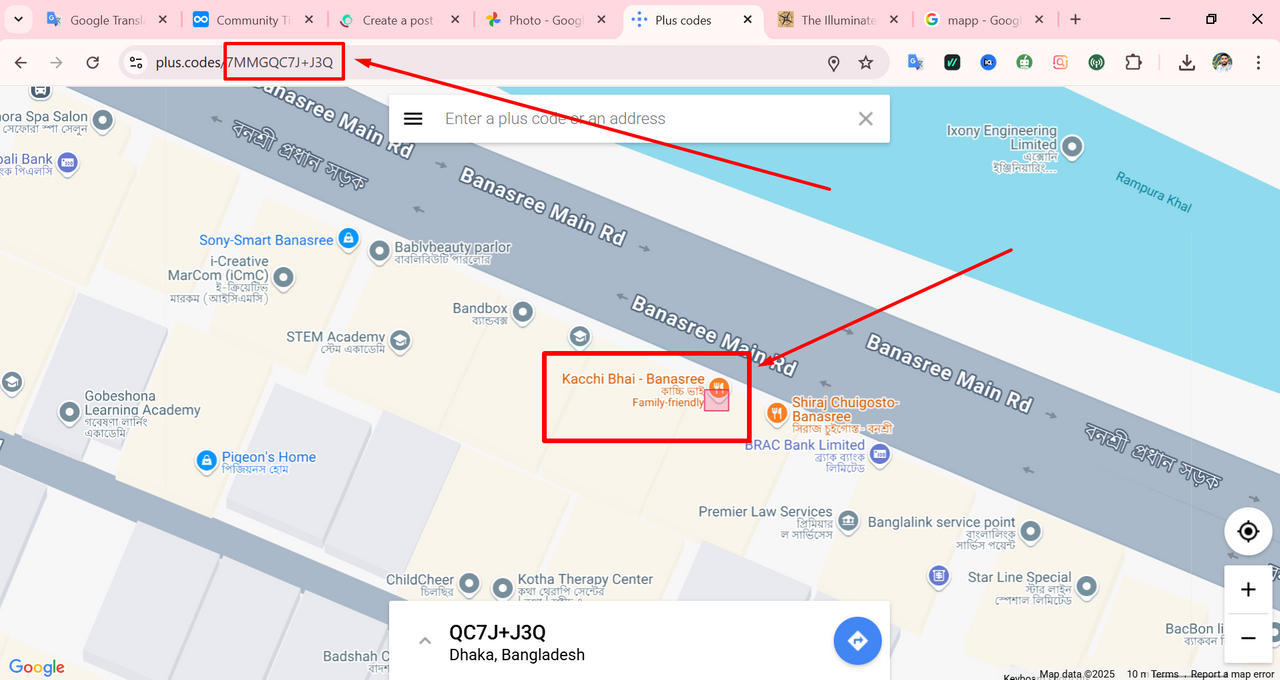
Then I zoom in a little to understand the location better on the map. At this stage, Kacchi Bhai – Banasree is clearly visible. Just above the search box, I see the Plus Code of my location: 7MMGQC7J+J3Q. I have copied this code. This is the Google Plus Code, using which anyone can easily see the address on Google Maps.
| Step 5: Prepare to embed the location by going to Steem Atlas |
|---|

Then I open a new tab and enter the https://steematlas.com/ site. There, I click on the EMBED PIN option from the top menu. Then a box appears below where it says Click the map to place pin. Here I click on the Enter Coordinates option because I want to use the exact coordinates found from Google Maps.
| Step 6: Creating a pin using Plus Code |
|---|

Then after clicking on the Enter Coordinates option, a search input box appears below. There I paste the code I copied from the Google Plus Code earlier: 7MMGQC7J+J3Q Then I click on the Create Pin button on the right side. Through this work, a pin of my specific location is created in Steem Atlas, which I can add to the post.
| Step 7: Preparing to embed the pin in the post once it is created |
|---|

Then after I click on the Create Pin button, Steem Atlas creates a point on my location map called My New Pin. To add this pin to the post, there is a place to give a description in the Embed in a Post section below.
| Step 8: Complete the pin with the post title and copy the code |
|---|

Then after creating the pin, I go to the Embed in a Post section below and get a text box. There I put the title of my Steemit post — Kacchi Bhai Restaurant Banasree Branch Dhaka, so that the name of the pin is correct. Then I click on the Copy Pin Code button on the right side. Now if I put this code in the location section of the Steemit post, readers will be able to see my specific location on the Steem Atlas map.
| Step 9: Go directly to Google Maps from Plus Code |
|---|

Then I go back to the Plus Code tab, where my specific location Kacchi Bhai - Banasree was shown. In that popup box, I see an option — View on Google Maps. If I click on this text, I go directly to Google Maps.
| Step 10: Copy the location link from Google Maps |
|---|

Then after I go to Google Maps, the full address, picture and location of the Kacchi Bhai - Banasree restaurant are displayed. This time I click on the address bar at the top of the browser, where the full URL is visible. Right-click on that URL and select the Copy option, so that the correct location link from Google Maps is copied.
| Step 11: Shortening the Google Maps link |
|---|


Then since the location link taken from Google Maps is very large and complex, I shorten it before placing it in the post. For this, I enter the https://www.shorturl.at/#google_vignette website. There I paste the long URL copied from Google Maps and click on the Shorten URL button. Within a few seconds, I get a short link, such as https://shorturl.at/tg4cB Then I click on the Copy URL option and copy this short link and add it to my Steemit post.
| Step 12: Save the necessary links and tags together |
|---|

Then after I finish the whole work, I save all the links and tags required for the Steemit post in a notepad file, so that it is convenient to copy and paste them in the post later. What I saved: Steem Atlas site link https://steematlas.com Steem Atlas tag (!steematlas 23.7640875 lat 90.43023438 long Kacchi Bhai Restaurant Banasree Branch Dhaka. d3scr) Google Maps shortened URL
https://shorturl.at/tg4cB I will use these three pieces of information in the Location Information section of the Steemit post.
| Step 13: Add all the information in Markdown format to the Steemit post |
|---|

Then after completing all the work, I go back to the post editor of the Steemit platform. There I copy the following information saved in Notepad and arrange it in Markdown table format Area, Google Maps Link View on Map, Steem Atlas Link, SteemAtlas Tag, Using Markdown format, each information is presented clearly in table form. The reader can easily understand where to go by clicking on any link.
| Step 14: Viewing my post on Steem Atlas |
|---|

Then after I have completed everything, I go to the Steem Atlas site and select the USER filter and search for my username imranhassan. At the same time, I see that my post —** Kacchi Bhai Restaurant Banasree Branch Dhaka is displayed beautifully on the Steem Atlas map** with the location. All the tags and cover images I used in the post are displayed correctly. This means that my Plus Code based location embedding and posting process has been completely successful — without any complications.
cc: @solaymann ,brother @ripon0630 ,sir
| Video Tutorial: To better understand the practical part of this tutorial, you can watch the video below. |
|---|
| Photography Details | 📱 Device: DESKTOP-3LKGMB4 | 📍 Location: Narayanganj, Bangladesh | 📷 Captured By Laptop screenshot: @imranhassan |
|---|
.gif)
I promoted my post X here.
@tipu curate
Upvoted 👌 (Mana: 9/10) Get profit votes with @tipU :)
Thank you for posting this on Steem Atlas, and for this useful guide!
To help improve your posts on Steem Atlas, and increase your chances of winning in the Atlas Challenge, check out these 21 Tips.
STEEM ATLAS [20 Apr '25] : 21 Tips to Make Better Posts for Steem Atlas
Thank you for setting a beneficiary to @steem-atlas, it will help the project grow.