AI Poster Design Tutorial: From ChatGPT to Realistic Face Swap

Cover
Assalamu Alaikum, I hope everyone is well and enjoying their lives. Today, I will show you how to create an aesthetically pleasing photo of yourself using AI for your profile pictures, banners, or any promotional work.
The primary purpose of this tutorial is to show you how to create an original photo with AI. When we generate a photo with AI, the face is not our original; however, in this tutorial, you will learn how to attach your original face as well.
Generate Image From ChatGPT
First of all, we have to open our chat GPT, log in to it, after logging in, we have to add our original photo there, as you can see in the pictures below, we will click on the plus icon below, then the option of Add Photos and Files comes, from there we have to add our pictures and along with that, we have to add a prompt below that what kind of image we want to create, I will mention it below anyway, what I wrote.

Add Image & Prompt

When our image and prompt are added, we have to click on the arrow button below. This means that we have sent our instructions to ChatGPT. Now it will generate the image for us according to our instructions.

After Adding Send To ChatGPT
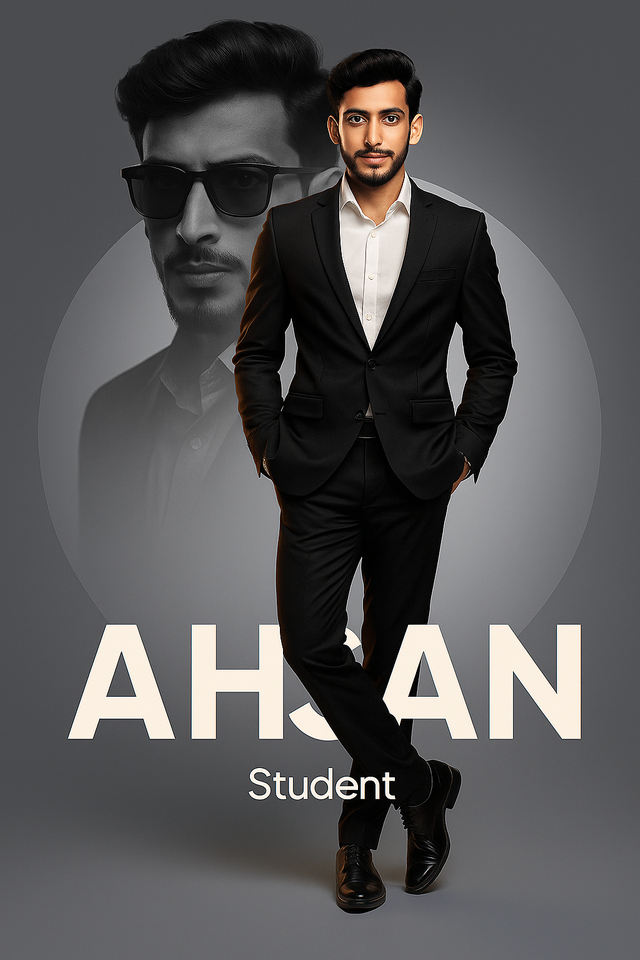
Image Prompt
Modern style poster design featuring an Asian Pakistani man with neat messi coma hair with a split personality concept. On the front, a colorful version is shown: the man is wearing a modern black suit, standing casually with one leg crossed in front, hands in pockets, a confident and charismatic face. In the background, a black-and-white version of him is seen wearing sunglasses, staring intently ahead with a mysterious expression. The background is light gray with a circle element of gray or a bright, dramatic gray gradient behind the main figure. The text reads 'AHSAN' with the subtitle 'Student' in a modern minimalist font.
Studio design, bold lighting, symmetrical composition." Ultra hyper realistic photo 8k Generate."
Processing takes place here for a while because many people are generating the image, which takes a little time, so after a while, we will have our image generated, as you can see below.

Image Generated
If you look at the end of this image, you will see a download option there, from there we have to download this image of ours, and this image will be saved in our phone gallery or our laptop's storage.

Download Image
Final Image From ChatGPT
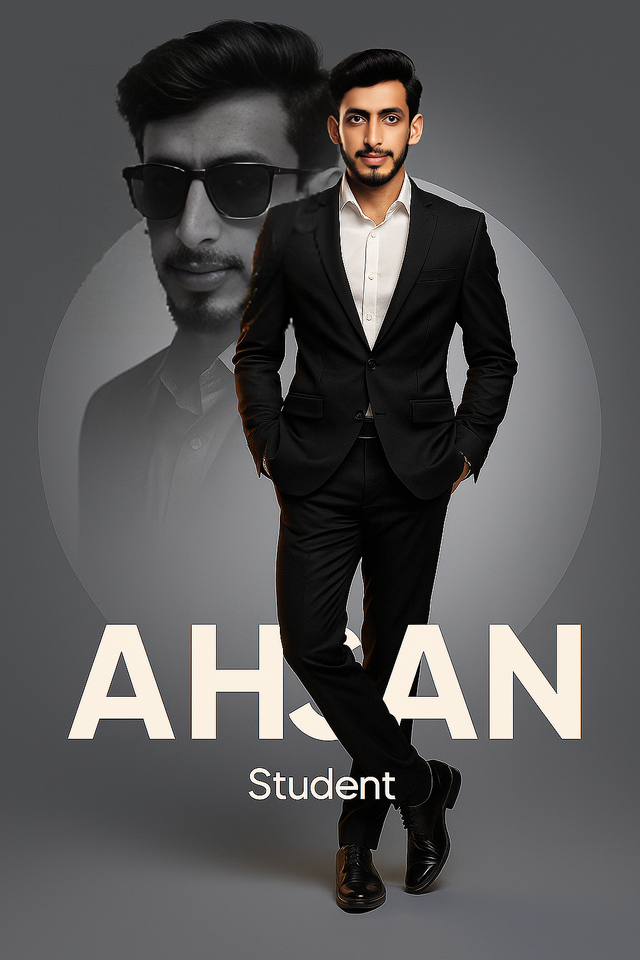
The job image has been prepared from ChatGPT. It is given below, you can see it. The problem we are facing is that its face does not match my original photo, so now our next procedure is that we have to swap our original face with this face so that the originality comes out.
Finally Download From GPT
Swap Image From Face Swap Online
To get our original image, we first have to open Google, and there we have to search by typing swap pic. As soon as we search, we will get different websites. Out of them, the website given at the top is Face Swap Online Free. We have to click on it.
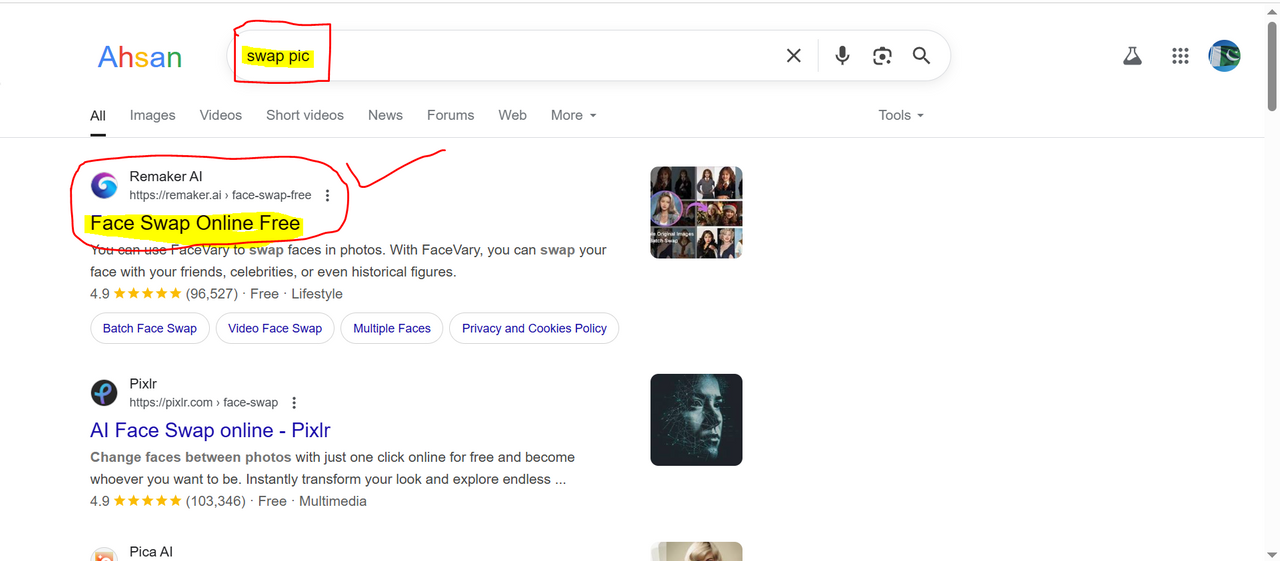
Search Swap Pic On Google
When we open this website, we will have an interface like this given below. First of all, we have to sign up from here because by signing up, we get 30 credits for free. 30 credits means that if you swipe a single fee, you will be charged one credit. This way, you can swipe around 30 images with a single fee. If you want to switch to multi-fee, you will be charged four credits per image. That's why I logged in first.

Sign Up Website
After signing up, its main interface will open to us. Three options are visible here: Single Swap, Multi Swap, and Batch Swap. From here, we have to open the middle one, the multi-faced one.

Select Multi Face
When we open it, the first thing we have to do is add our image below, the image that we downloaded from ChatGPT. When we add it, all the faces in this image will be shown in front. From here, we have to add our original photo from the plus button that is visible.

Add Image Generated From ChatGPT
In the image below, you can see that we have added our original faces here. Now it will swap our images. To swap it, the swap option is visible below. Along with this, it is also telling us how many credits it will cost. From here, we have to click on Simple Swap.


Click On Swap
Finally, our face has been swiped, and as an output, our image is being shown again on the next page. From here, we will now download our image.

Download Image
Check Difference
Now you can see the difference between the two images below, one we created with ChatGPT and the other we created with ChatGPT and then swapped with our original photo, so our original image is ready.
|  |
|---|---|
This is an easy method, and for free, we can create our own AI image. It is going to be useful for us in many places. We can promote our business, set our profile picture, or put these images on any of our promotional banners. You can also use this method to create your images. You will get this image ready in about five minutes, sitting at home for free.
If we were to have the same image made by a studio, it would cost us a lot to go there, get the images prepared, wear the printed coat, and then have the image printed. So it is better to use AI in today's era and promote AI and take the best advantage of it, rather than taking advantage of it incorrectly.
Thank You
🎉 Congratulations!
Your post has been manually upvoted by the SteemX Team! 🚀
SteemX is a modern, user-friendly and powerful platform built for the Steem ecosystem.
🔗 Visit us: www.steemx.org
✅ Support our work — Vote for our witness: bountyking5
Thank you so much dear @suboohi for the support ❤️.