Why I Changed My Display Picture After 2 Months (With My Own Logo Design!)
Assalam-o-Alaikum!
So, brother, after a long time, maybe not a long time, about two to two and a half months later, I thought, why not change my display picture? The reason is that recently my son has learned some graphic design, and he has also started changing his display pictures on his social media and many other accounts. So at the same time, he also asked me why I didn't change my display picture. But I wanted to do this myself. The reason was that I have a lot of knowledge in the field of graphic design. In the past, I have also been a graphic designer and have edited ads for a local TV station. So in this sense, I have a lot of knowledge. So I thought, why not use this knowledge, that is, after a long time, make a logo for myself.
So I did that, and in today's post, we will know which steps I followed. The purpose of this post is only And just to share one thing with you that a logo is usually made in a very easy way, not in a difficult way, in a very easy way because usually Adobe Illustrator or CorelDRAW is used to make a logo. Still, I have installed Adobe Photoshop on my low-end PC, so with the help of that, I have created this logo using just a few tools, and let me tell you one thing that this logo does not even meet the principles of making a logo. However, I still wanted a JPG picture, so for that, I considered it necessary to use Adobe Photoshop and create this logo with it. So let's move on to the steps of how this logo is created and how you can also draw a logo using different techniques in this way.
So the first picture of our entire stage is the welcome screen of this software or the opening screen of this software, which, whenever we click on this software, this screen appears in front of us. As you can see in the screenshot, I am using Adobe Photoshop CS6 Extended, and it is a great, lightweight, and user-friendly software, especially for those who are more familiar with old technology. Well, it does not have the generative fill and modern artificial intelligence options, but still, it is a good choice.
 |
|---|
Image by Author using Adobe PhotoshopNow in this picture, we have our software fully open and I have pressed the control and n buttons to take a new file and I want to take a white sheet of 1000 X 1000 pixels here so that I can put my logo in high quality and high resolution.
 |
|---|
Image by Author using Adobe PhotoshopIn this picture, we have a square-shaped paper open in front of us, which is, of course, 1000 by 1000 pixels in width and height.
 |
|---|
Image by Author using Adobe PhotoshopNow here I have typed the English alphabet letter A, for this I have used the type tool and the font I have used is called Heavy Test, it is a bold, smooth, and It is modern font and is free to use. You can use it freely for commercial purposes as well.
 |
|---|
Image by Author using Adobe PhotoshopYou will see a curve on the letter A. I have simply drawn this curve with the help of a shape tool. By turning off the fill of the shape tool and keeping only its stroke on, I have made a curve of about 50 to 70 pixels in the middle, which is visible to you here in white form because our background is also white and the color of the curve or the color of the curve widget is also white, so that is why its background parts are not visible here because they have merged with the white background.
 |
|---|
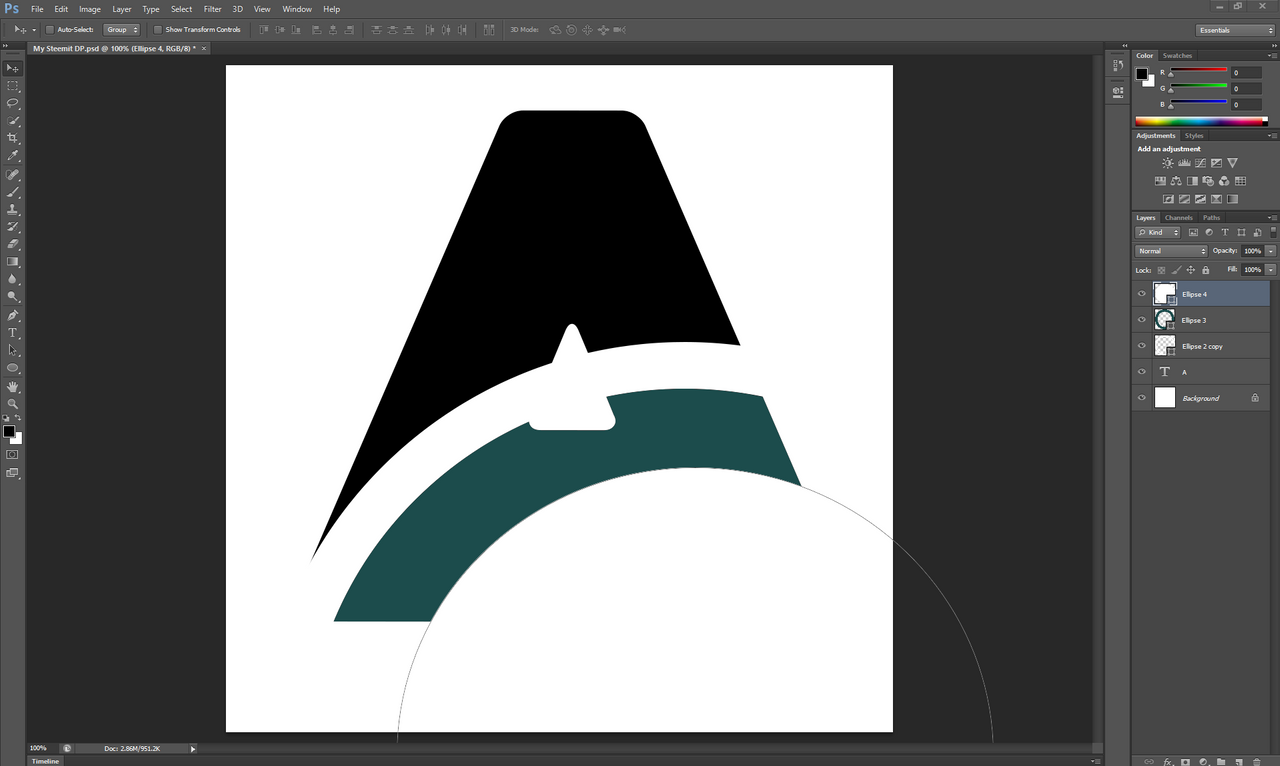
Now the same step has been followed here too, that we have drawn a circle with the help of the shape tool and by turning off the fill of the circle and only stroke on, we have taken a stroke of about 80 to 90 pixels as a sample and this is also in our blending mode Like Tone or On Screen which Due to this, the white parts of it have merged with the white background and they are not visible to you.
 |
|---|
Image by Author using Adobe PhotoshopNow I have taken a white circle here whose stroke is closed but its fill is completely open, from which the black parts of the alphabet letter A that were visible below have also been covered, and this is our logo completely ready. Now this logo is a normal form of a logo that has been made without any skills, using only some techniques.
 |
|---|
Image by Author using Adobe PhotoshopOur final logo is here.
 |
|---|
Logo JPG by Author |
|---|
Logo JPG by AuthorThere are many areas for improvement in this logo, and it took me about 30 to 35 minutes to make it. This logo was already made, but the images that you see above are a form of its pre-prepared layers that I drew, and it took about one to one and a half hours to draw this logo and get its concept.
So this is our post for today. That's all we get for today's post. With such an interesting post, the sole purpose of this post is to show you a little bit about how a logo is drawn in general and how we can create a logo using some techniques in software like Photoshop which is not even remotely related to vectors because I think it is a simpler and lighter software than Adobe Illustrator which can work easily even on a low end PC.
If you like the post, share it on your social media accounts and join the mission of Steemit. See you in another such interesting post.

$upvote30%
I used Photoshop a long time ago, I think it was version 6 if I recall correctly. I acquired basic skills and really enjoyed using it. Your post reminded me of those days.
The way you explain it makes it seem so simple. And tasteful.
The version is CS 6.
It is very simple, and you know it becomes an interesting tool for new learners to transform their pictures.
Stay Blessed 😇
Can you please help me to achieve a tag of "Member" in this community.
Just by giving me a guide that how it is achieved.
Hi friend
I think you can introduce yourself on the Discord channel
Link:
https://discord.gg/wqyJXdrd
🎉 Congratulations!
Your post has been upvoted by CCS Curation Trail – a community powered by witness @visionaer3003.
“Home is where your heart is ❤️.”
👉 Join the CCS Curation Trail | Full Community Invitation
✅ Vote for @visionaer3003 as witness